BehaviorCloud is a web-based platform designed to help researchers collect, analyze, store, and share their data. There are several ways to use BehaviorCloud:
Capturing Data: Use the BehaviorCloud Camera app to record video data directly into your account via a mobile device. Or connect a BehaviorCloud Bridge to your lab instruments and stream the data into your account.
Uploading Data: Upload data you’ve previously collected for storage, analysis, or sharing.
Analyzing Data: Use our built-in tools for tracking animal behavior in mazes or home cages, scoring complex behaviors, or tracking movement in photobeam-based activity chambers. More analyses coming soon.
Storing Data: Access your data from anywhere simply by logging into your BehaviorCloud account.
Sharing Data: Collaborate with colleagues near and far by sharing datasets or analyses from within your account.
To get started you will need a BehaviorCloud account.
Set up an account at BehaviorCloud using your institutional/company email address. You will receive an email prompting you to validate your email address and sign in to your new account.
If you plan to stream data from your third-party instruments into your BehaviorCloud account, then you will need a BehaviorCloud Bridge device. The Bridge can be purchased from our store and is currently compatible with select San Diego Instruments equipment including the Photobeam Activity Systems for open field and home cage. These products can be purchased bundled with a BehaviorCloud Bridge directly from our store.
At present, you can capture two types of data using BehaviorCloud - video data using the BehaviorCloud Camera app and photobeam data using the BehaviorCloud Bridge connected to a San Diego Instruments Photobeam Activity System. This section walks through the steps required to capture each type of data.
Capturing video with the BehaviorCloud Camera app requires a stable WiFi connection for streaming and a power source for your mobile device. Log in to the BehaviorCloud Camera app using the credentials you created above and mount the mobile device above your cage or maze so the desired recording area is in view. The mobile device running the Camera app serves as the video camera - you will need a second mobile device or laptop computer to control your experiment.
Make sure the phone is mounted securely so it will not shift during testing. Smartphone mounts or tripods work well for this purpose.
The ambient lighting in the testing room must be sufficient for the camera to capture clear video. If testing in dim light or darkness is required, then a red light or, depending on particular device specifications, an infrared light source can be used to capture clear video.
Set up the experiment in a low traffic area. Shadows moving across the tracking area may interfere with tracking of the subject or affect behavior of the test subjects.
Streaming works best if the Camera app is positioned to record in landscape orientation - not portrait.
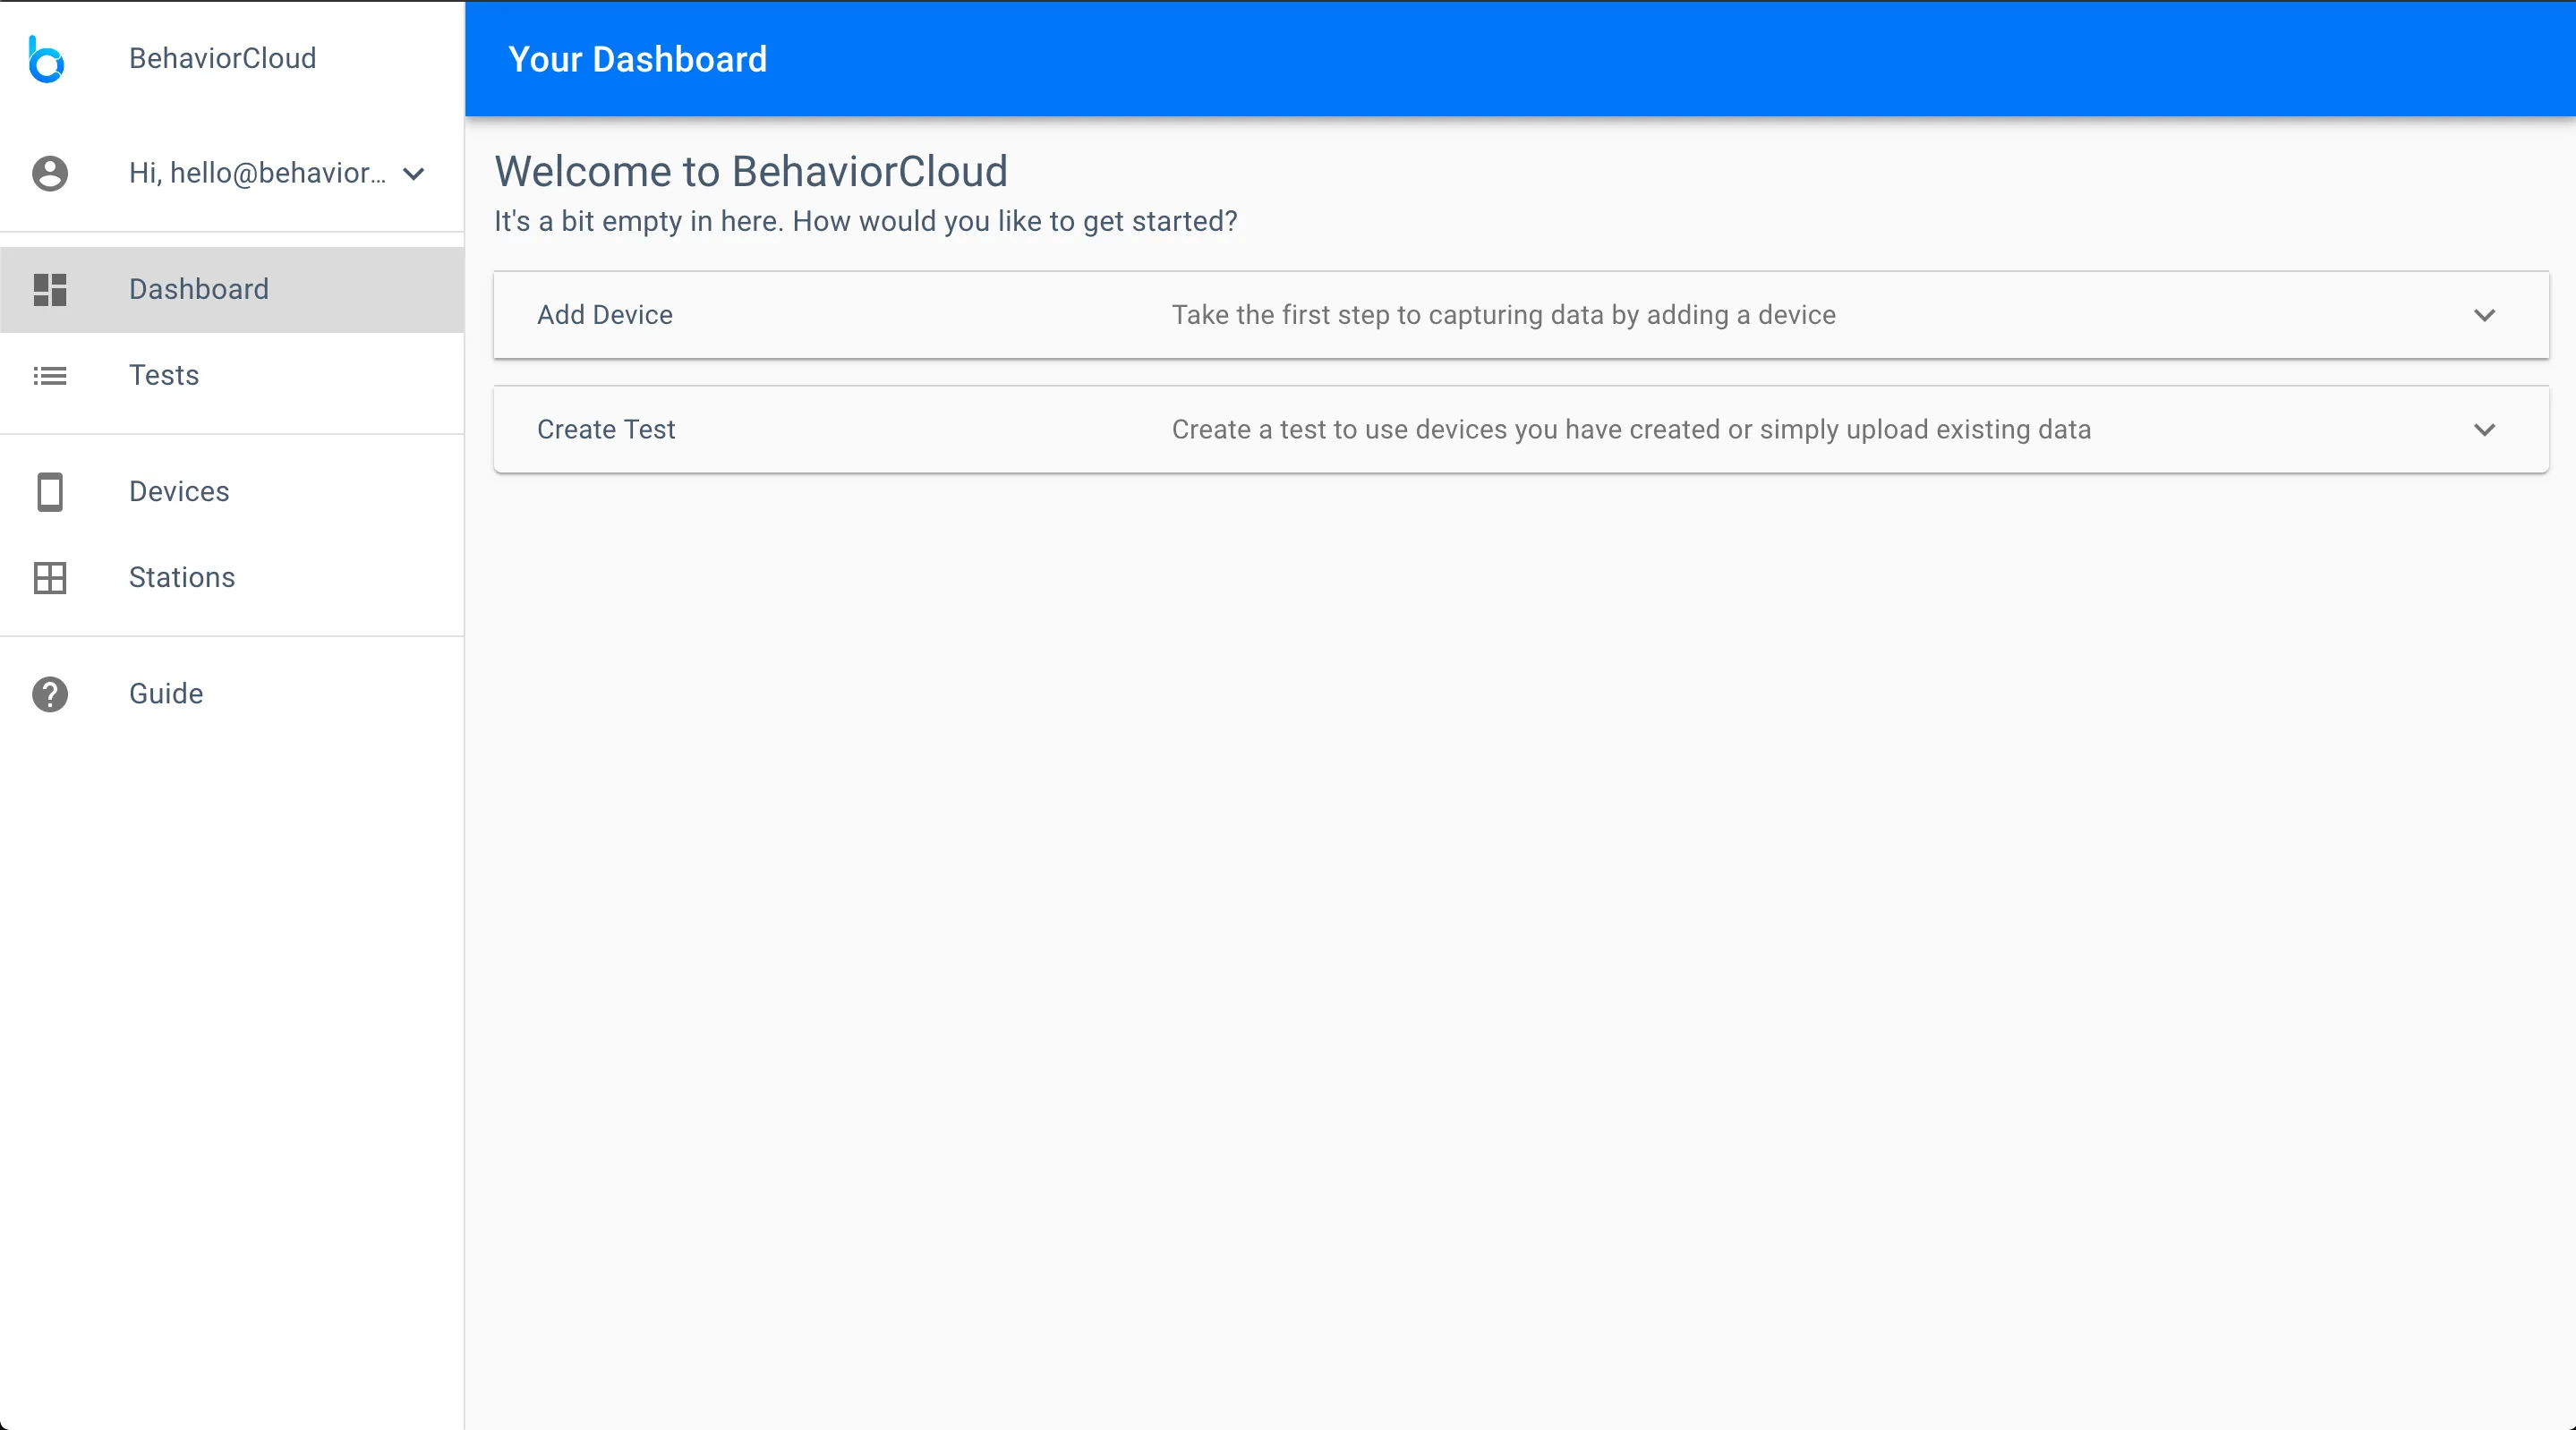
The first time you log in to your account you will see options to add a device or create a test.
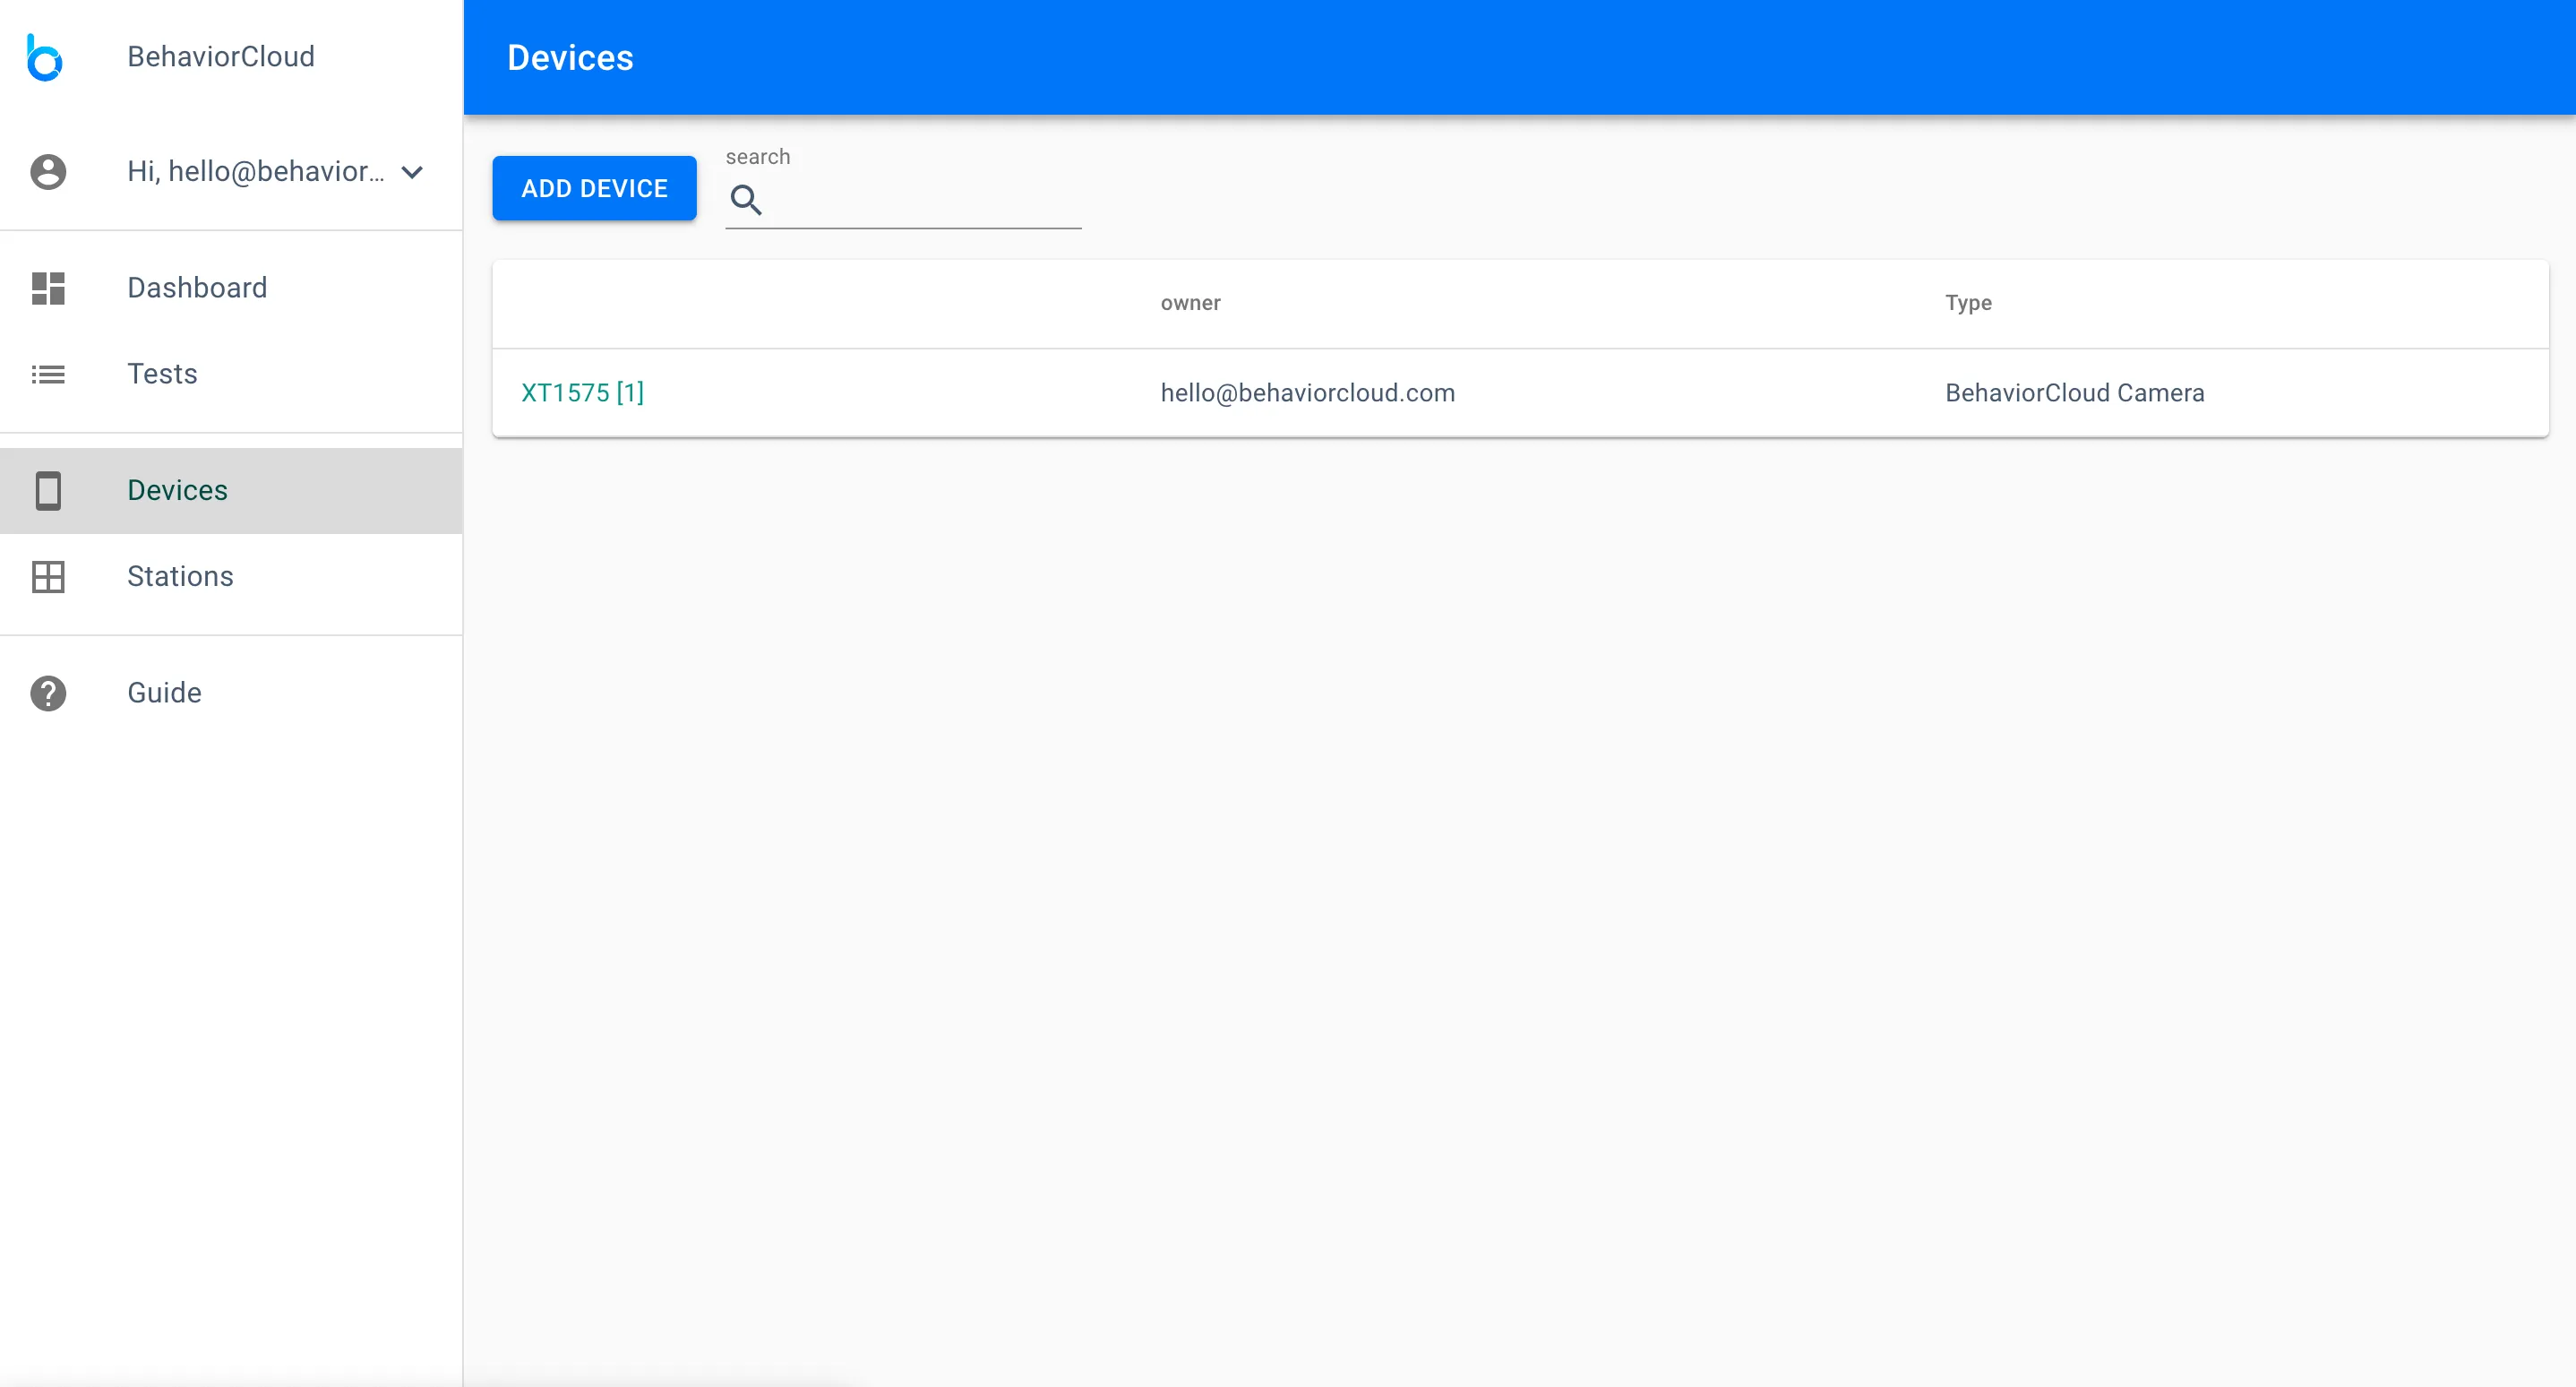
Make sure you have installed the BehaviorCloud Camera app onto the mobile device you intend to use for recording video (as described above in the Prerequisites section). The first time you log in to the mobile app it will be automatically paired to your account. Check in the Devices page to make sure your mobile device is listed.
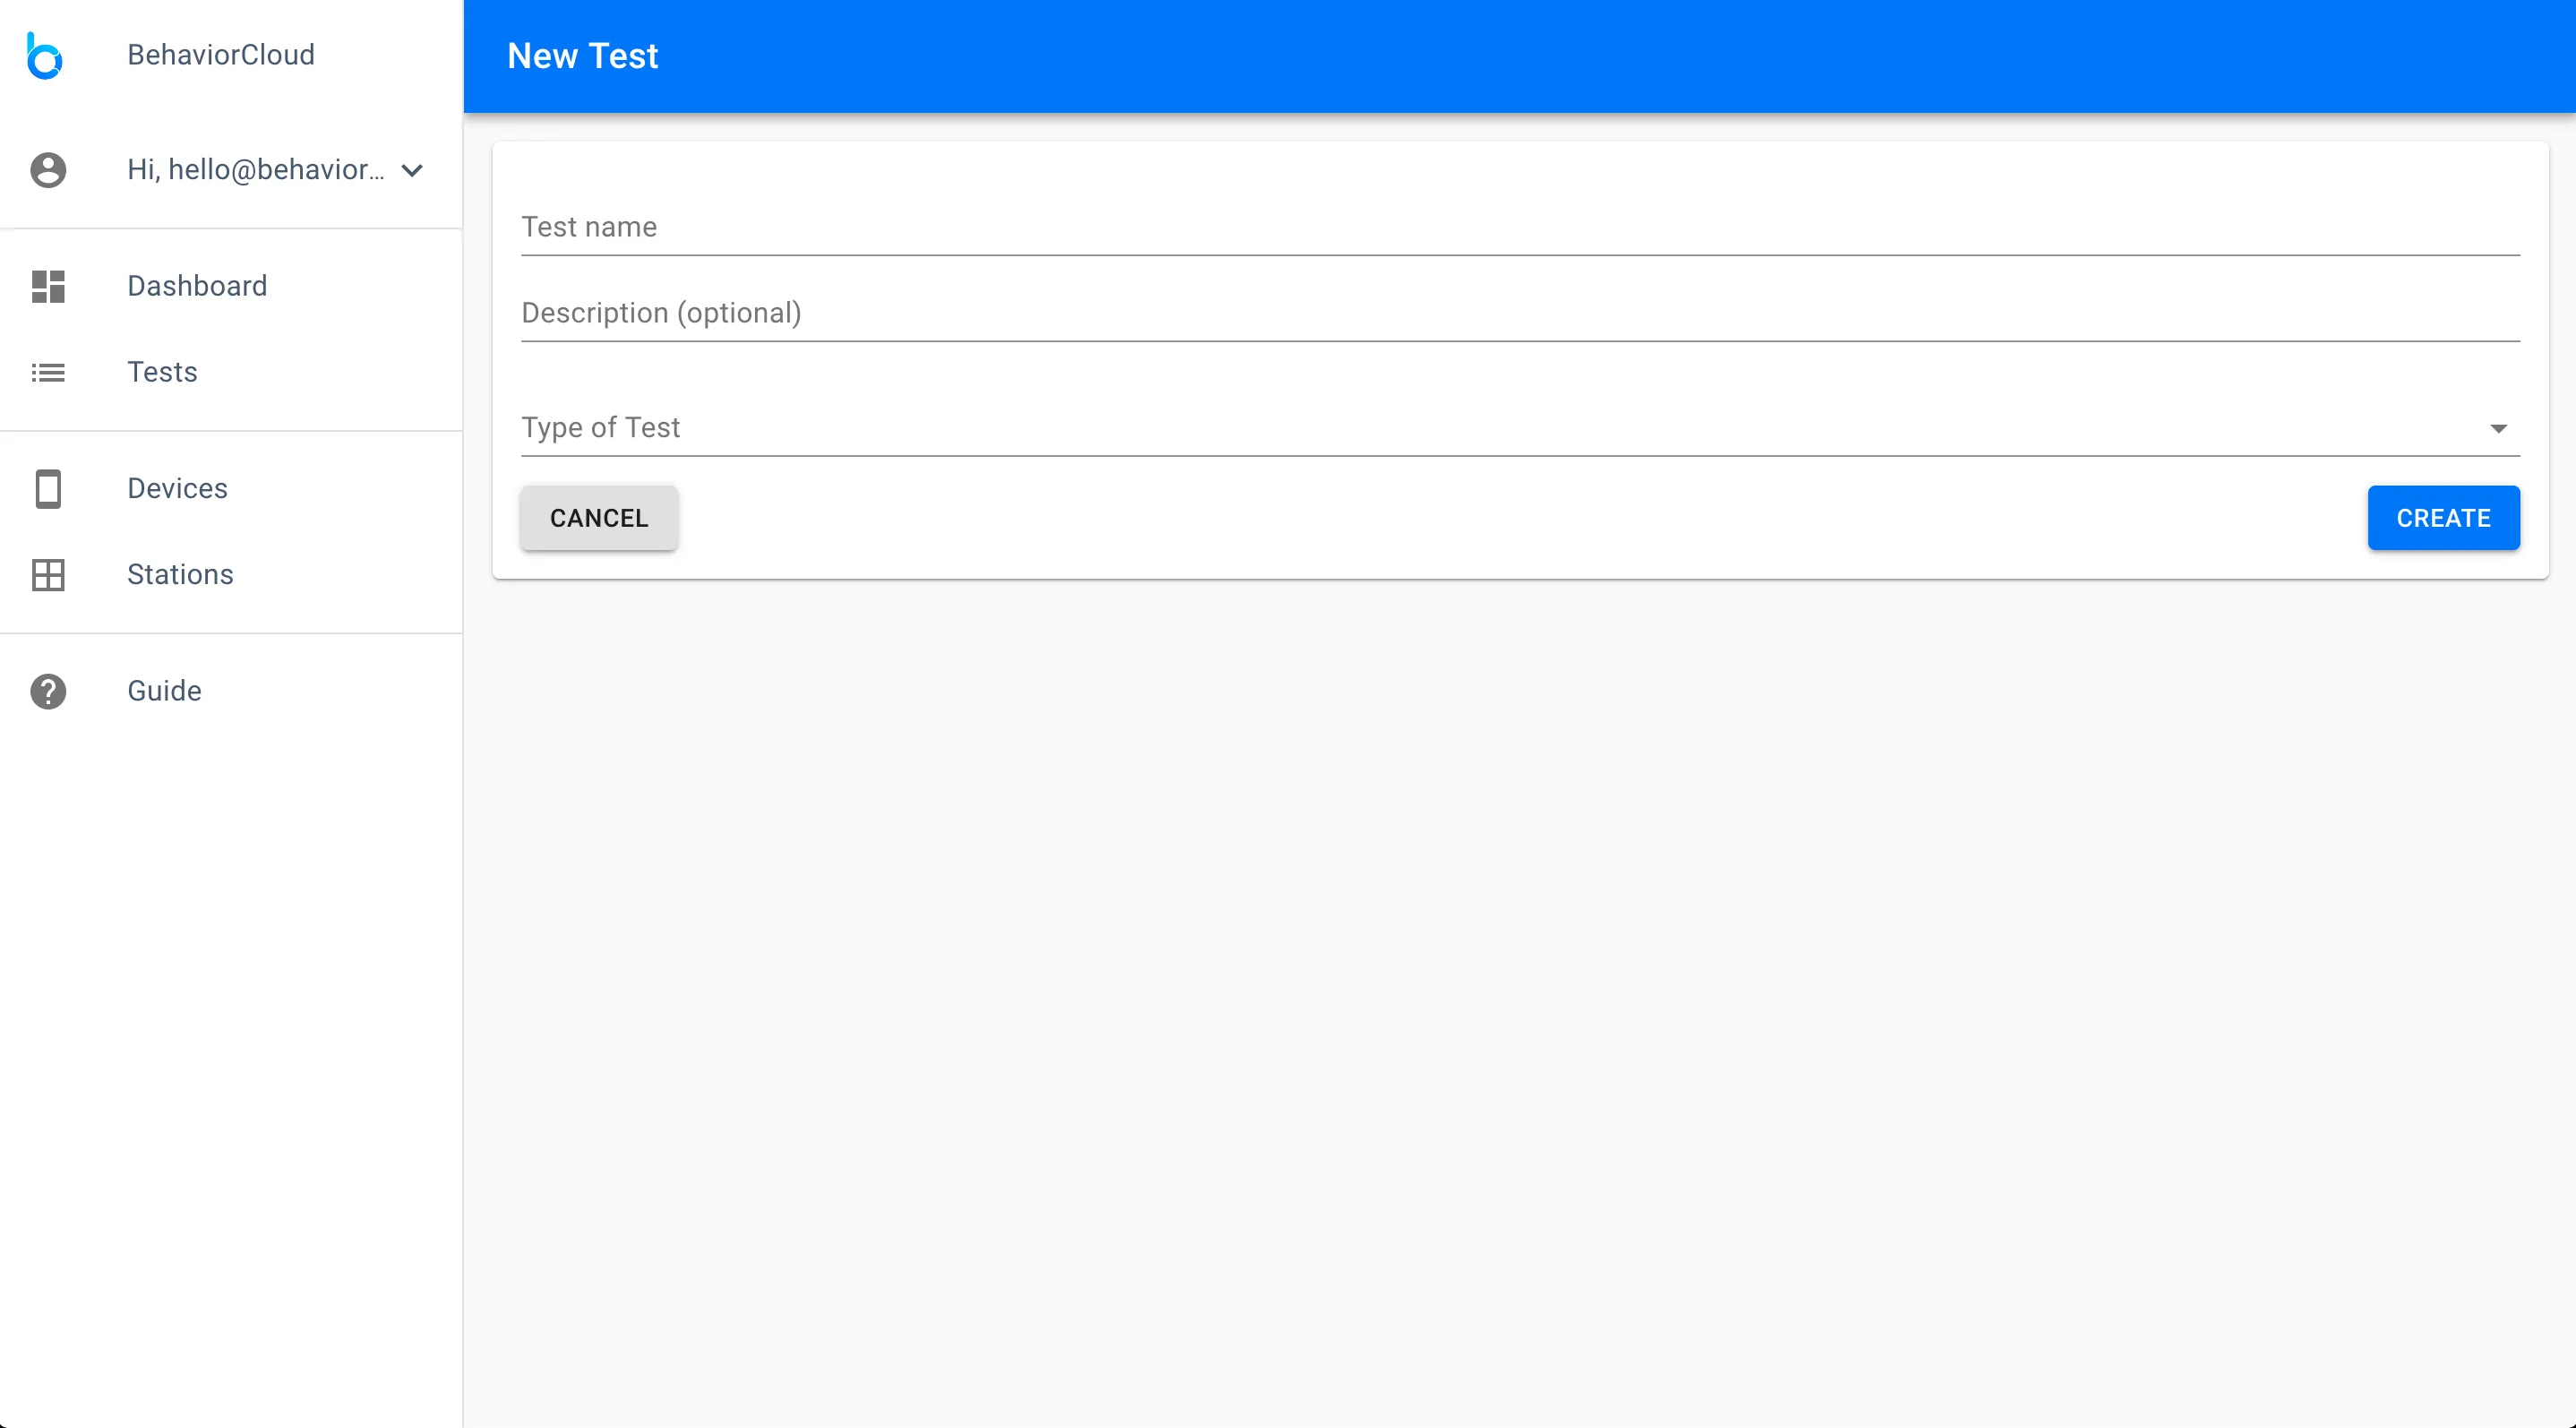
Navigate to Tests and click Create Test. Enter a name and select the type of test from the dropdown menu. For video data, you should choose either Automated Video Tracking or Manual Video Scoring, depending on your primary analysis strategy. You will have the option to add both analyses later if desired (described more below). After selecting the type of test, you will be prompted to enter the duration of the test in seconds.
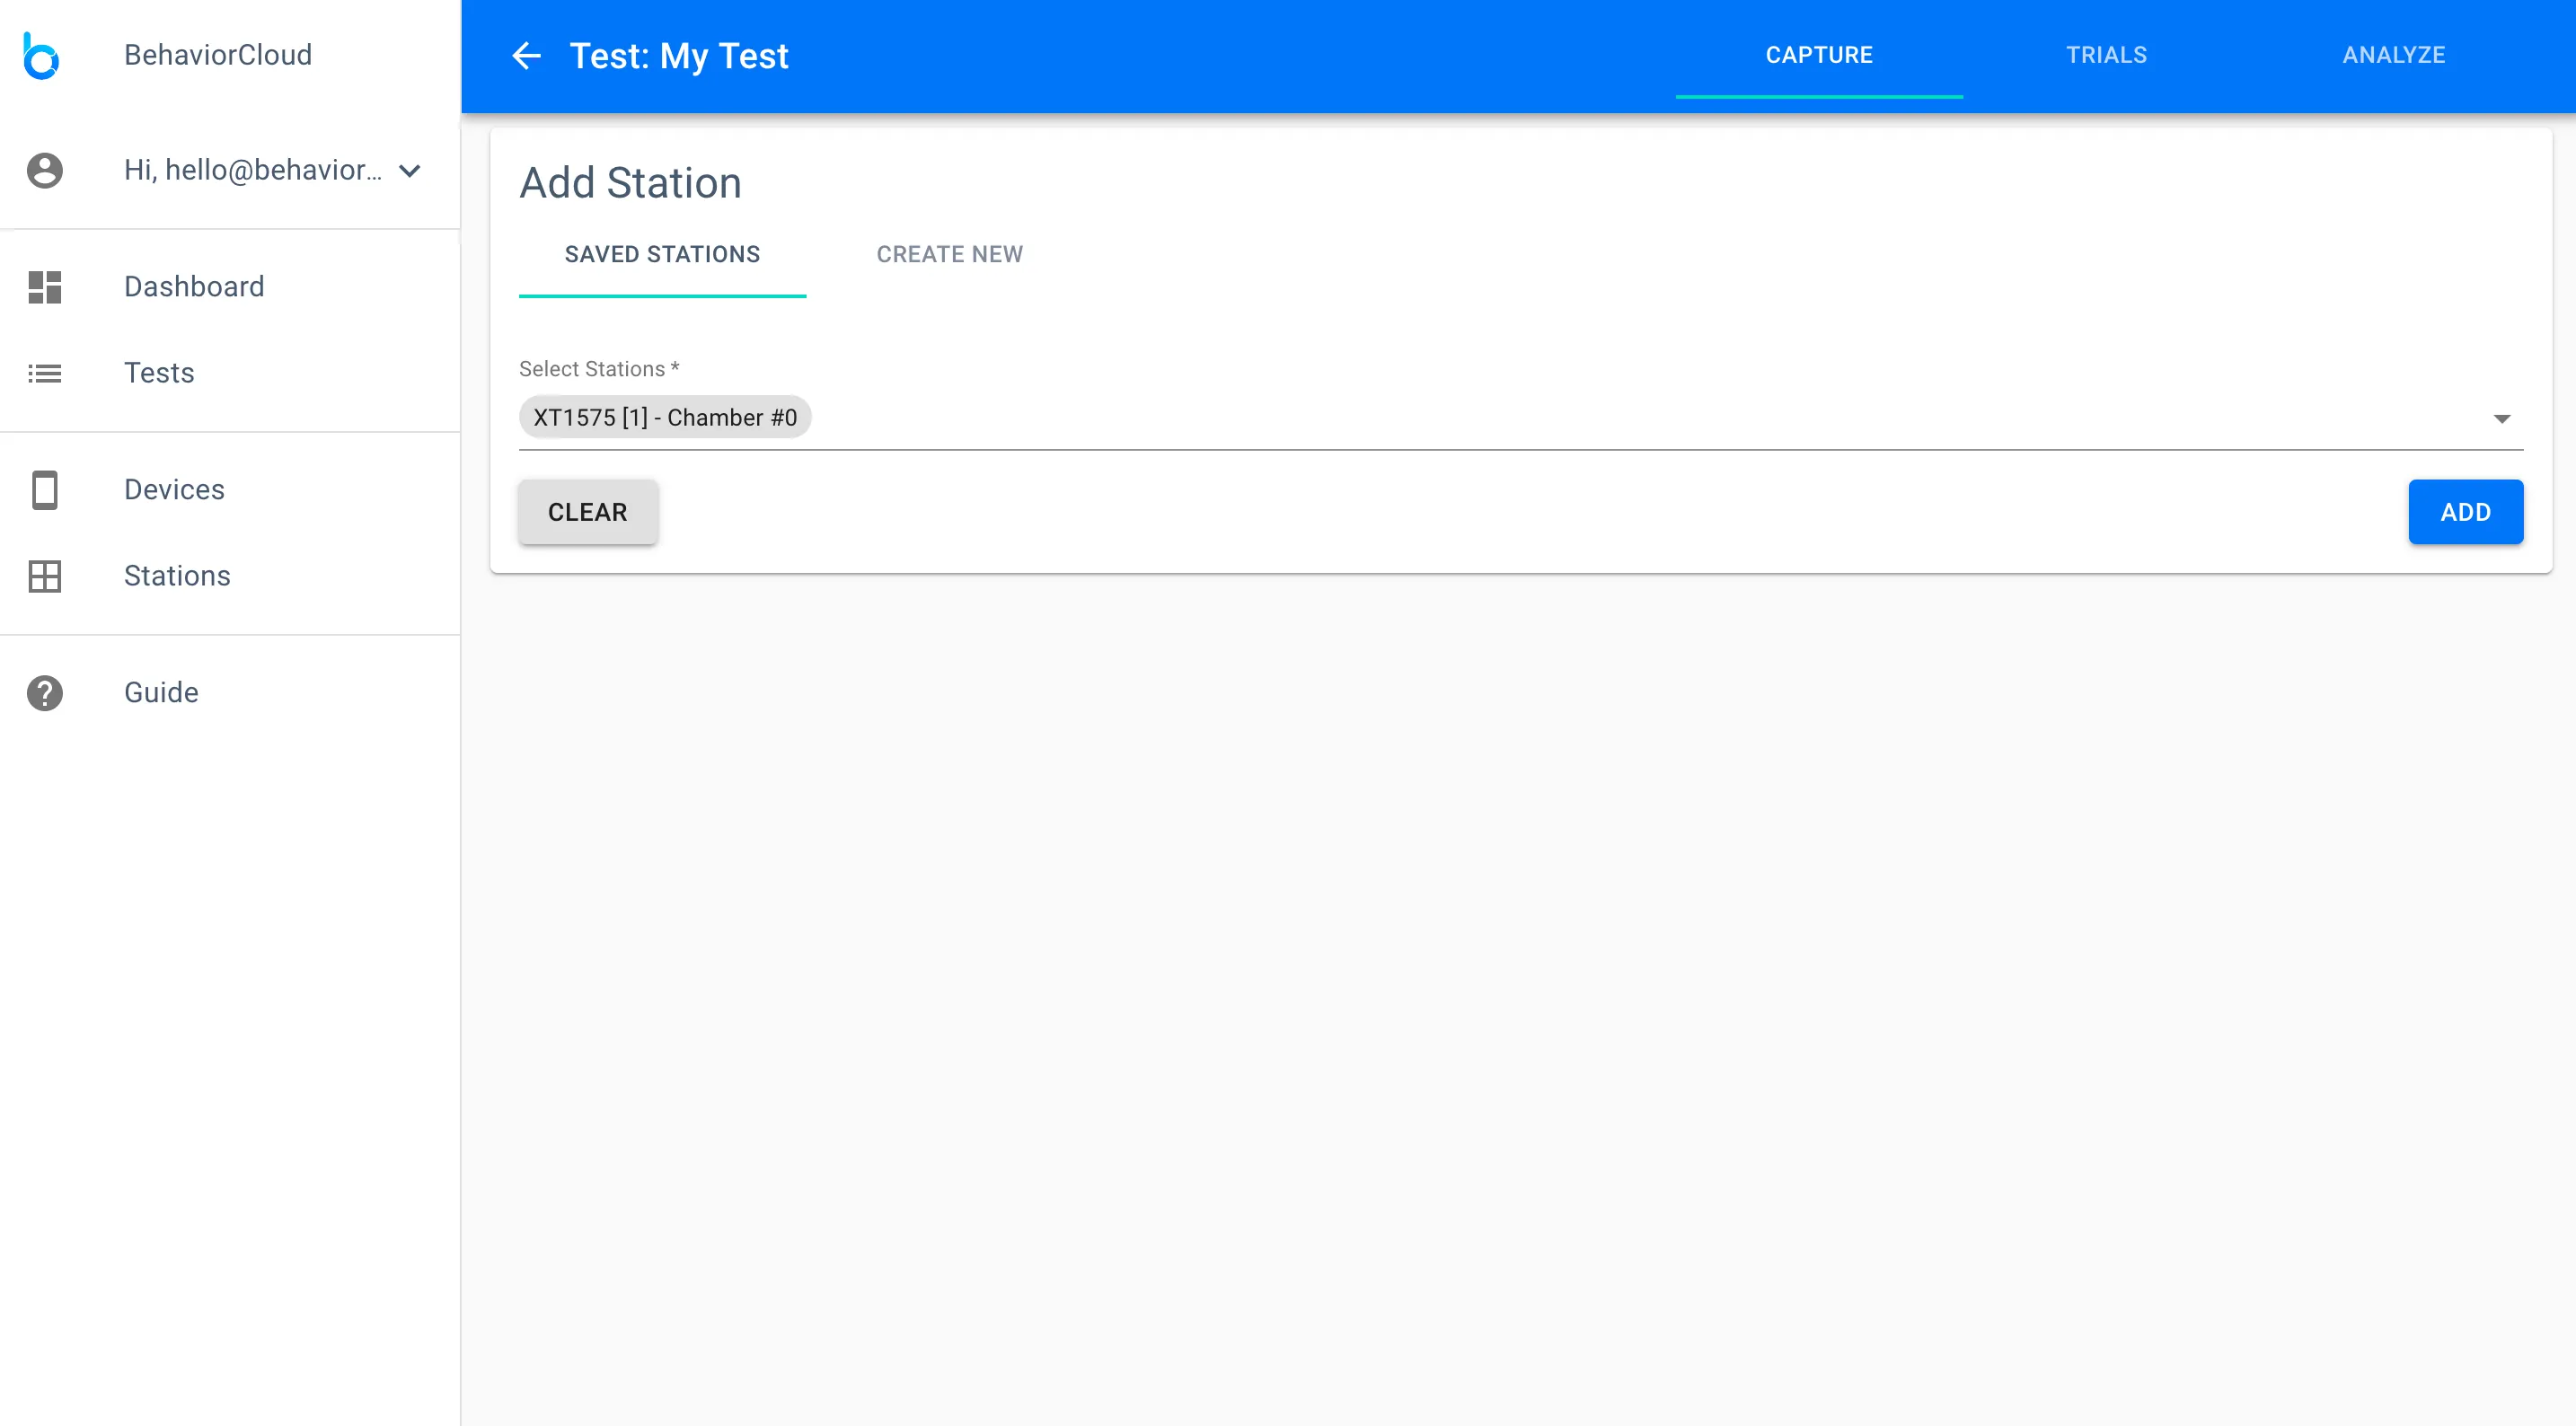
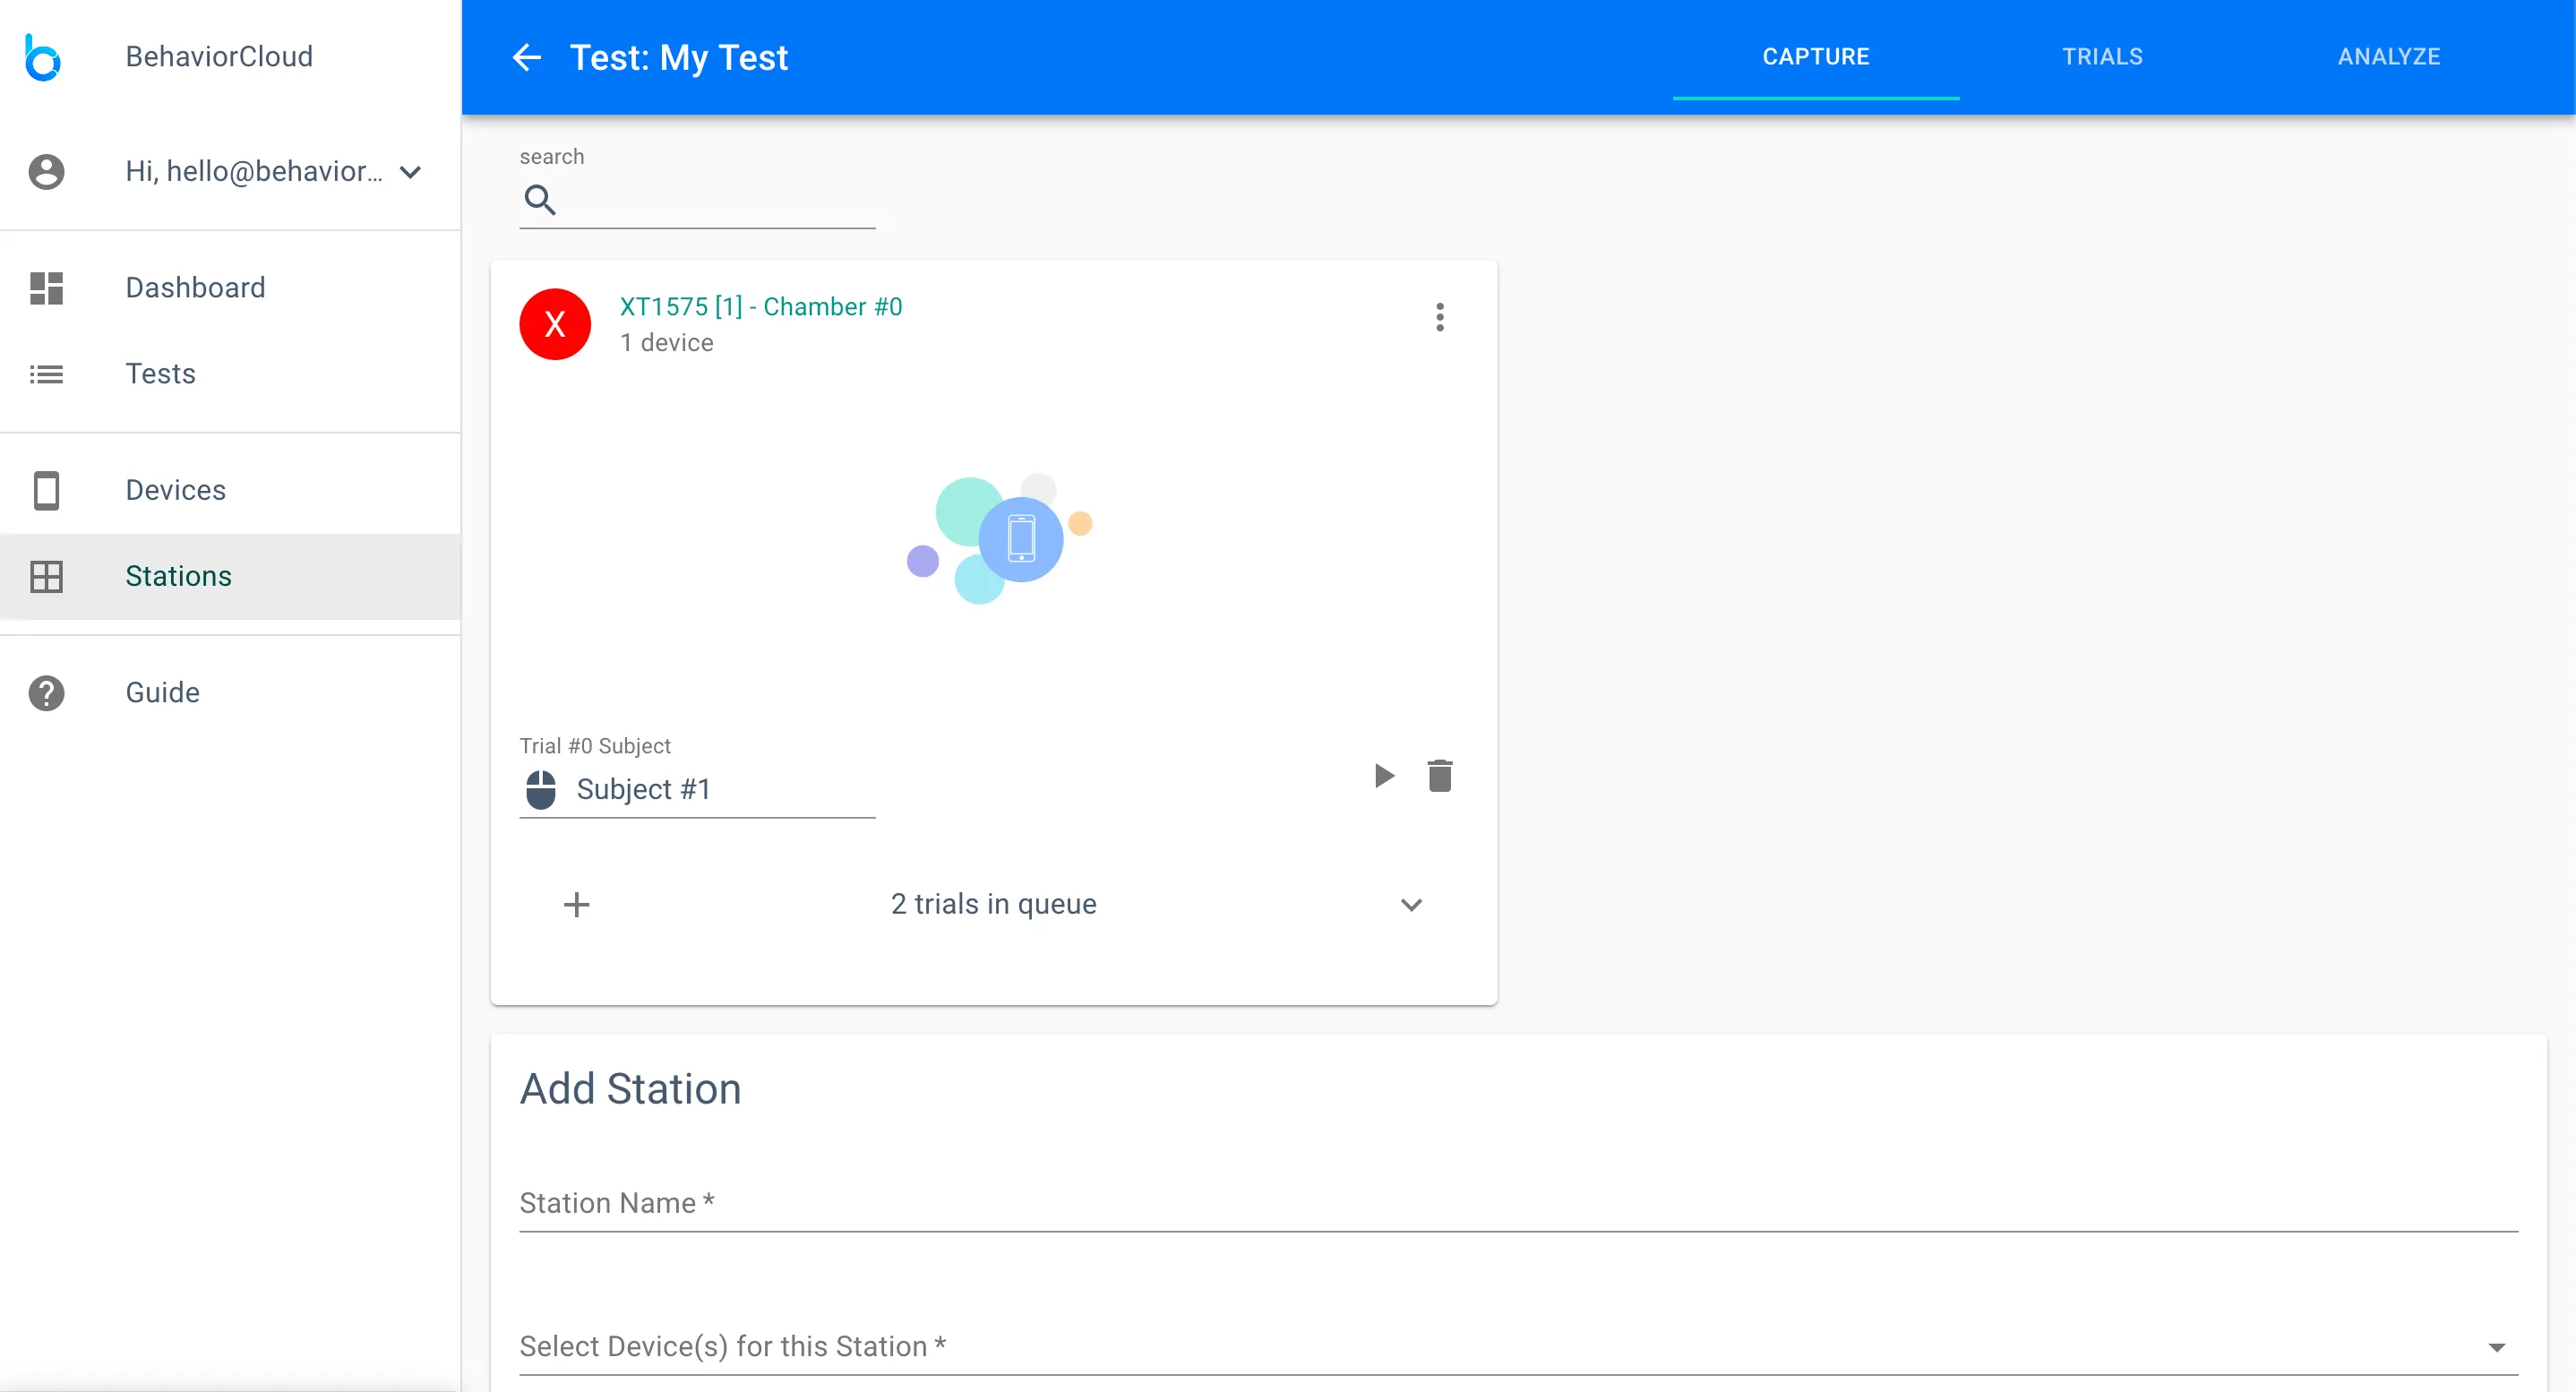
The next screen asks if you would like to capture data or upload data. Click capture data. This takes you to a page for adding stations to your test. A station (sometimes known as a test chamber) is a data-capture set-up consisting of one or multiple data sources. In this example, the station is the mobile device you have connected for capturing video, likely mounted above a maze or cage. If you had multiple mobile devices that you planned to run at the same time (e.g., for running multiple subjects in separate mazes), then you could add them all on this page.
After adding your station(s) you will see your main working view for capturing data. Note the three tabs at the upper right of the screen. These tabs allow you to toggle between Capture, Trials, and Analysis views for a given test. In the Capture view, each station is represented by a card. Clicking the plus icon at the bottom left of a station card will allow you to add subjects to the queue for that station. Clicking the play icon to the right of a subject will start a trial.
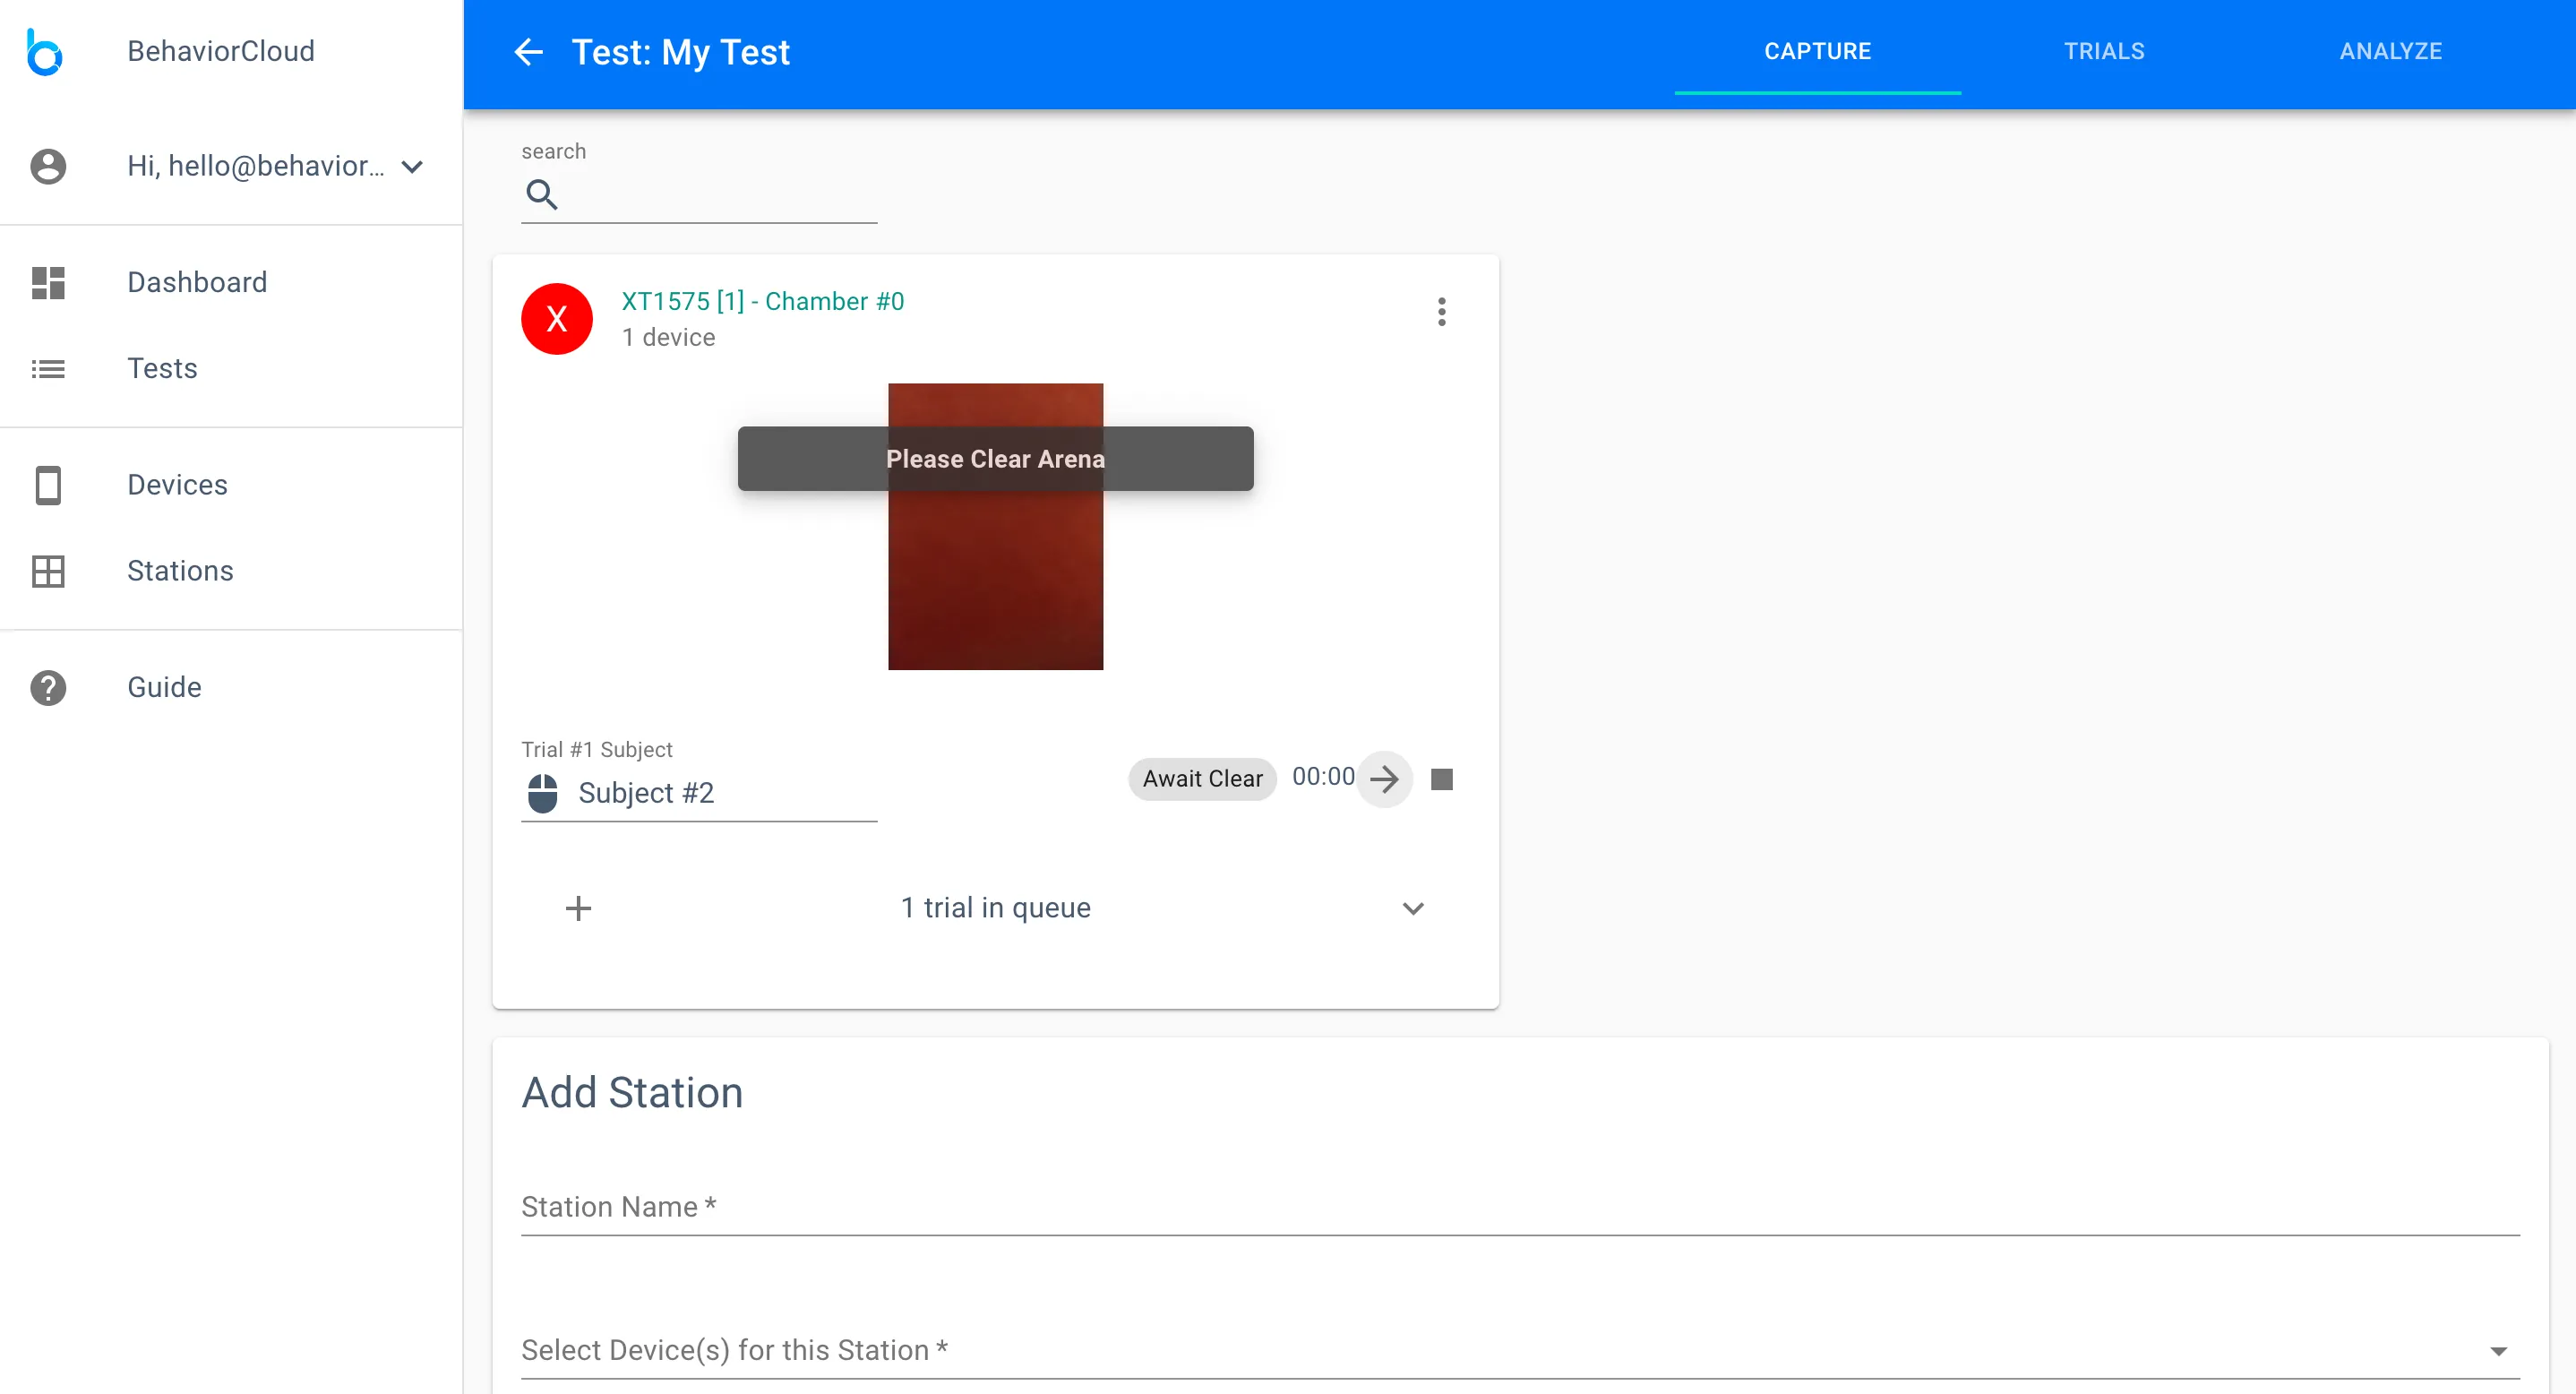
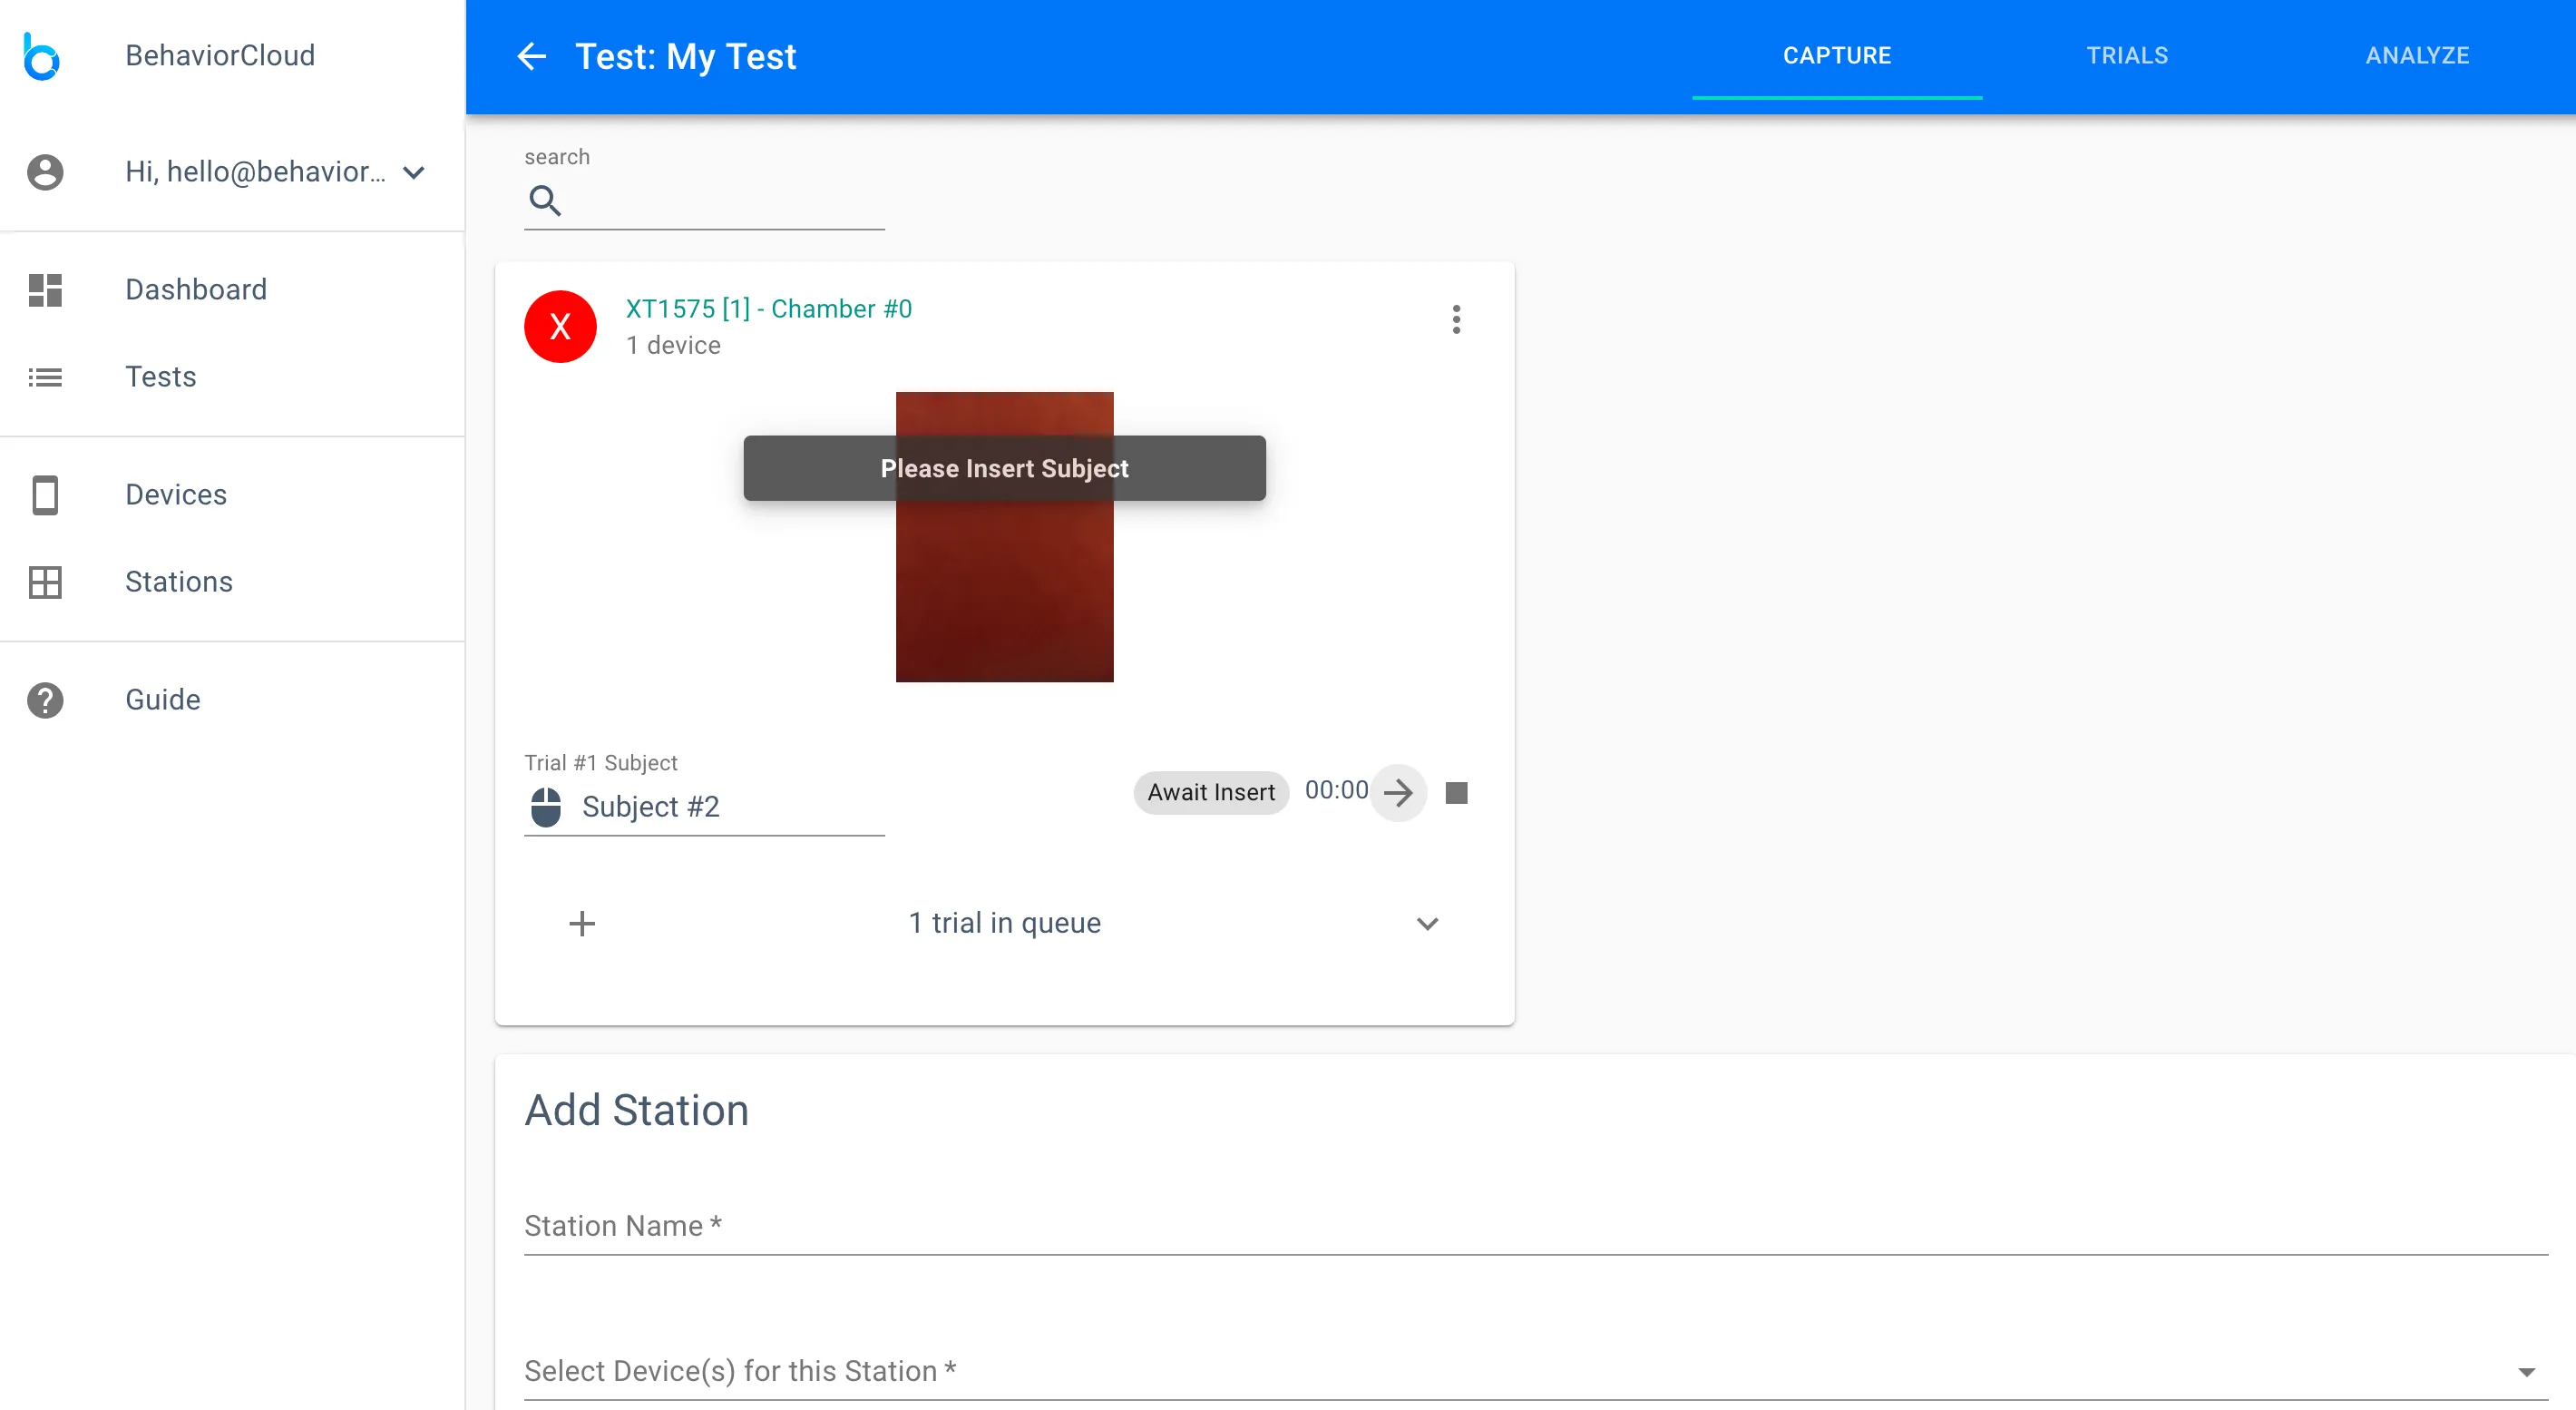
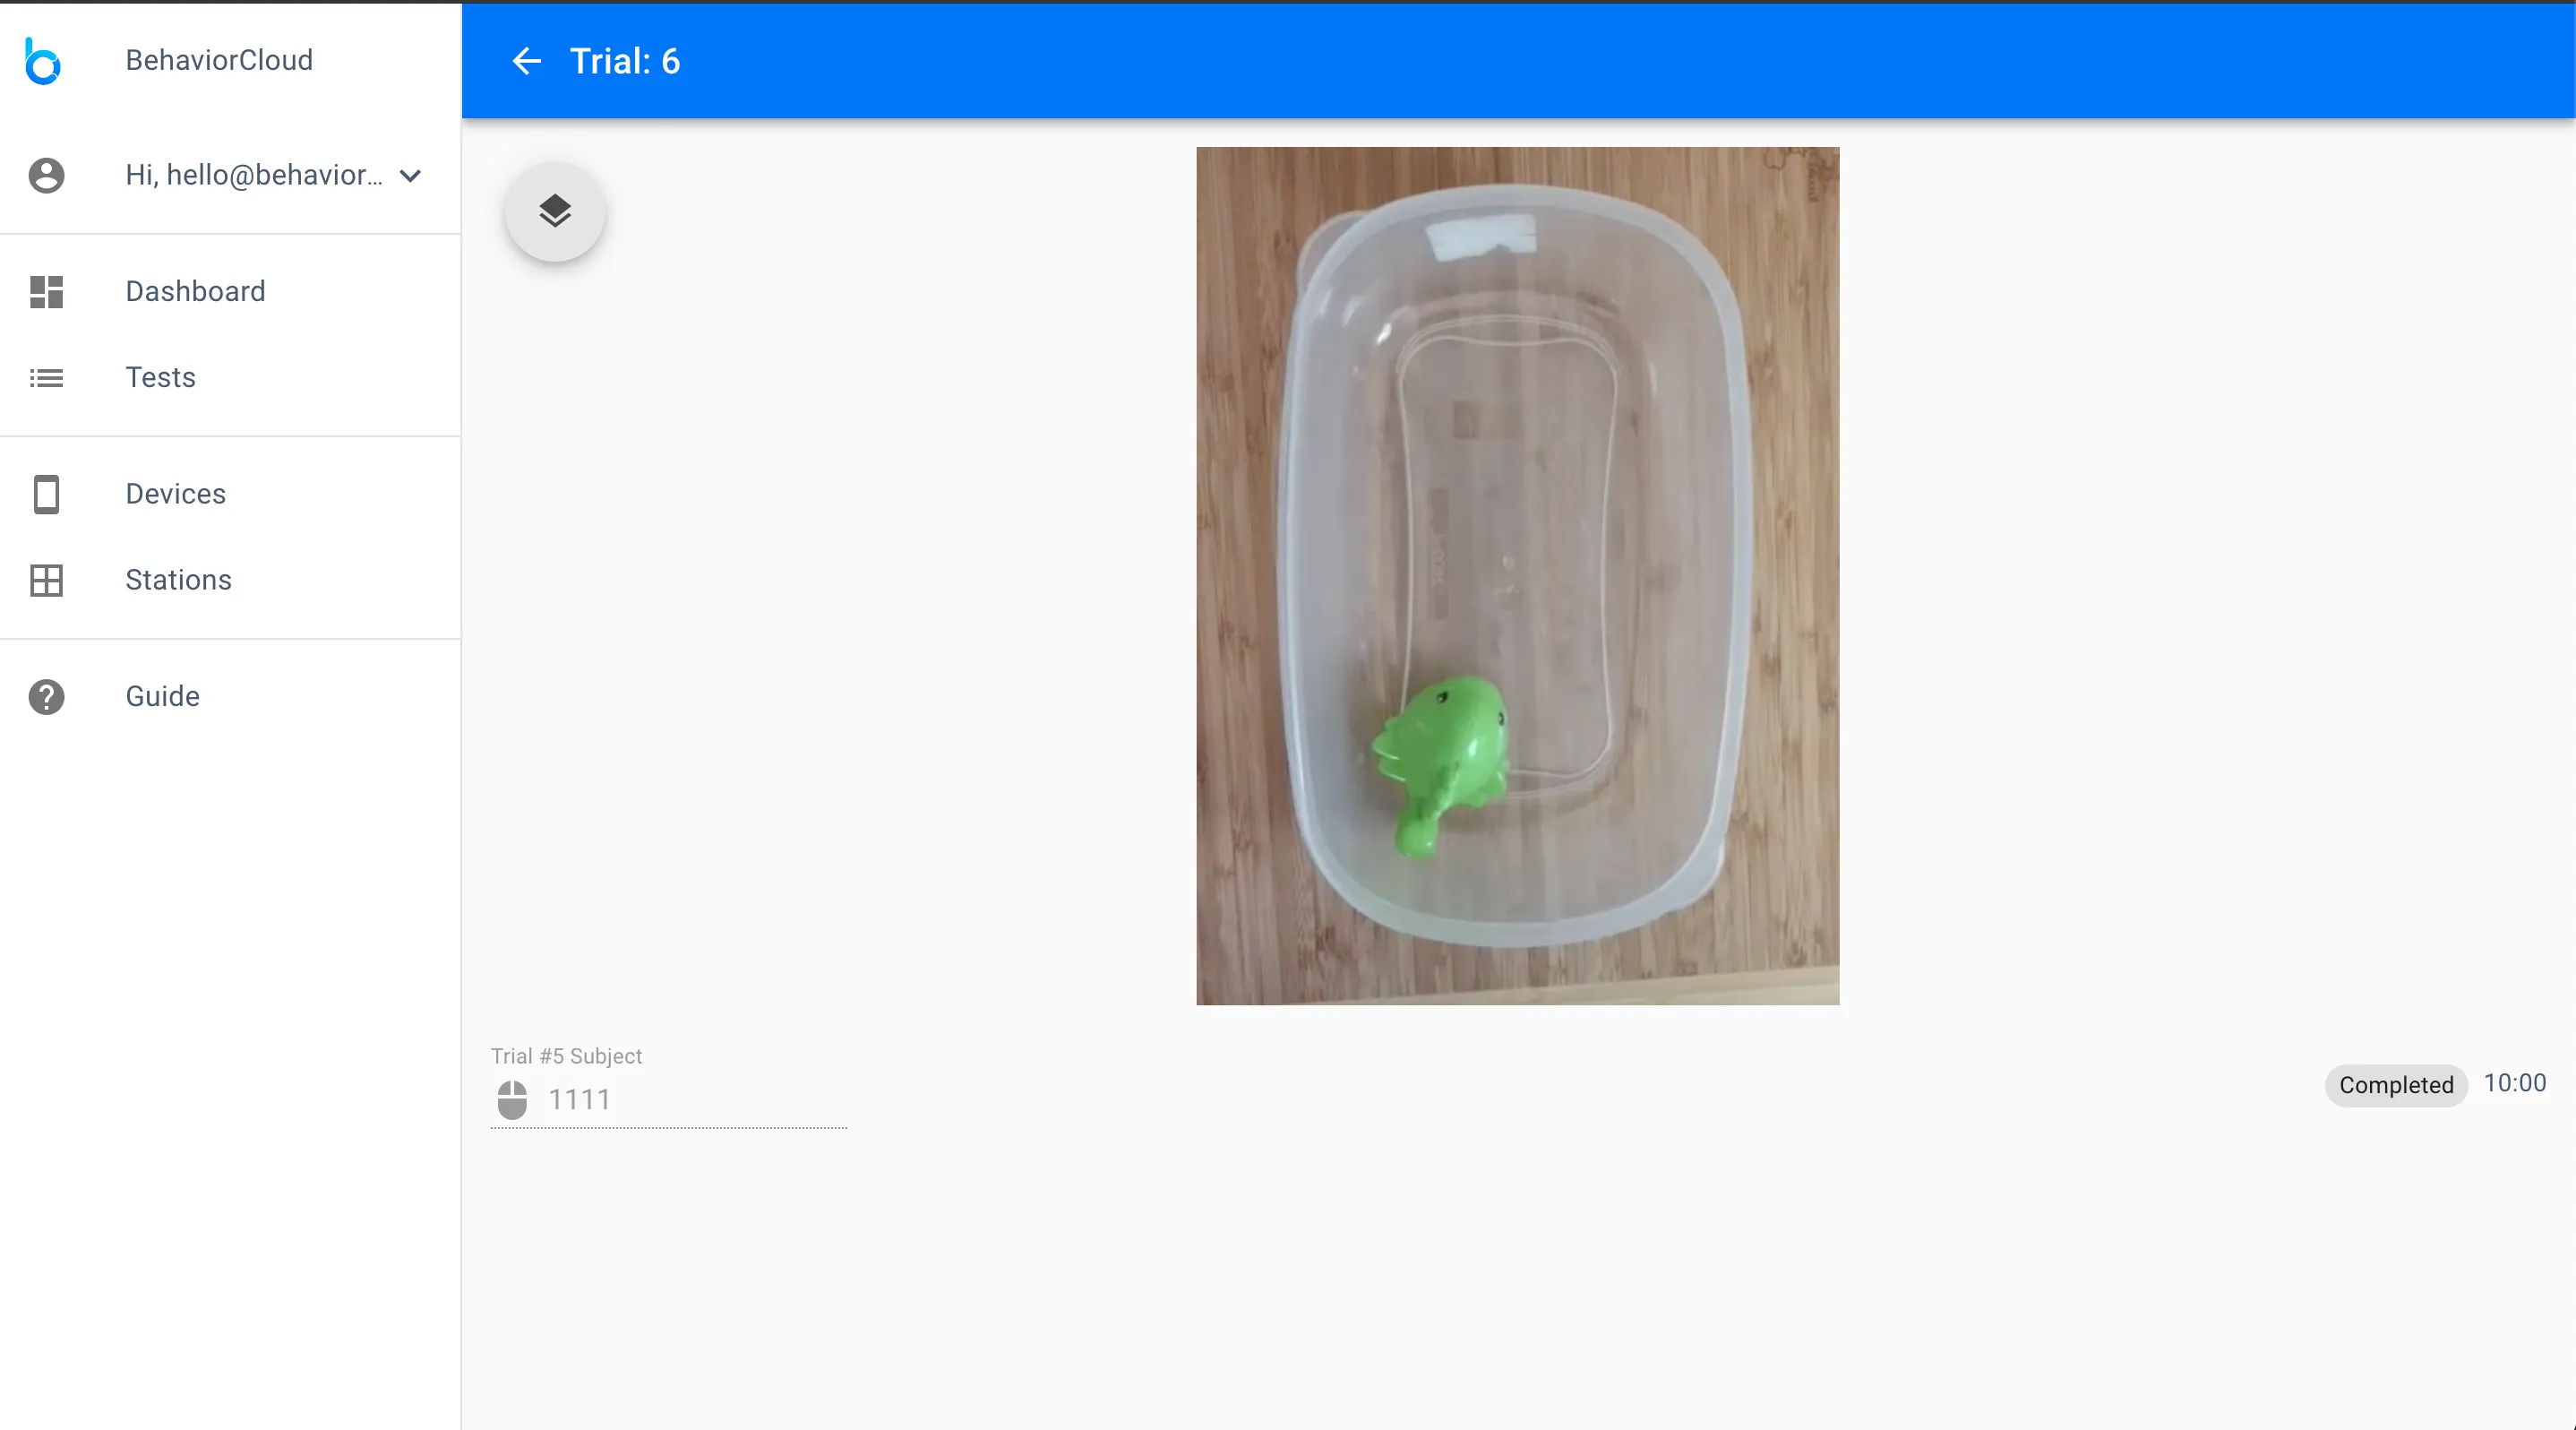
After starting a trial you will see a live preview of the video stream. A prompt will ask you to clear the arena, meaning remove all subjects, shadows, movements etc. from the camera view to provide a clean background image. Click the arrow to proceed when ready. Another prompt will ask you to insert the subject. Click the arrow when ready to begin the trial. When time is up, the trial will automatically end and you will be prompted to enter the next subject. Record as many trials as desired.

You can also click on a station to go to a more detailed view. If you’re running one station at a time, then the detailed view is useful. If you’re running multiple stations at the same time, the main Capture view shown in the images above is useful for previewing and controlling all your stations at once.
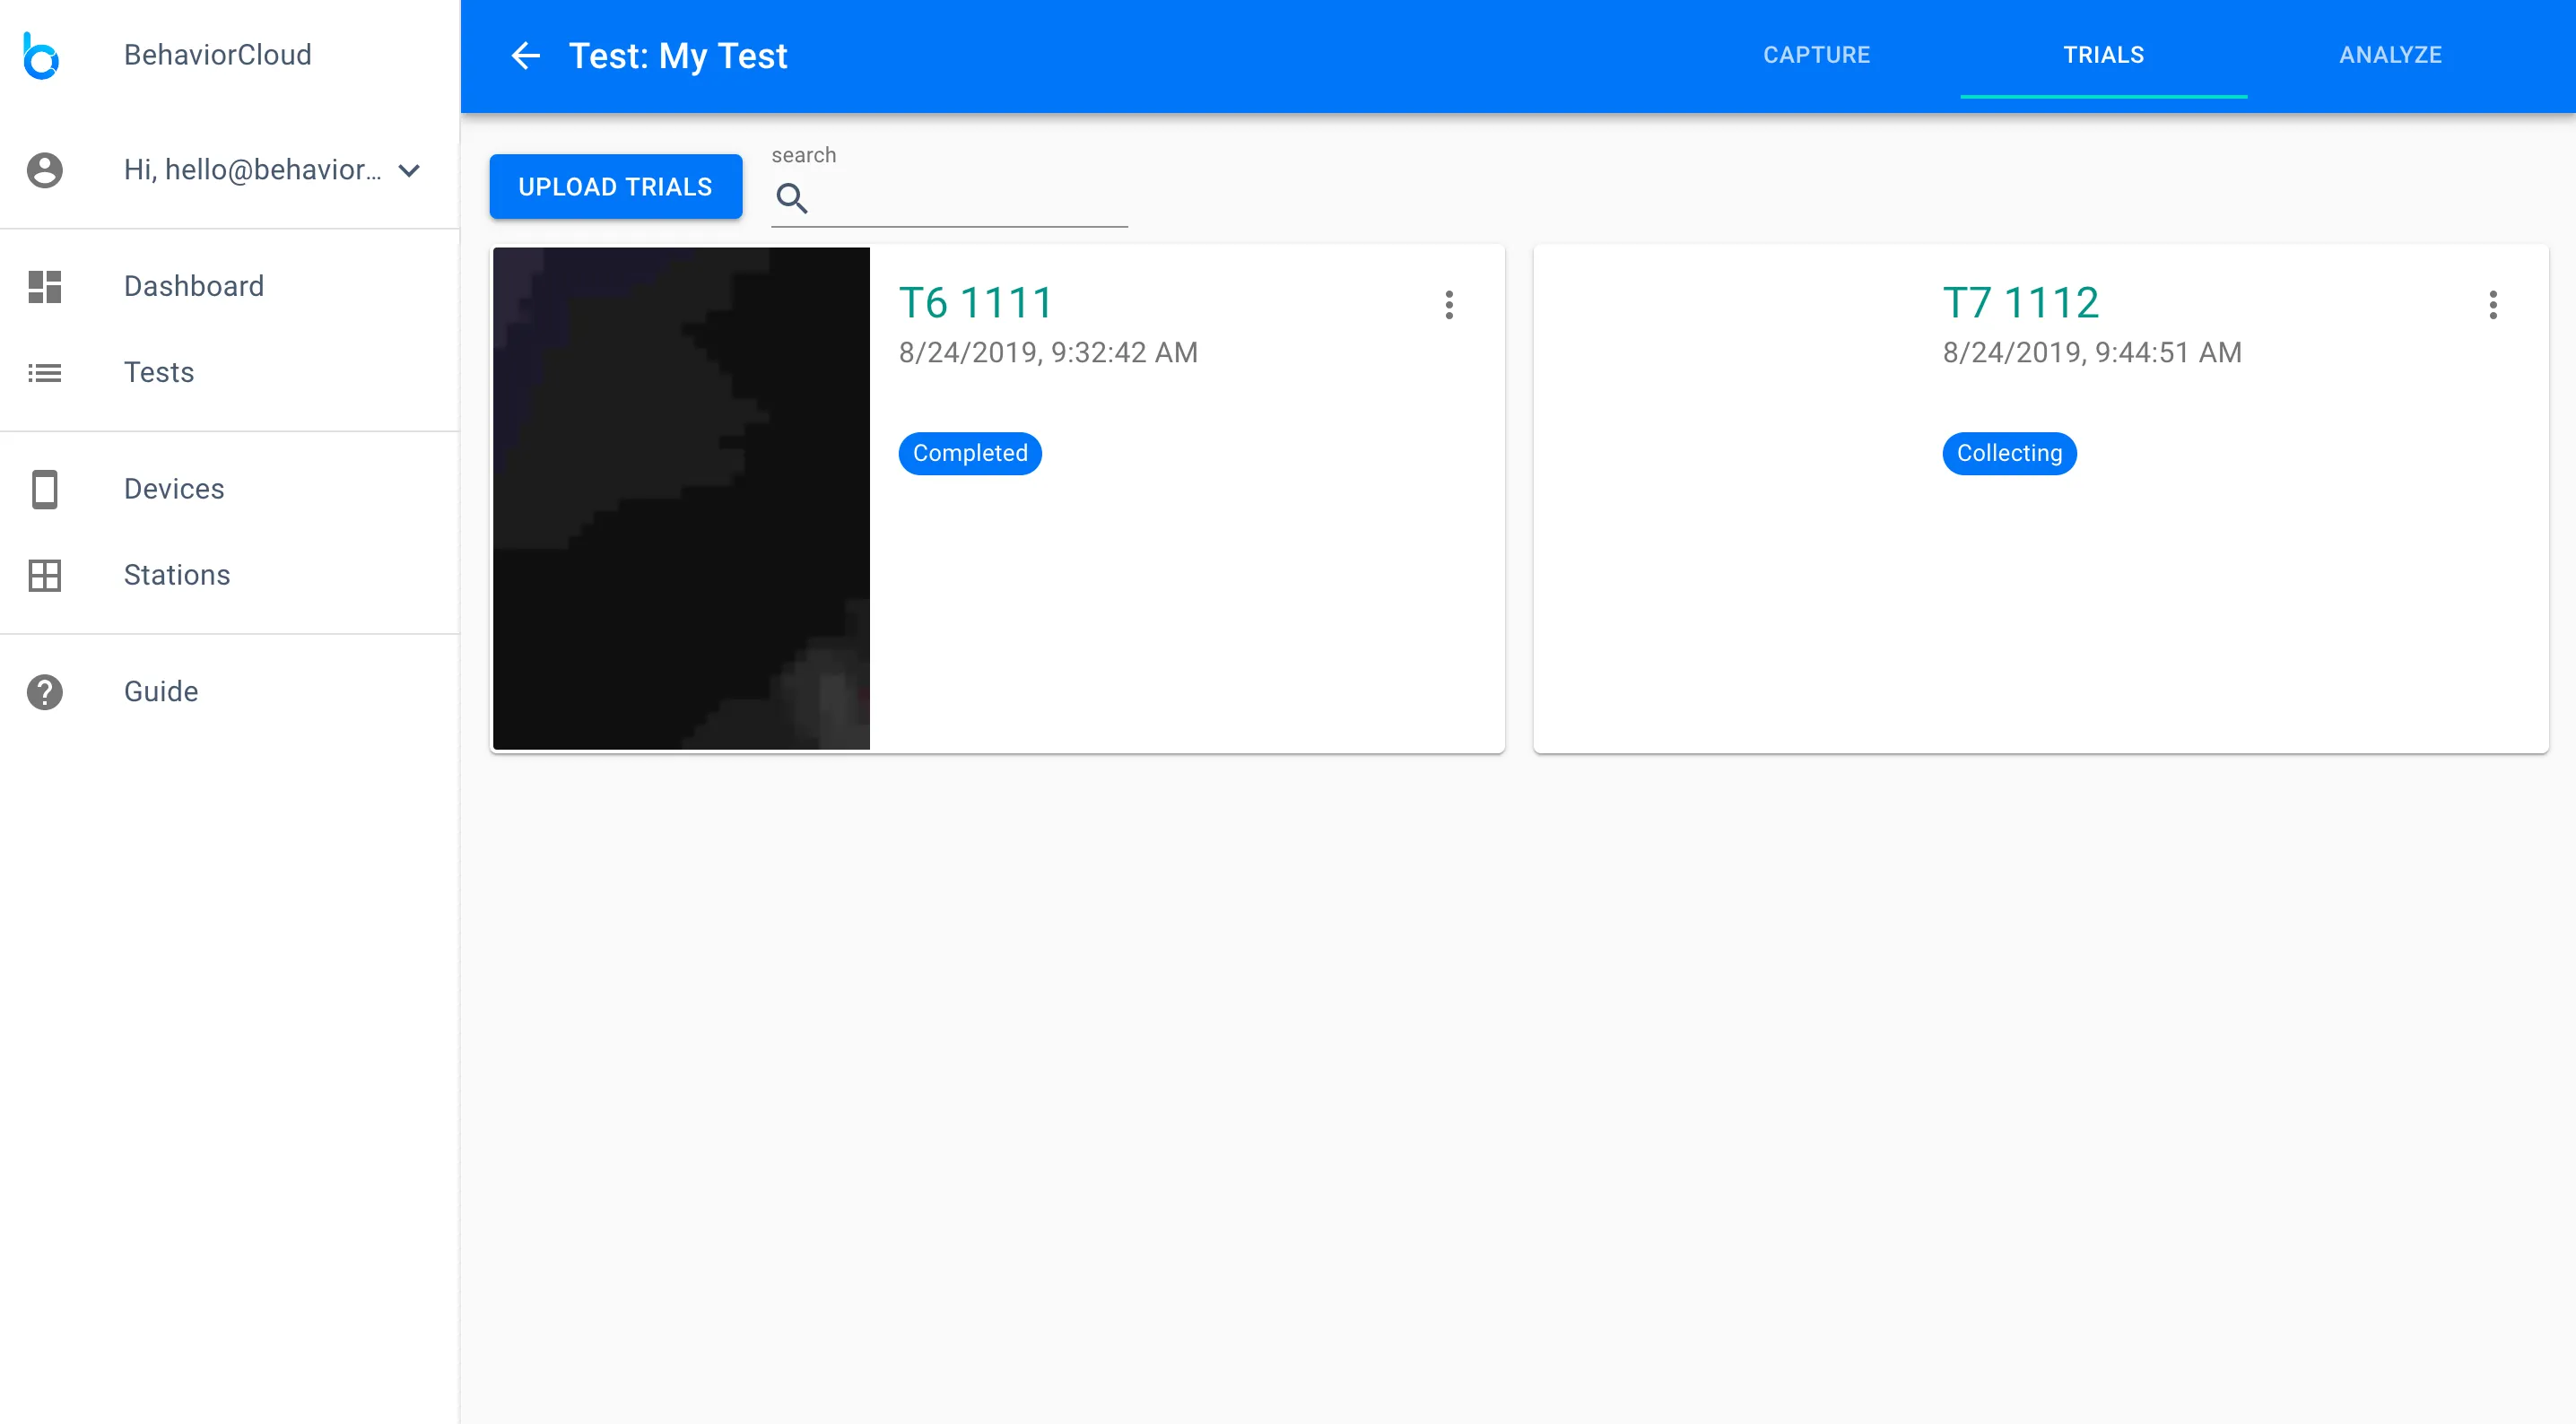
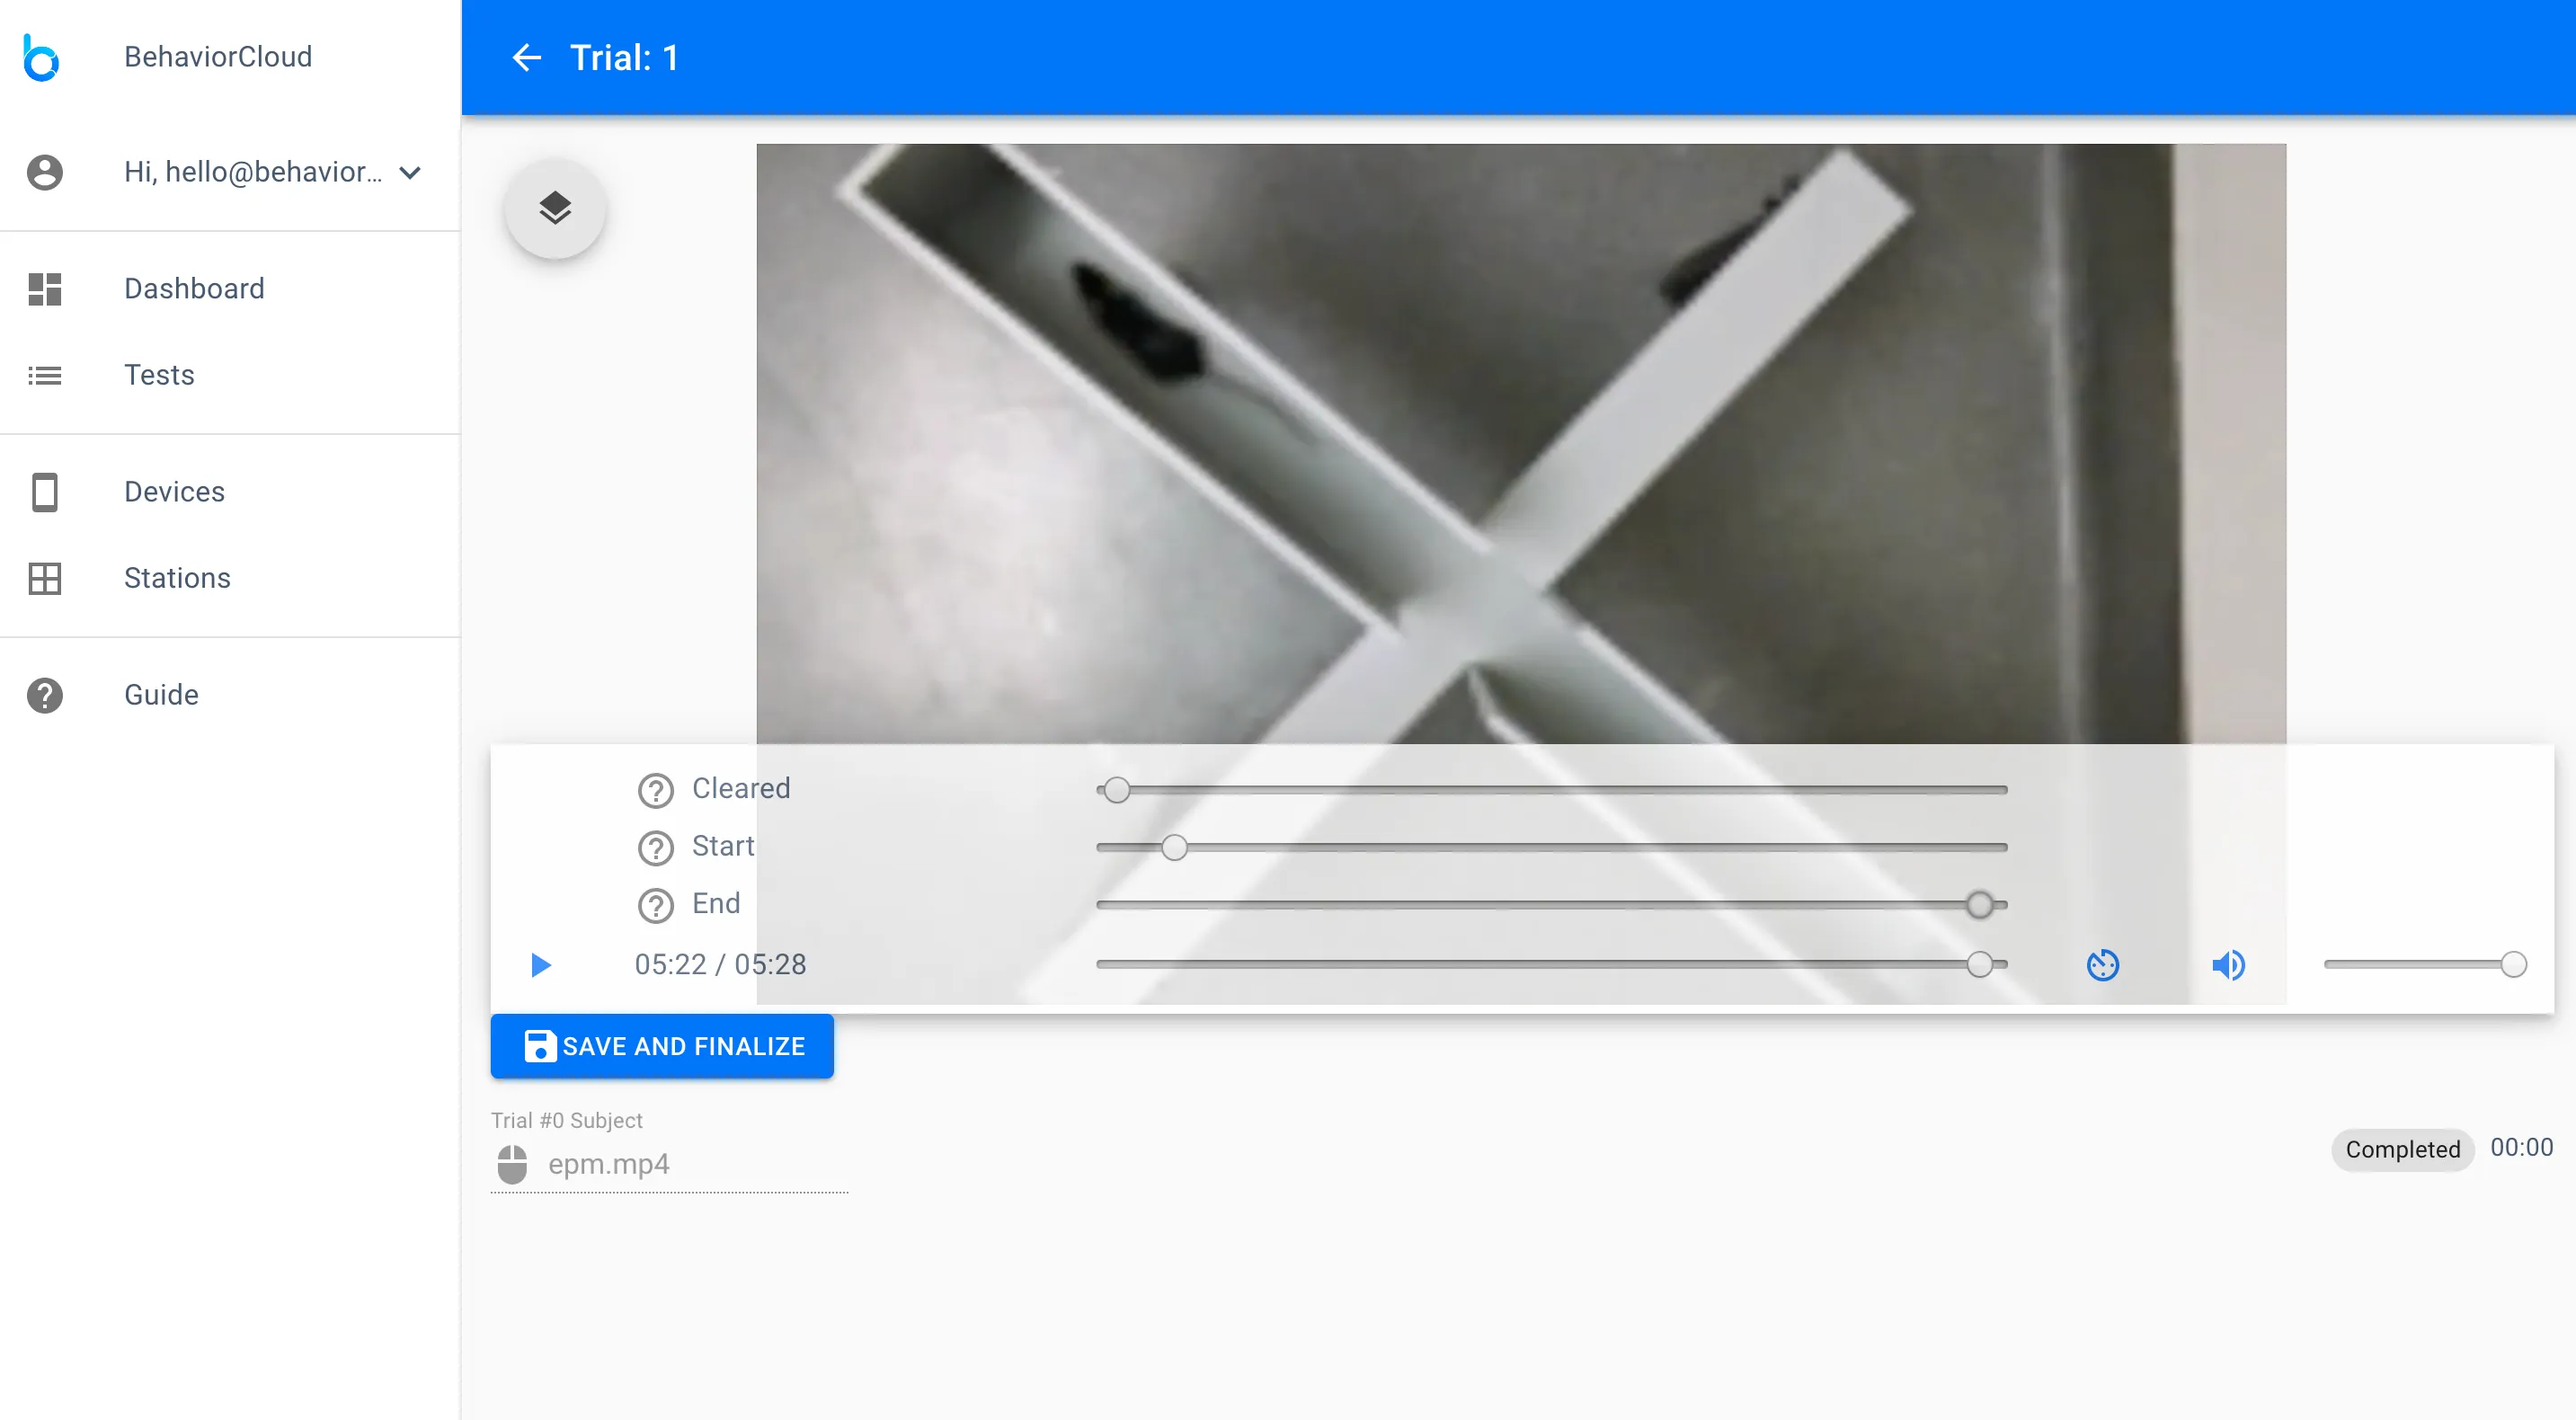
Navigate to the trials page to see a list of your completed and currently running trials.
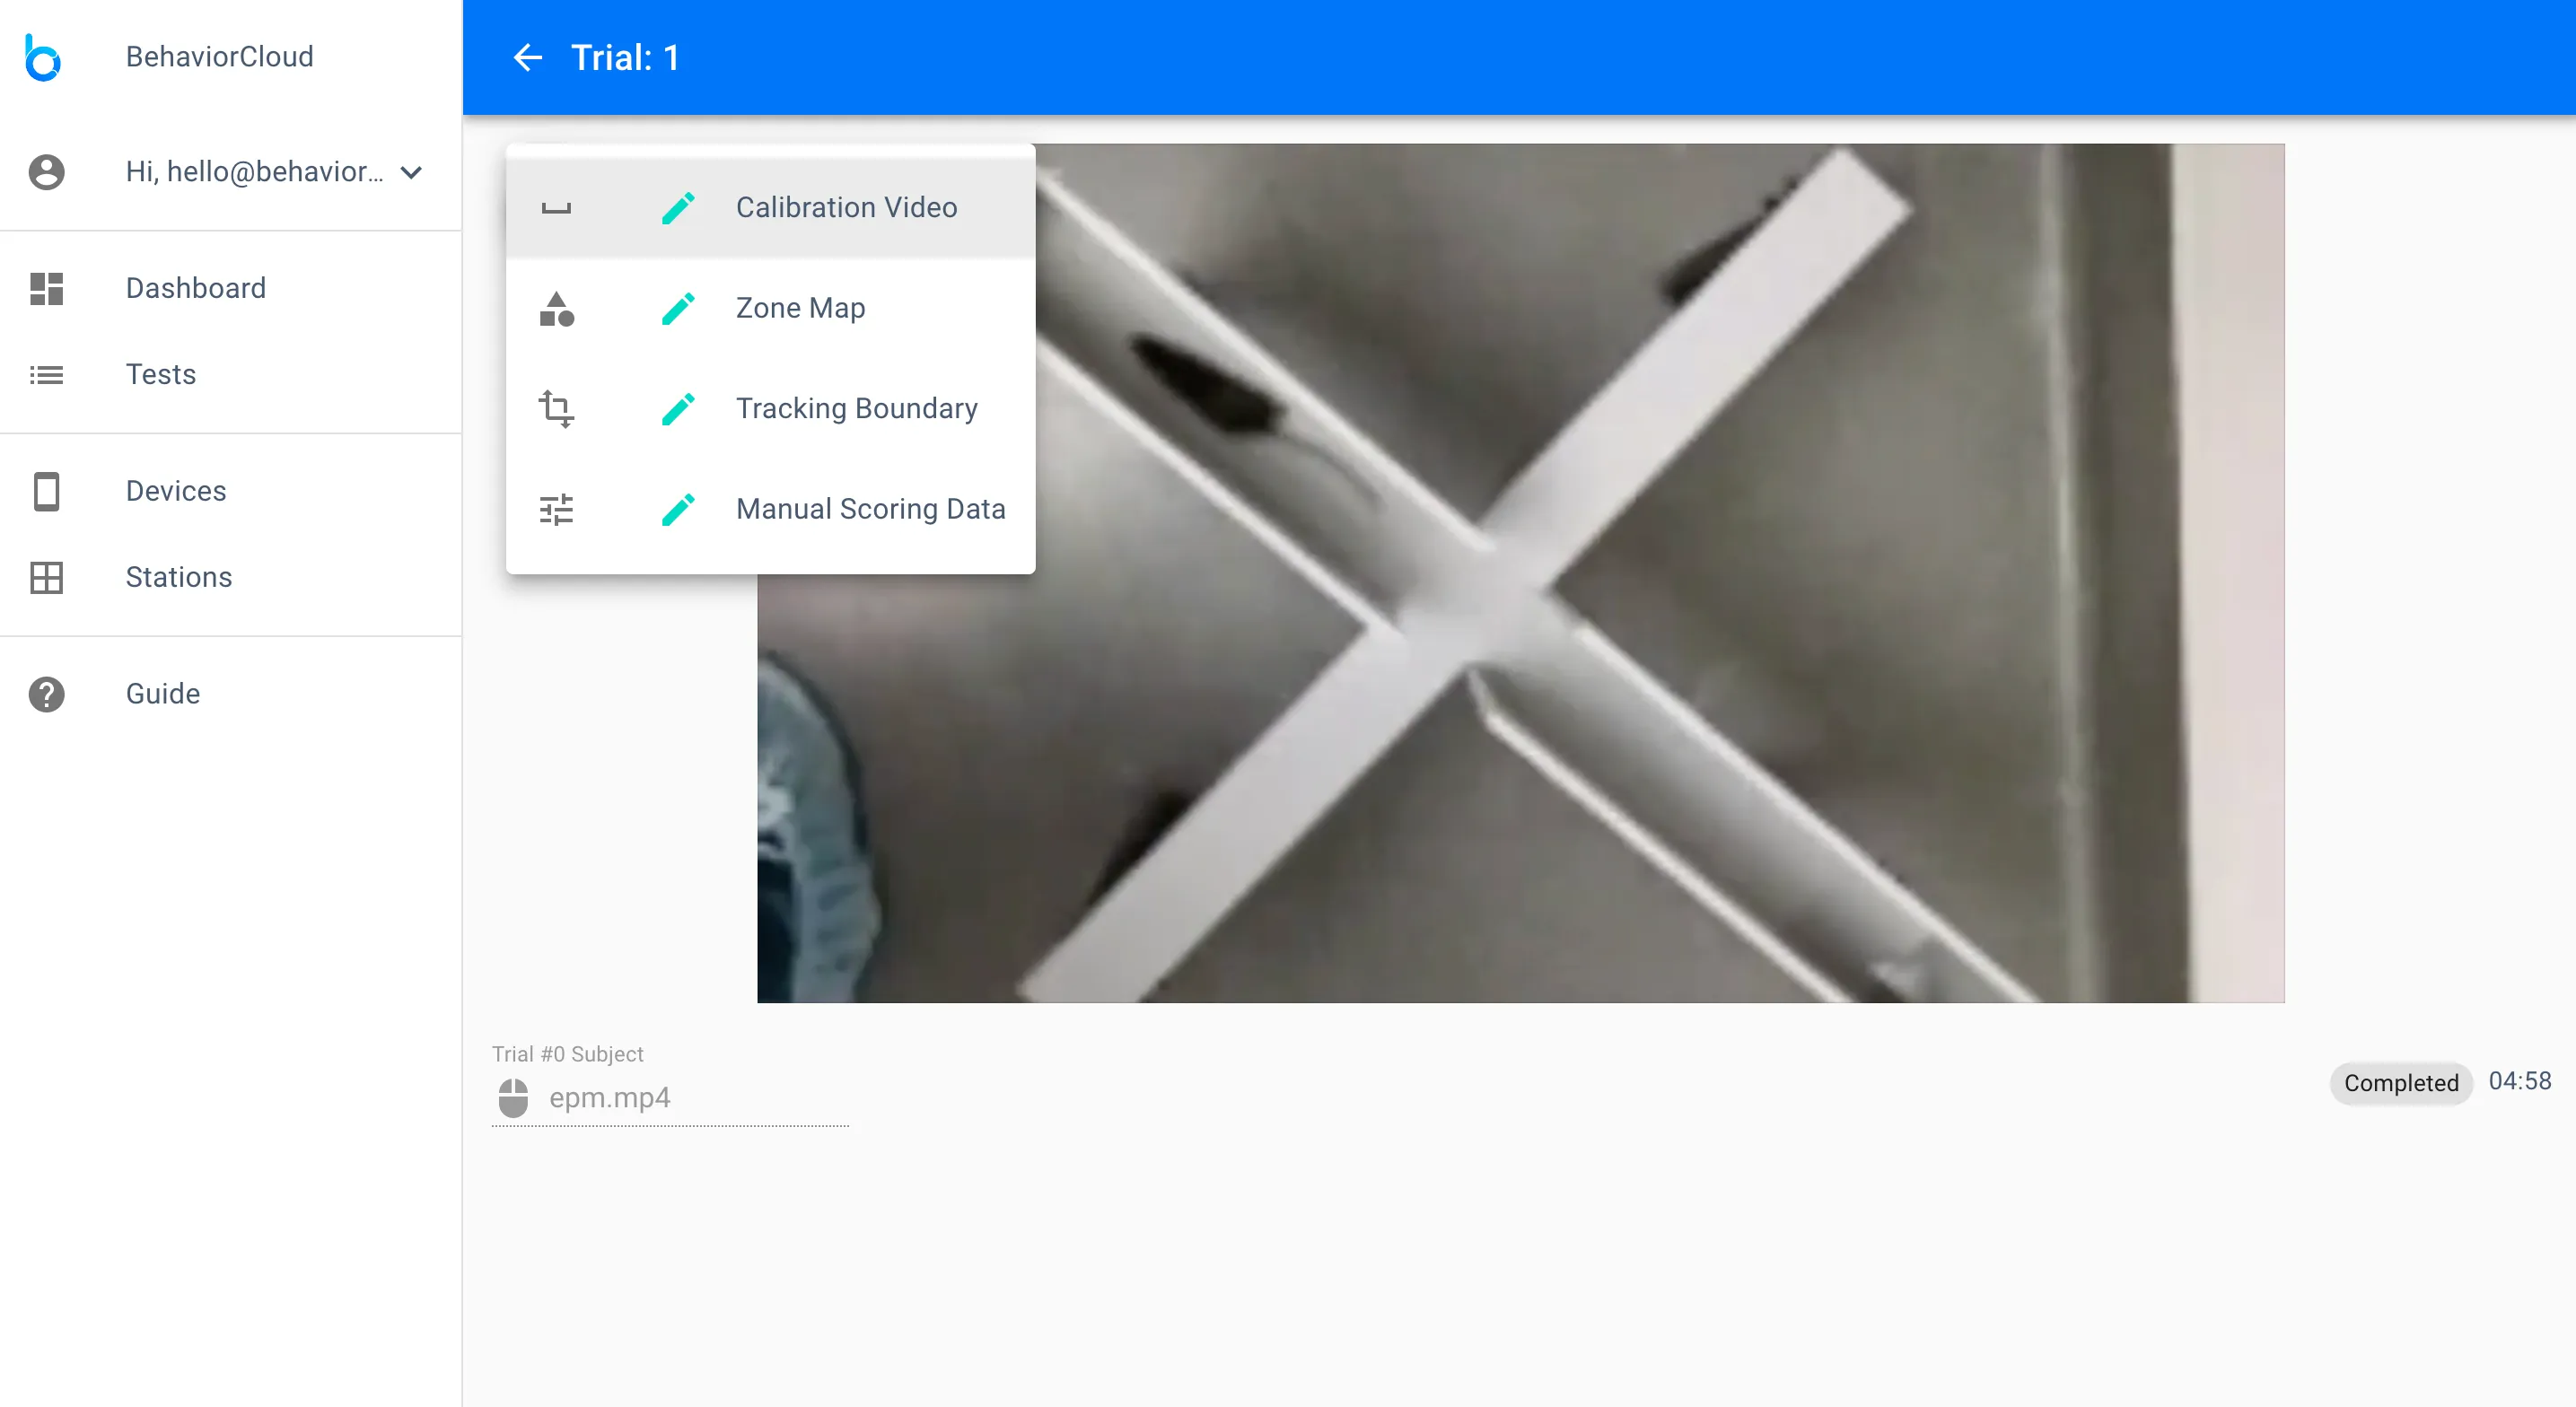
Click on a completed trial to see the detail view for that trial. On this page, you can play back your trial or add additional meta-data. Click the overlay icon in the upper left to see options to add a distance calibration, zone map, tracking boundary, or manual scoring data. We’ll cover these options in more detail below.
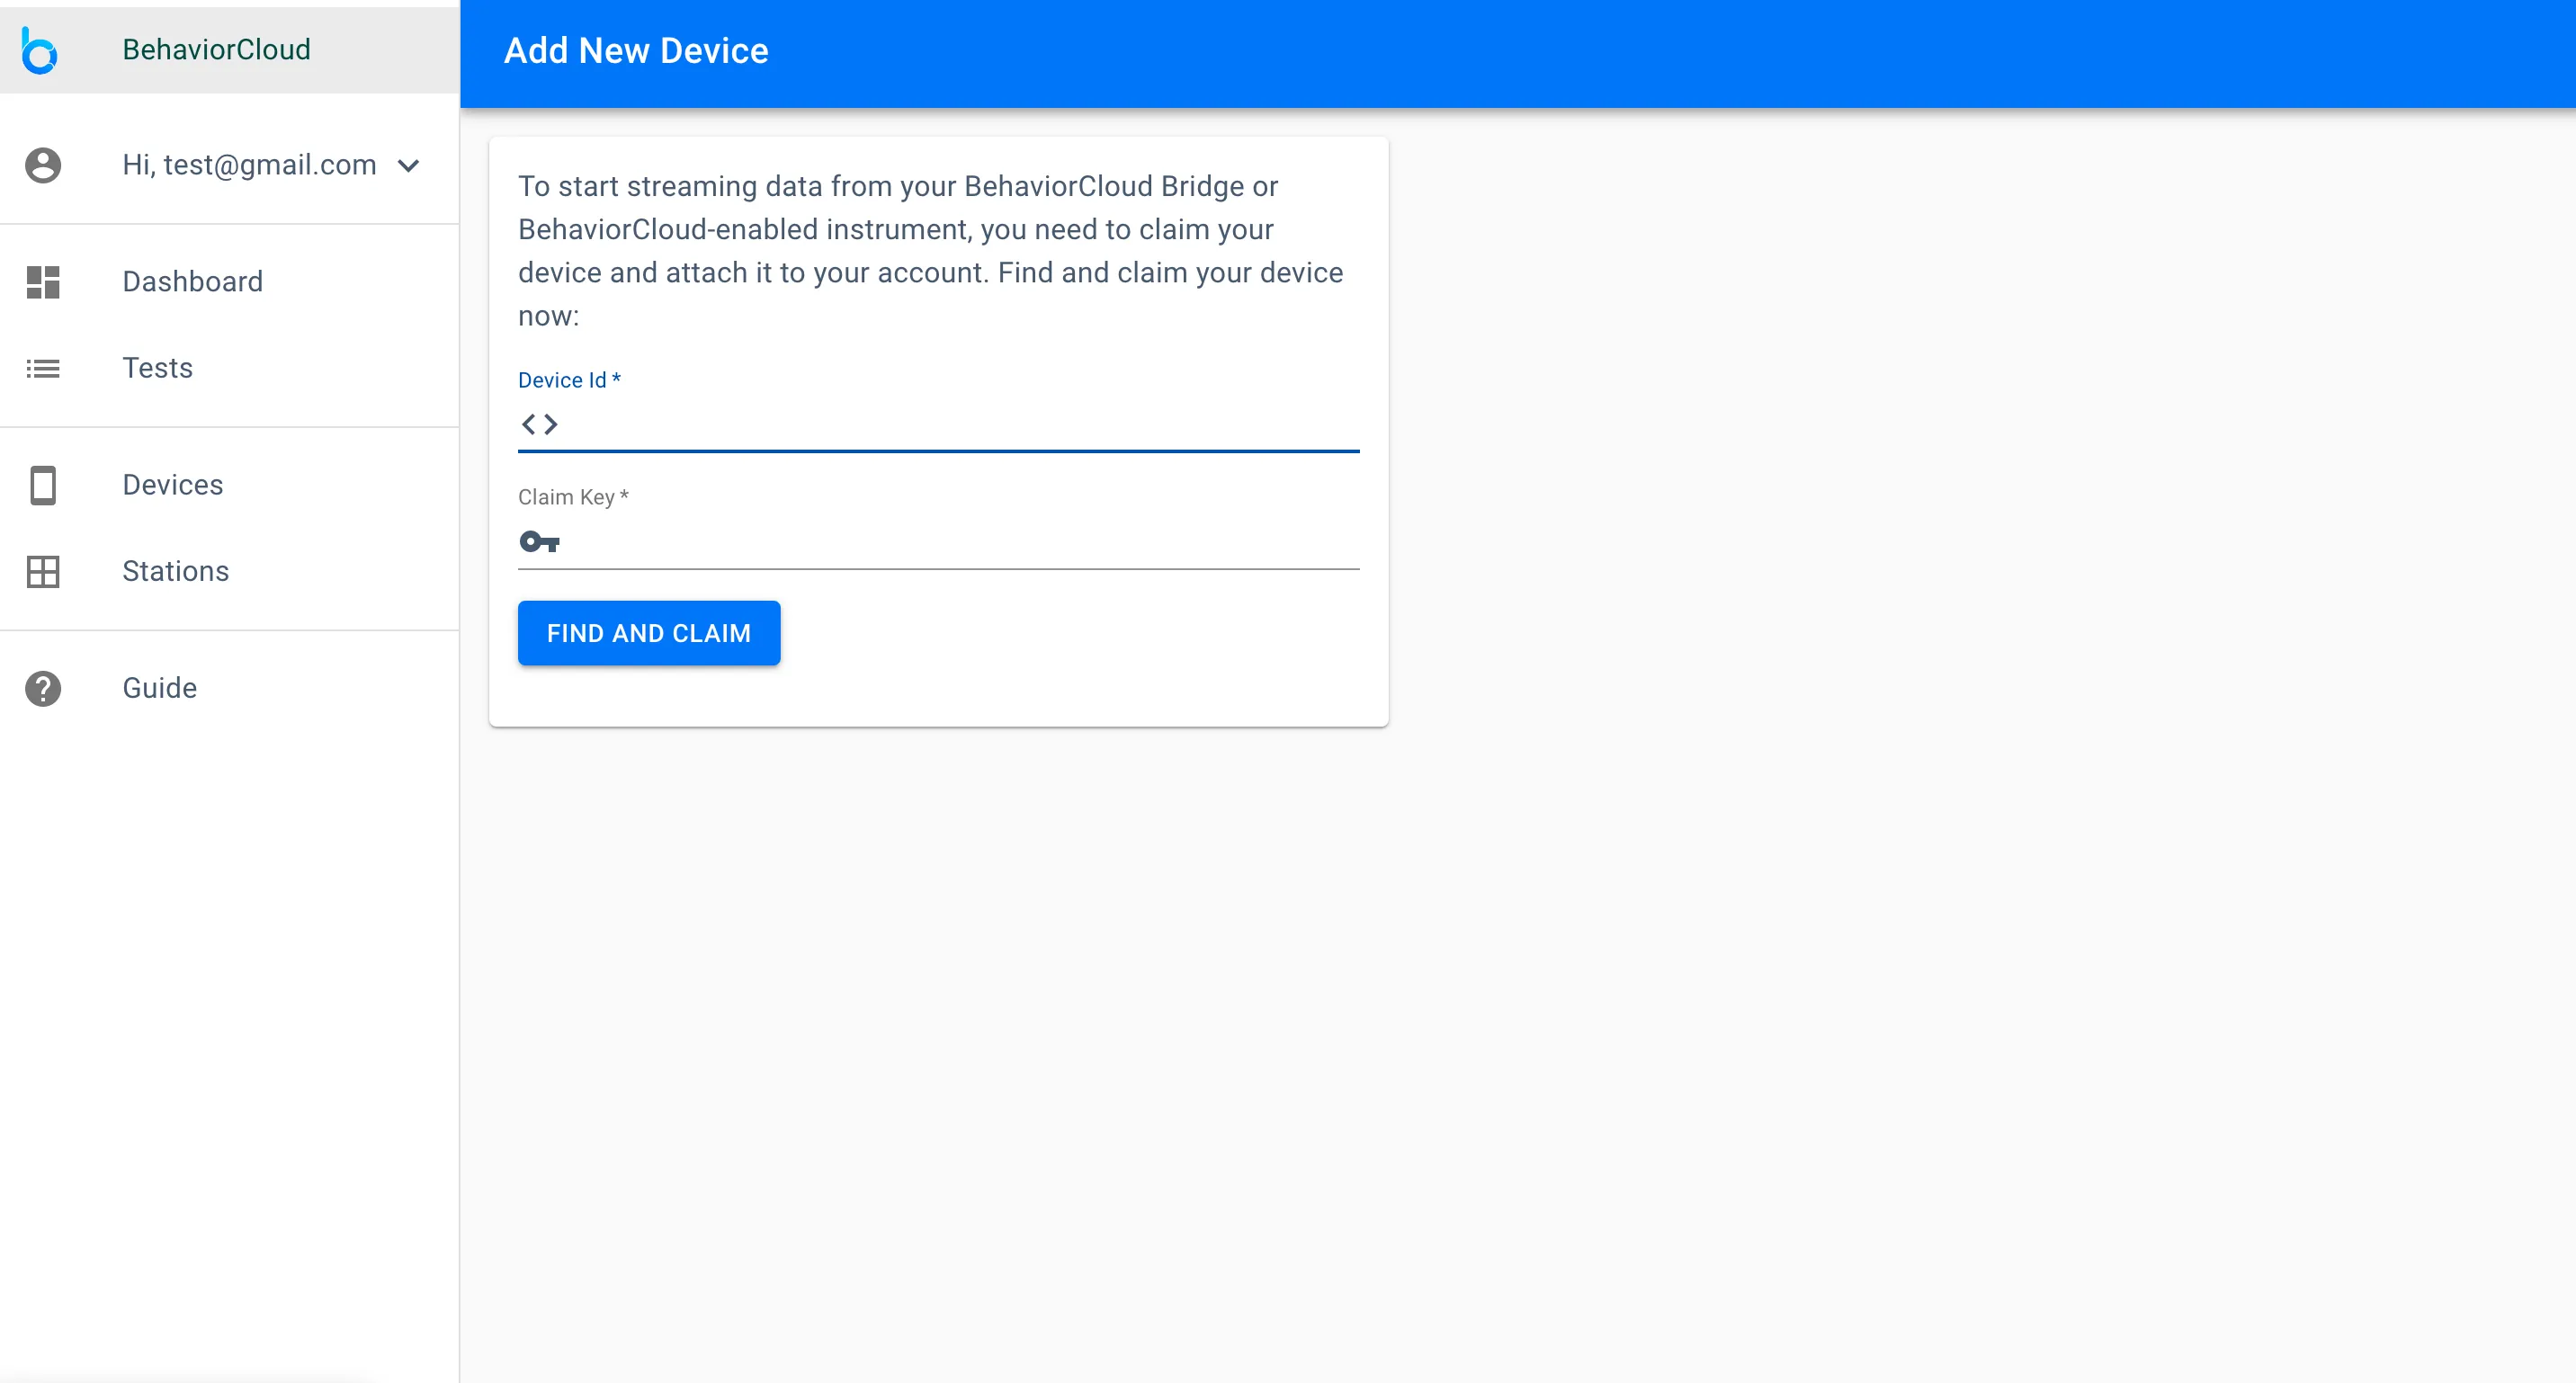
You can use a BehaviorCloud Bridge to control third-party hardware and collect the data into your account in real-time. You will need either a wired internet connection or a WiFi connection to run the Bridge. Currently we support the San Diego Instruments Photobeam Activity Systems for open field and home cage. More compatibility coming soon. To get started, plug your Bridge into the USB port of your SDI Photobeam Activity System. Log in to your BehaviorCloud account and navigate to the Devices page. Click Add Device and then Instrument Data. Here you will be able to enter the Device ID and Claim Key provided with your Bridge.
Your device will now be listed on the Devices page.
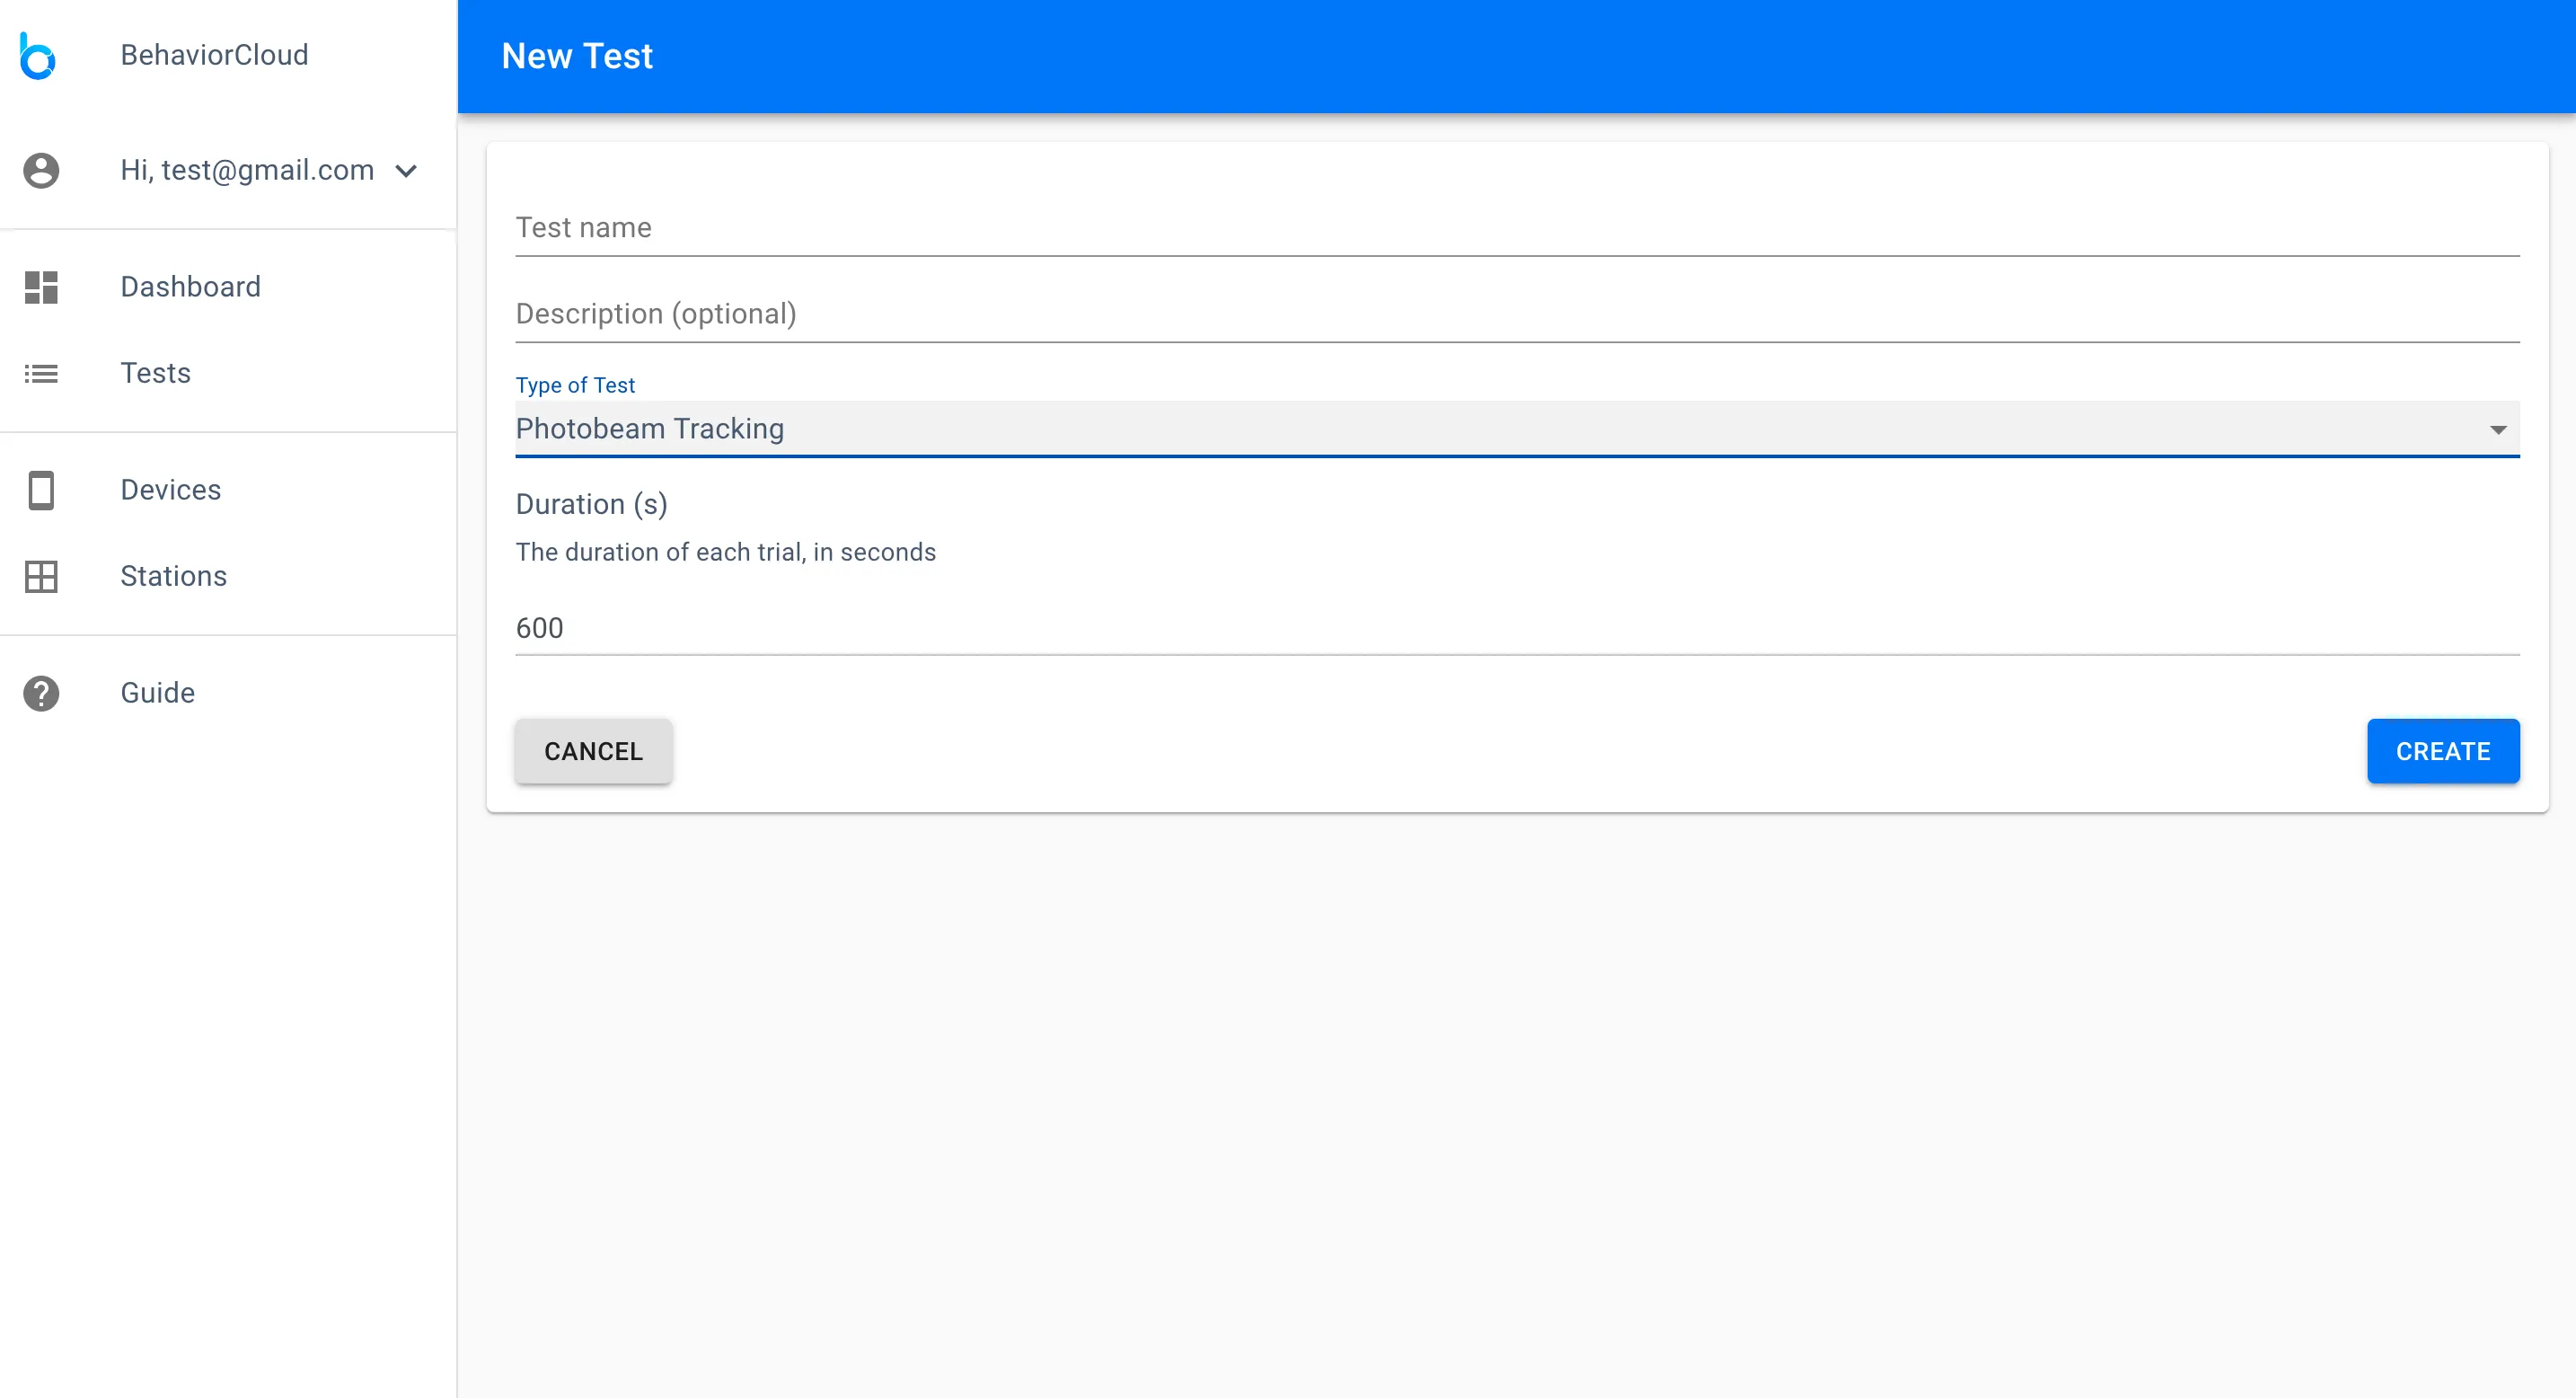
To capture photobeam data, navigate to the Tests page and click Create Test. Enter a name for your test and select Photobeam Tracking from the dropdown menu. Enter a duration for your trials in seconds.
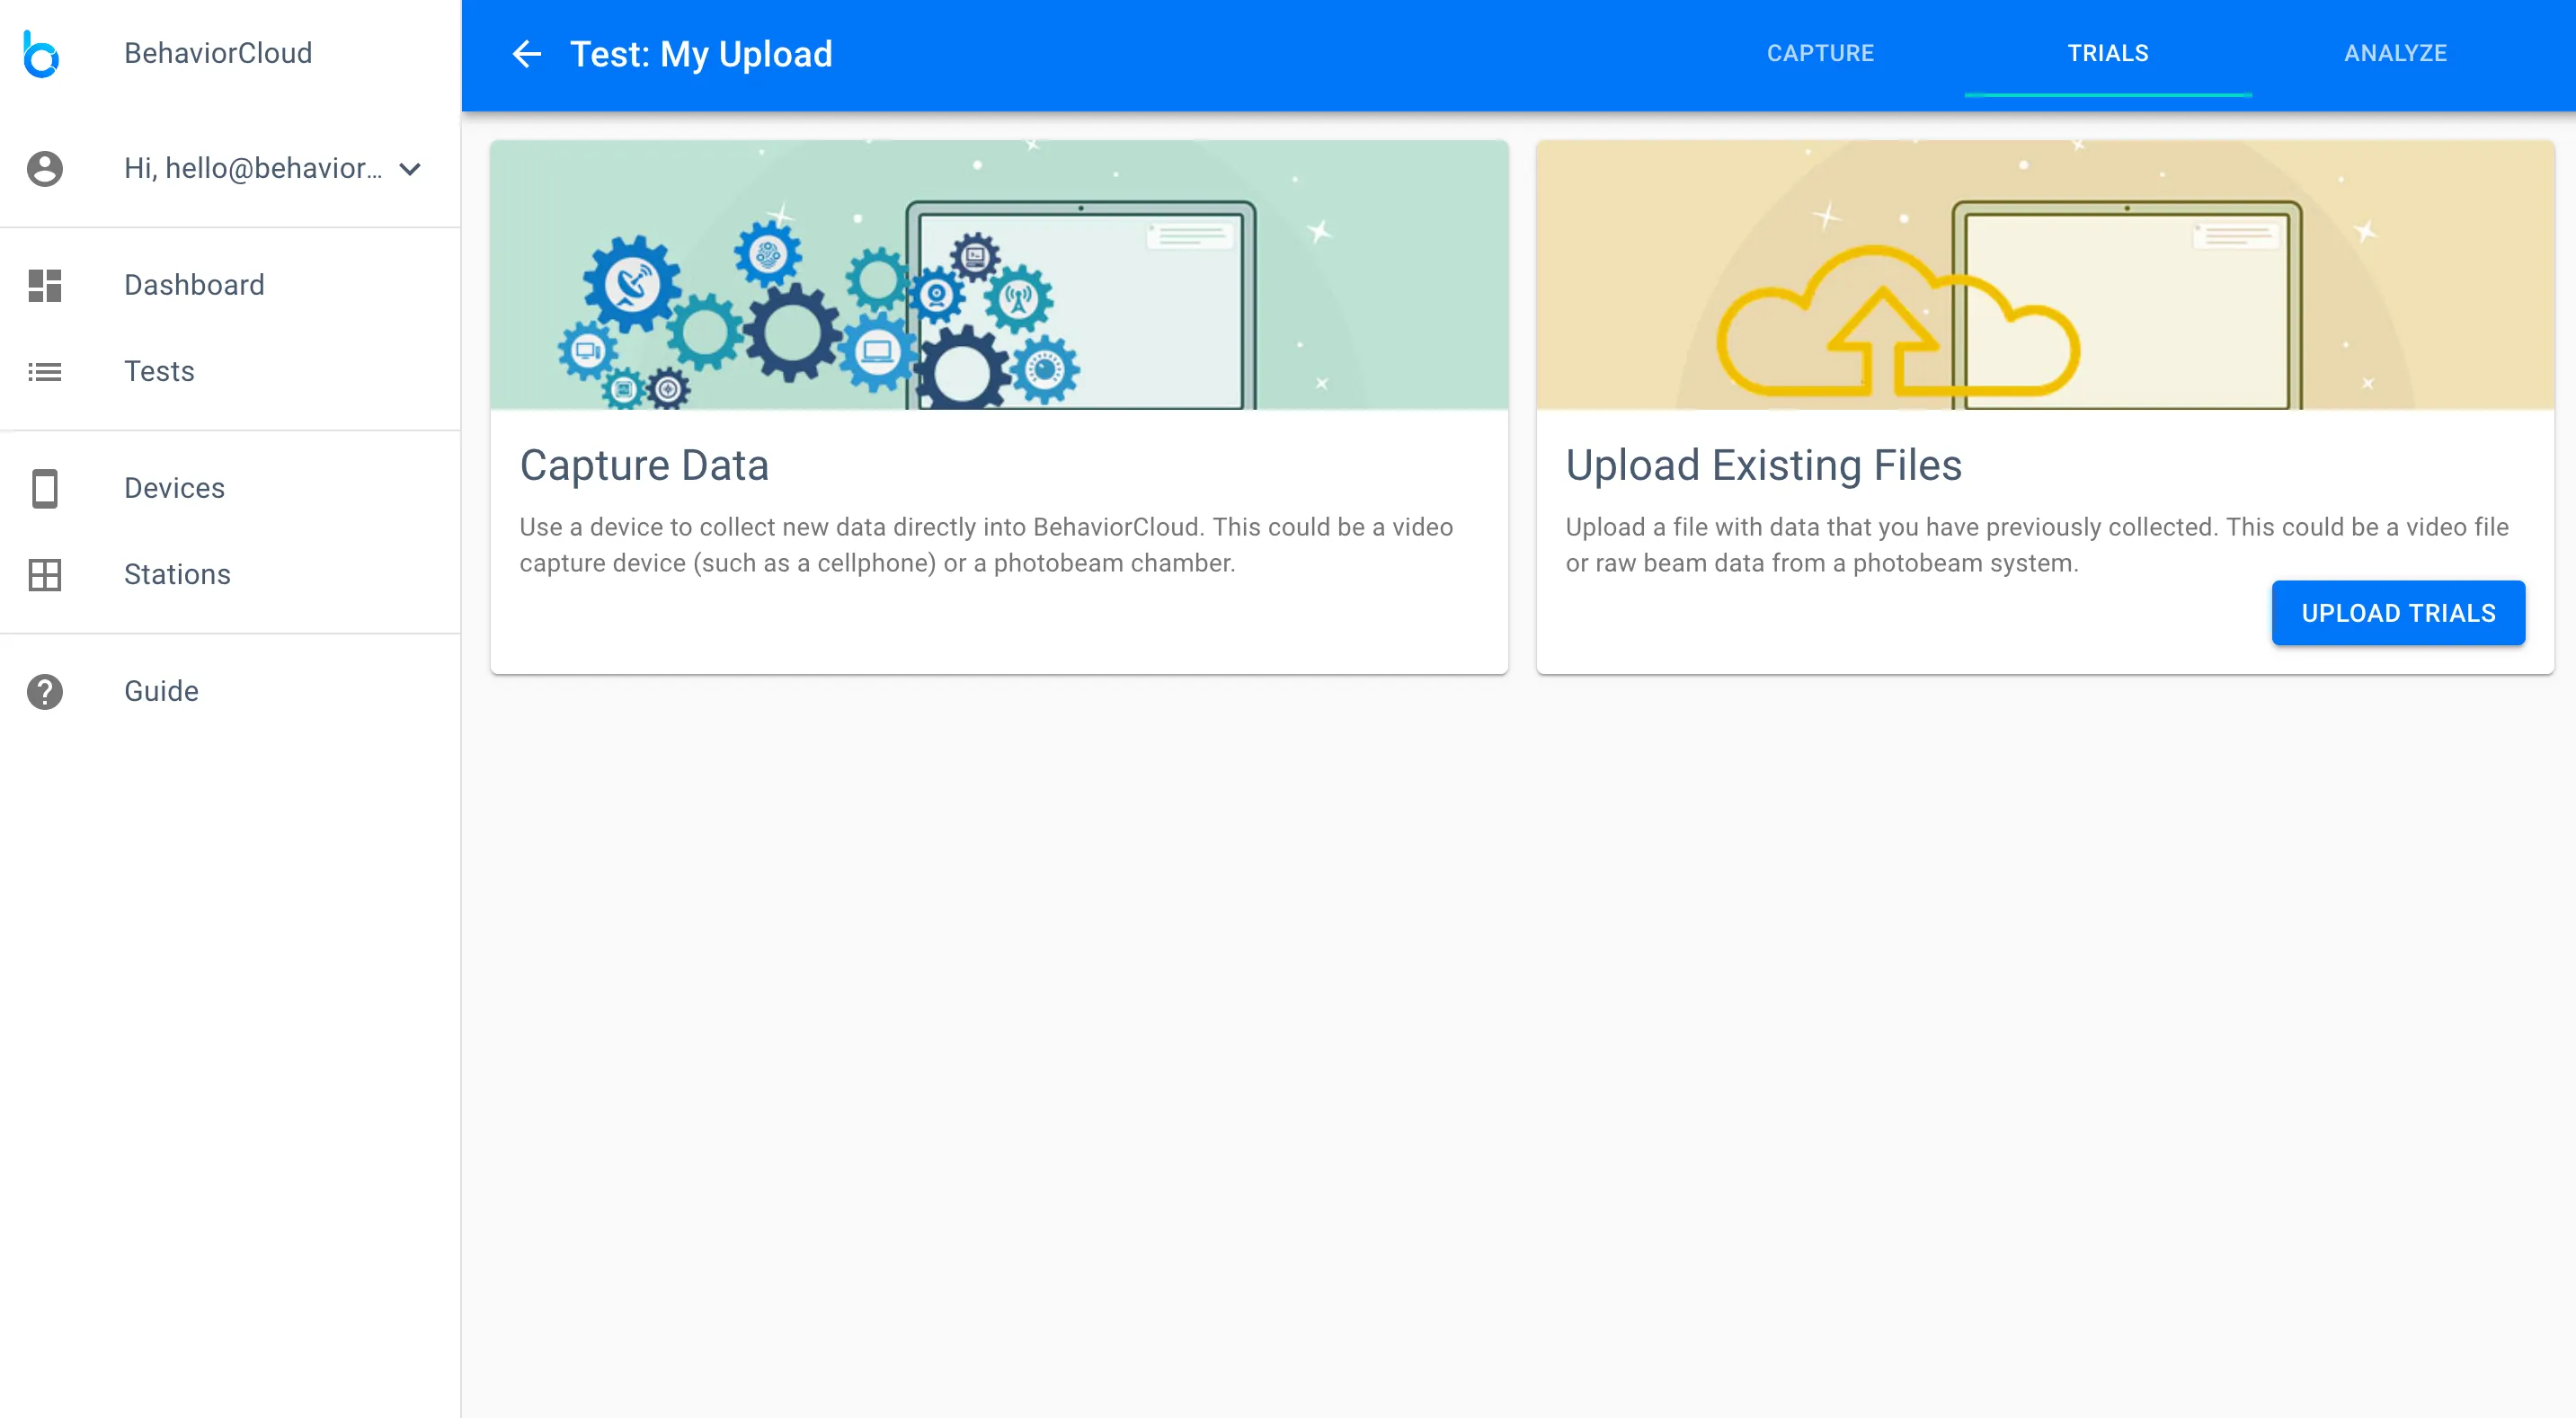
If you have existing video recorded elsewhere, you can upload those files to your BehaviorCloud account for video tracking analysis. Most major video formats are supported, but 4k, HD, or very large files will take time to upload. We recommend transcoding those files to a lower resolution or frame rate to accelerate upload and analysis times. Feel free to get your uploads started and then log out and come back later. Now we’ll walk through how to upload video files.
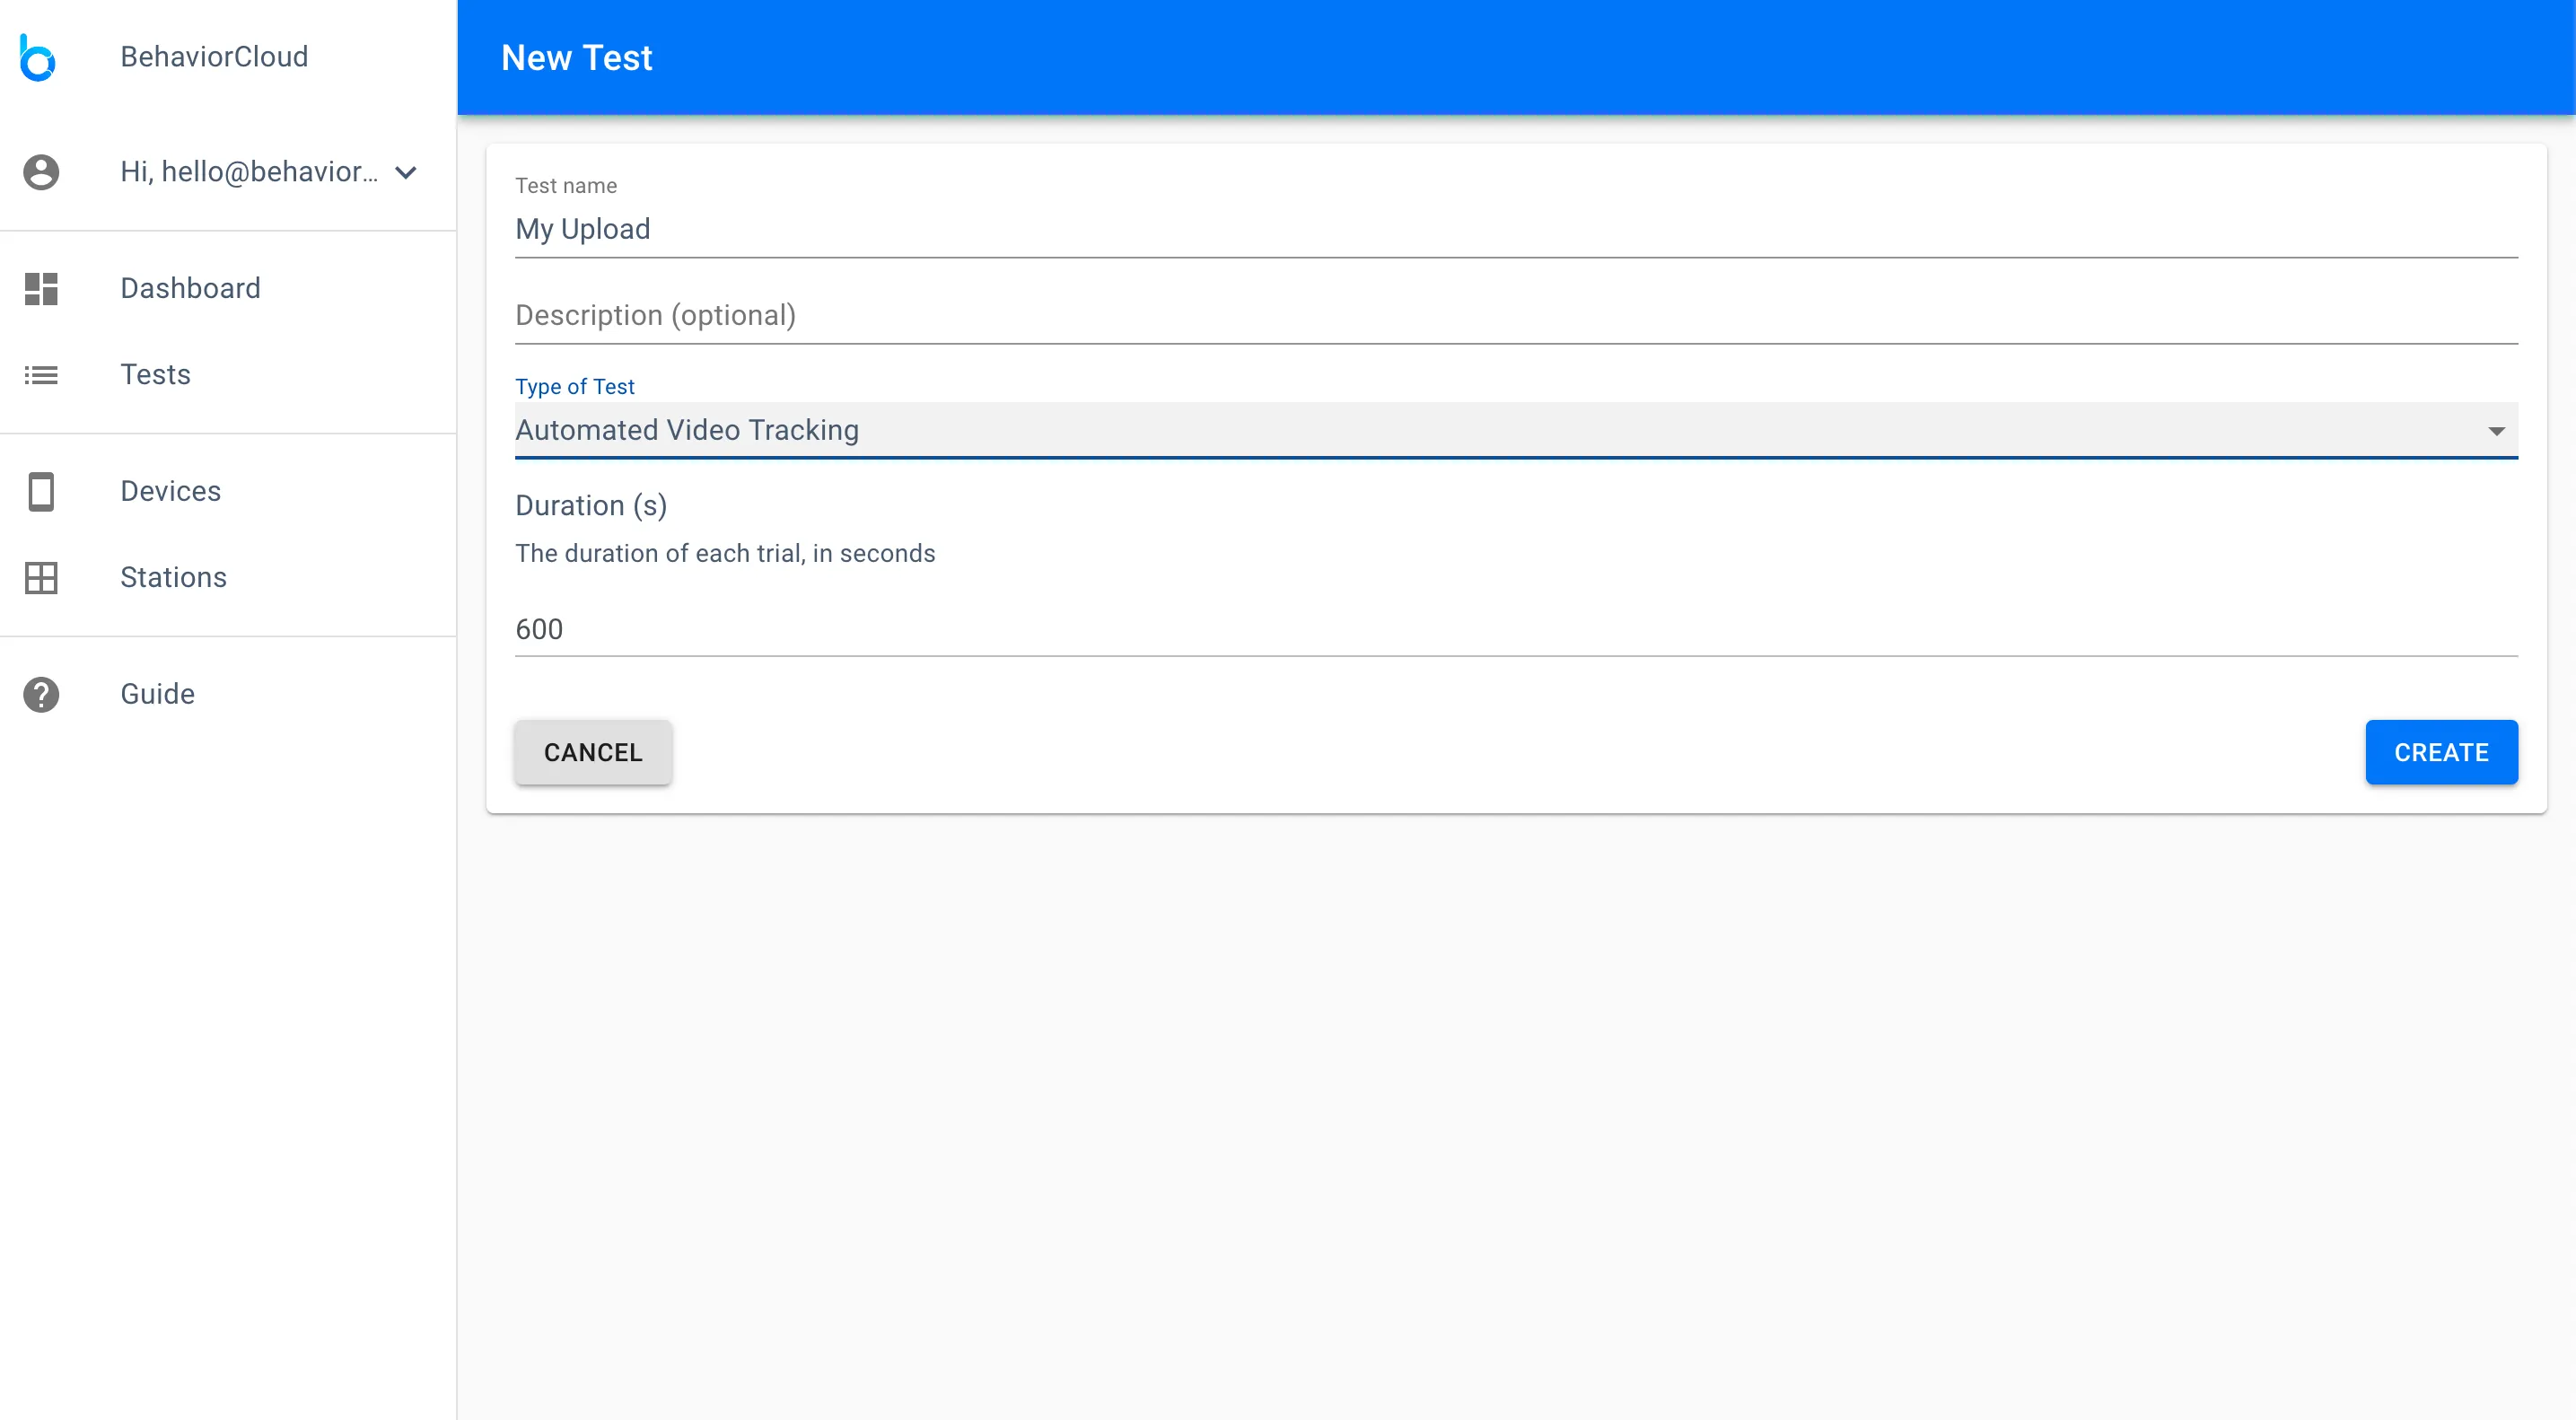
Navigate to the Tests page and click Create Test. Enter a name for your new test and select your primary analysis strategy from the dropdown - either Automated Video Tracking or Manual Scoring. Enter a duration for your trials in seconds.
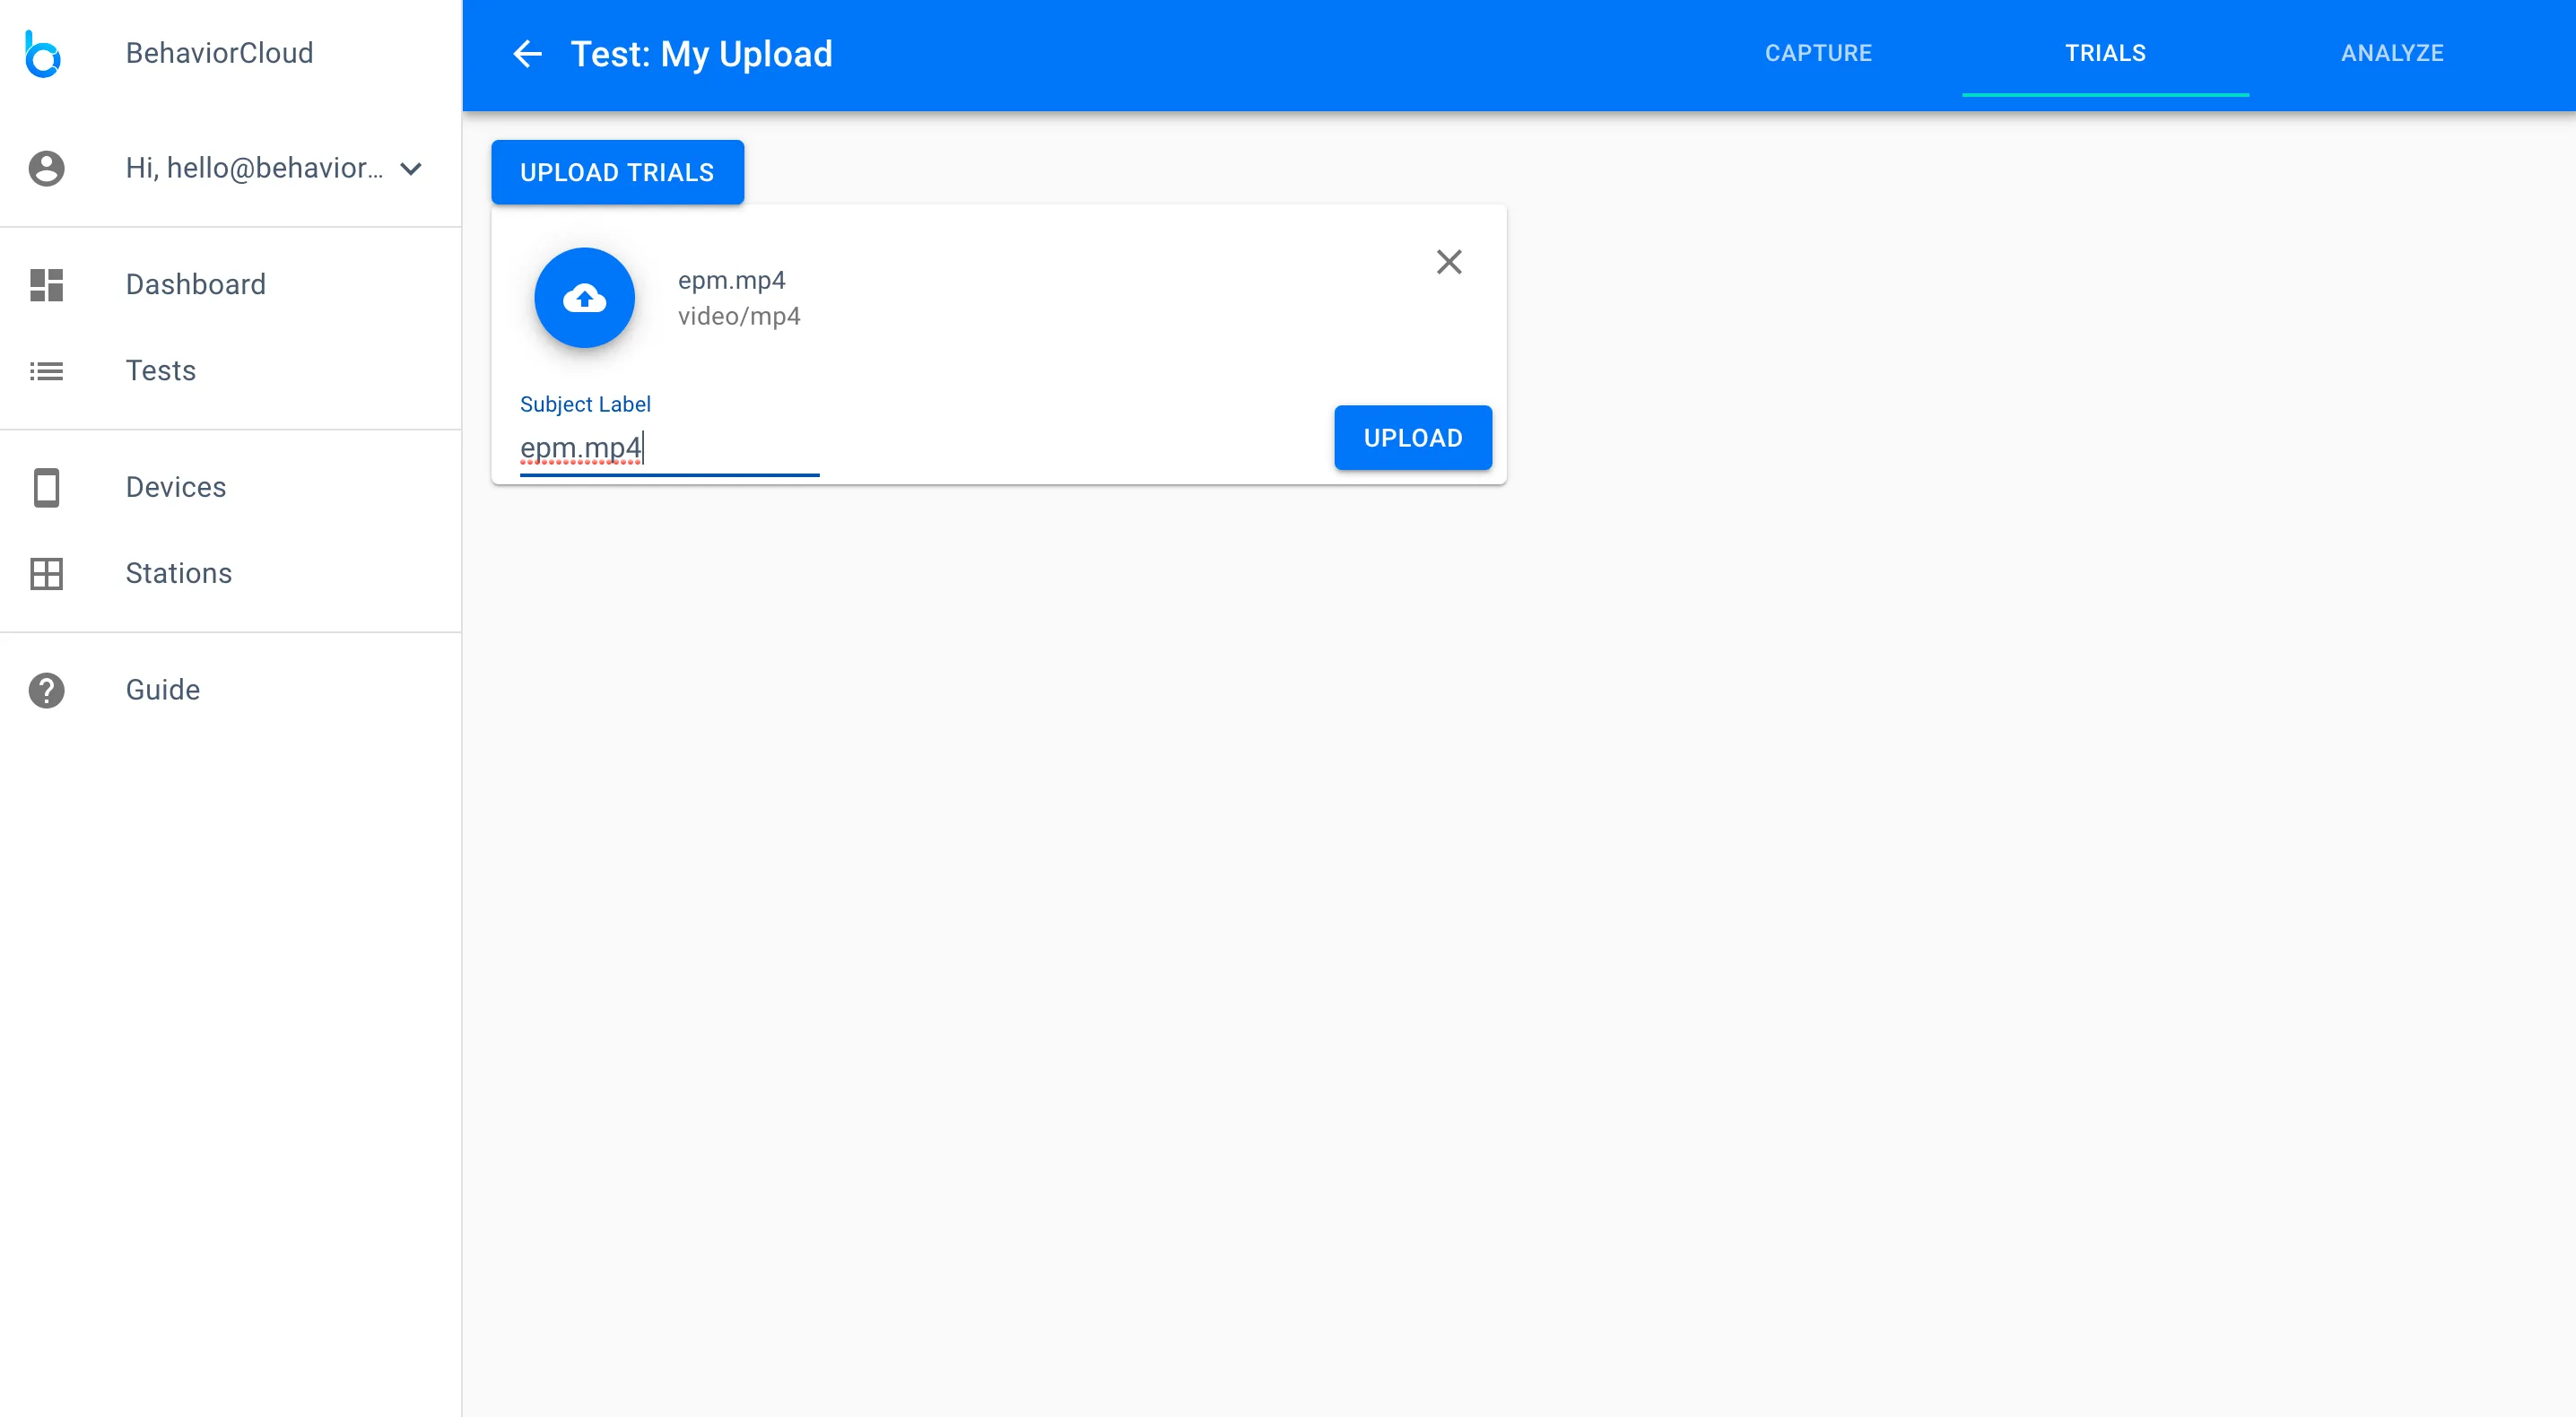
On the next page, click Upload Existing Files and select the files you wish to upload.
Edit the name of your video if desired and click Upload to begin the upload. This may take some time so feel free to log out and come back later. If your videos are very large or high resolution we recommend transcoding them to a lower resolution or frame rate to accelerate upload times.
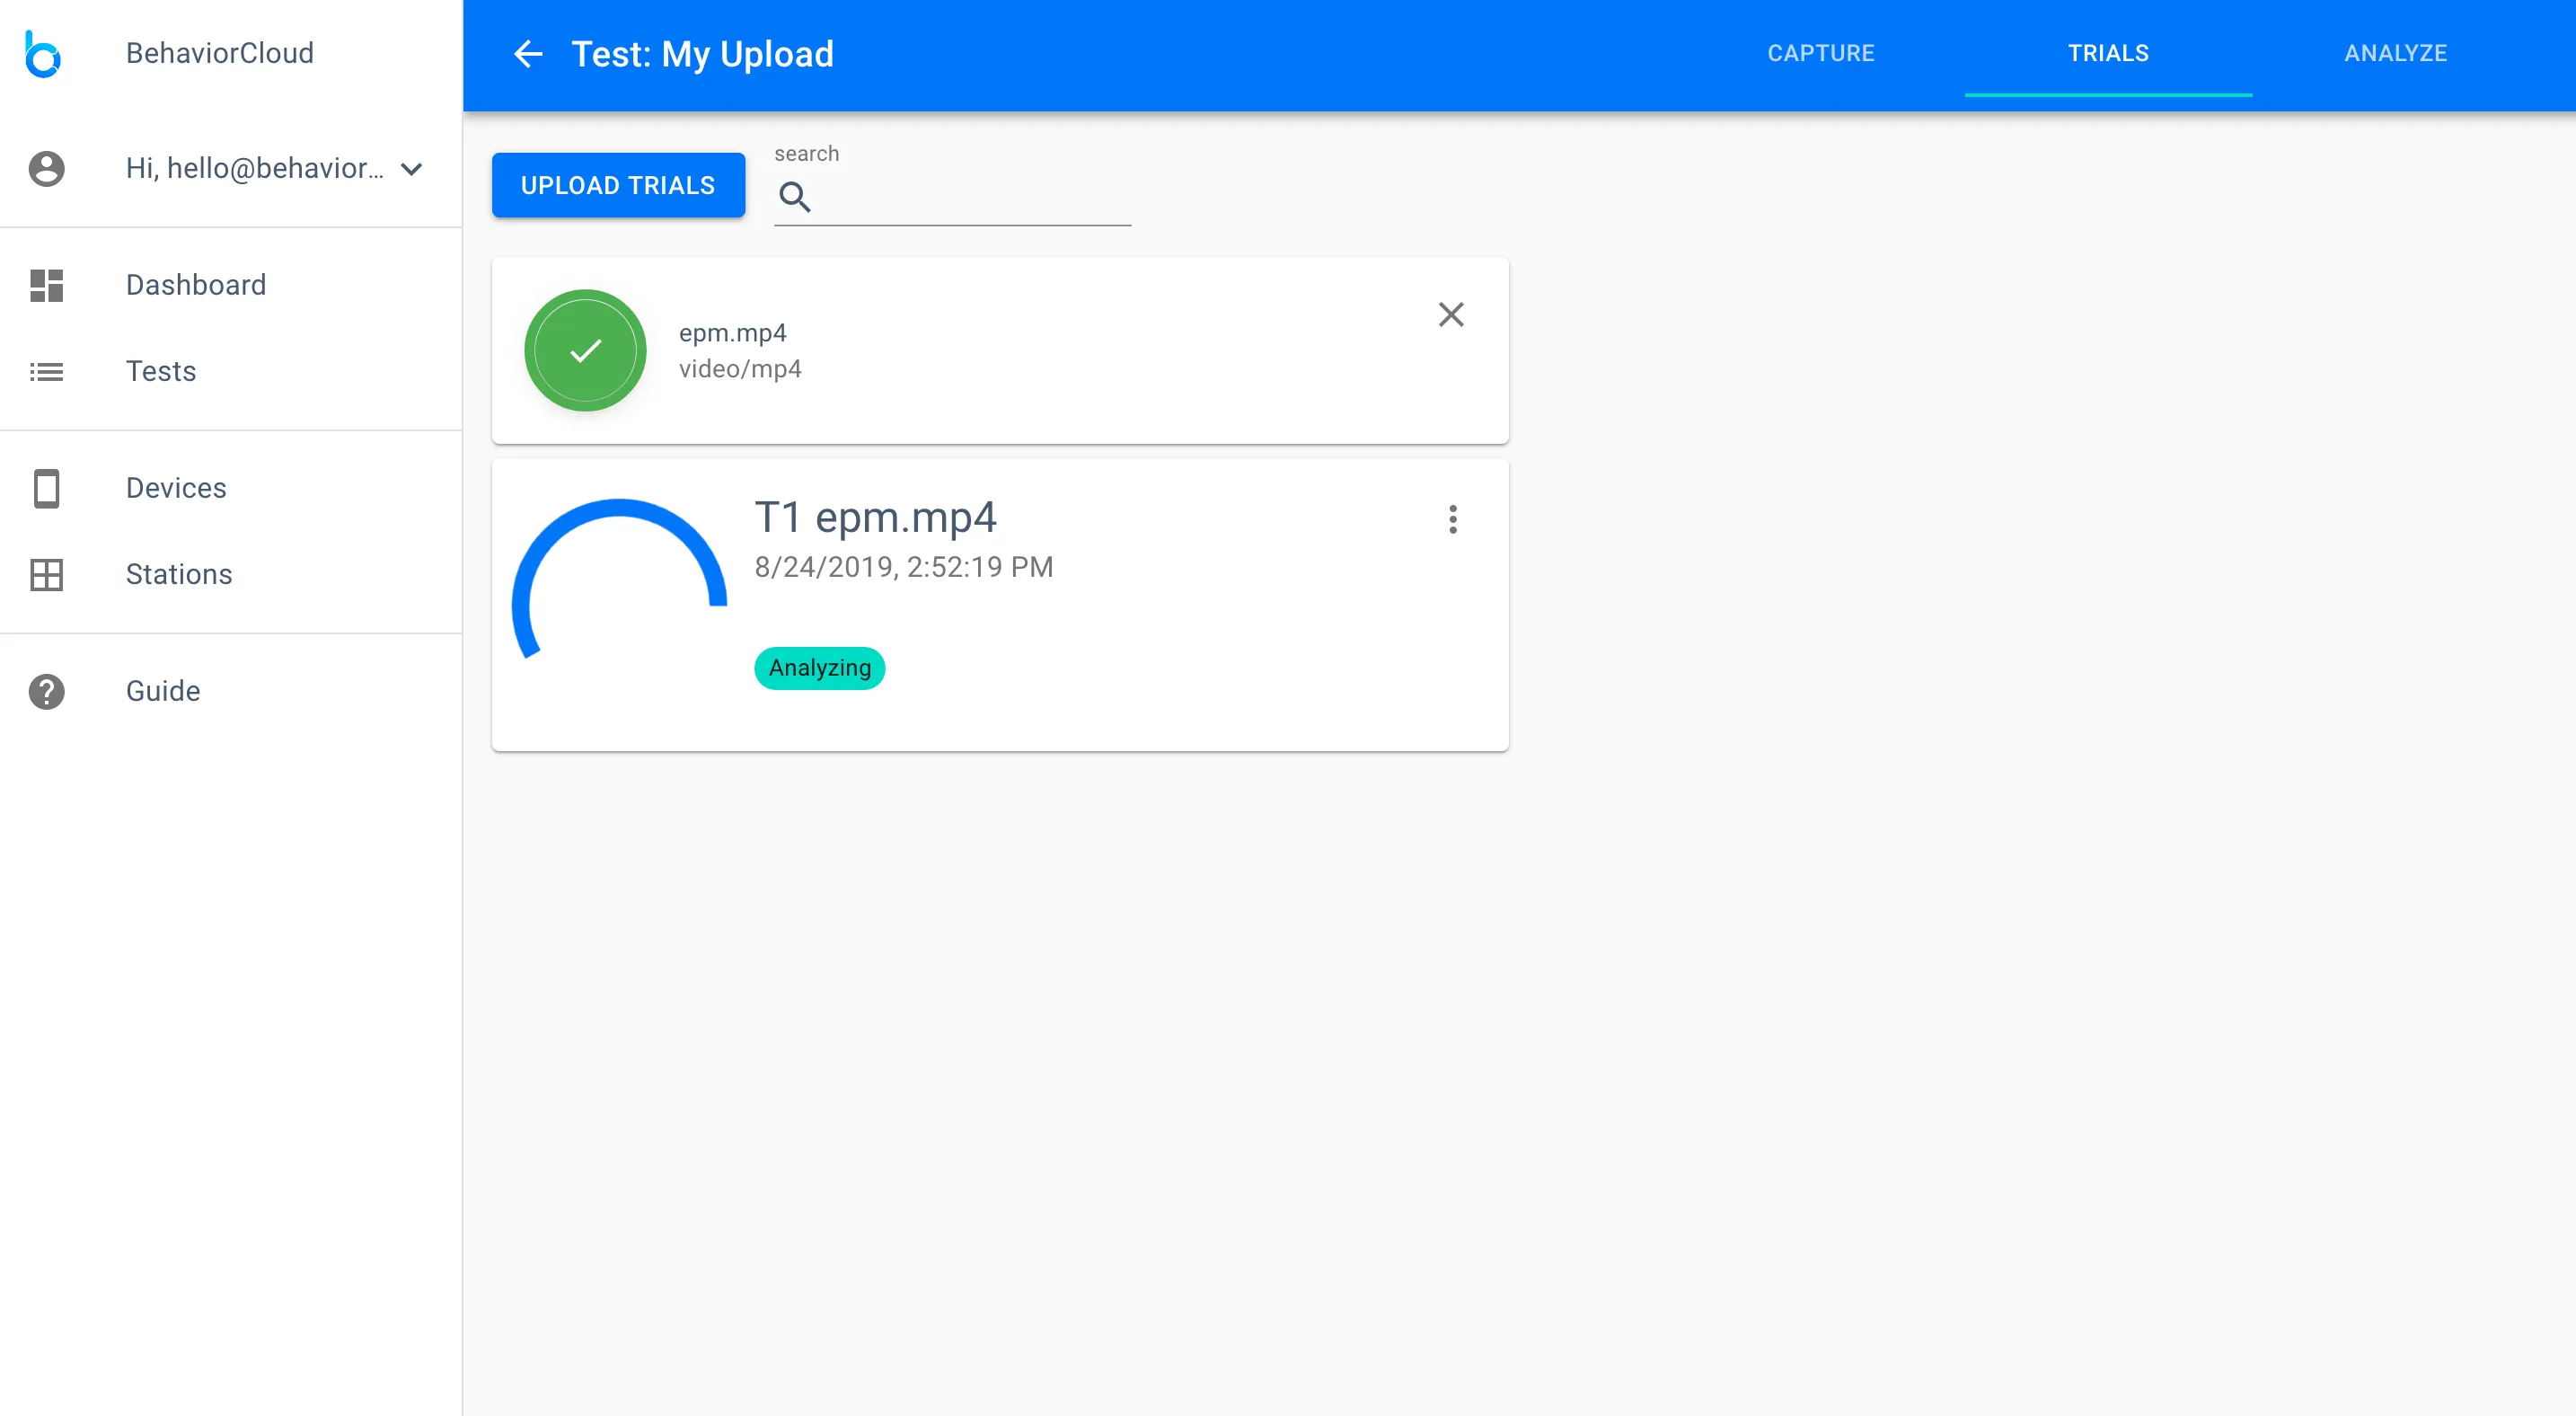
After a file uploads successfully you will see the following screen as the file is automatically converted to a format compatible with BehaviorCloud. Please wait for the file to be converted successfully before proceeding.
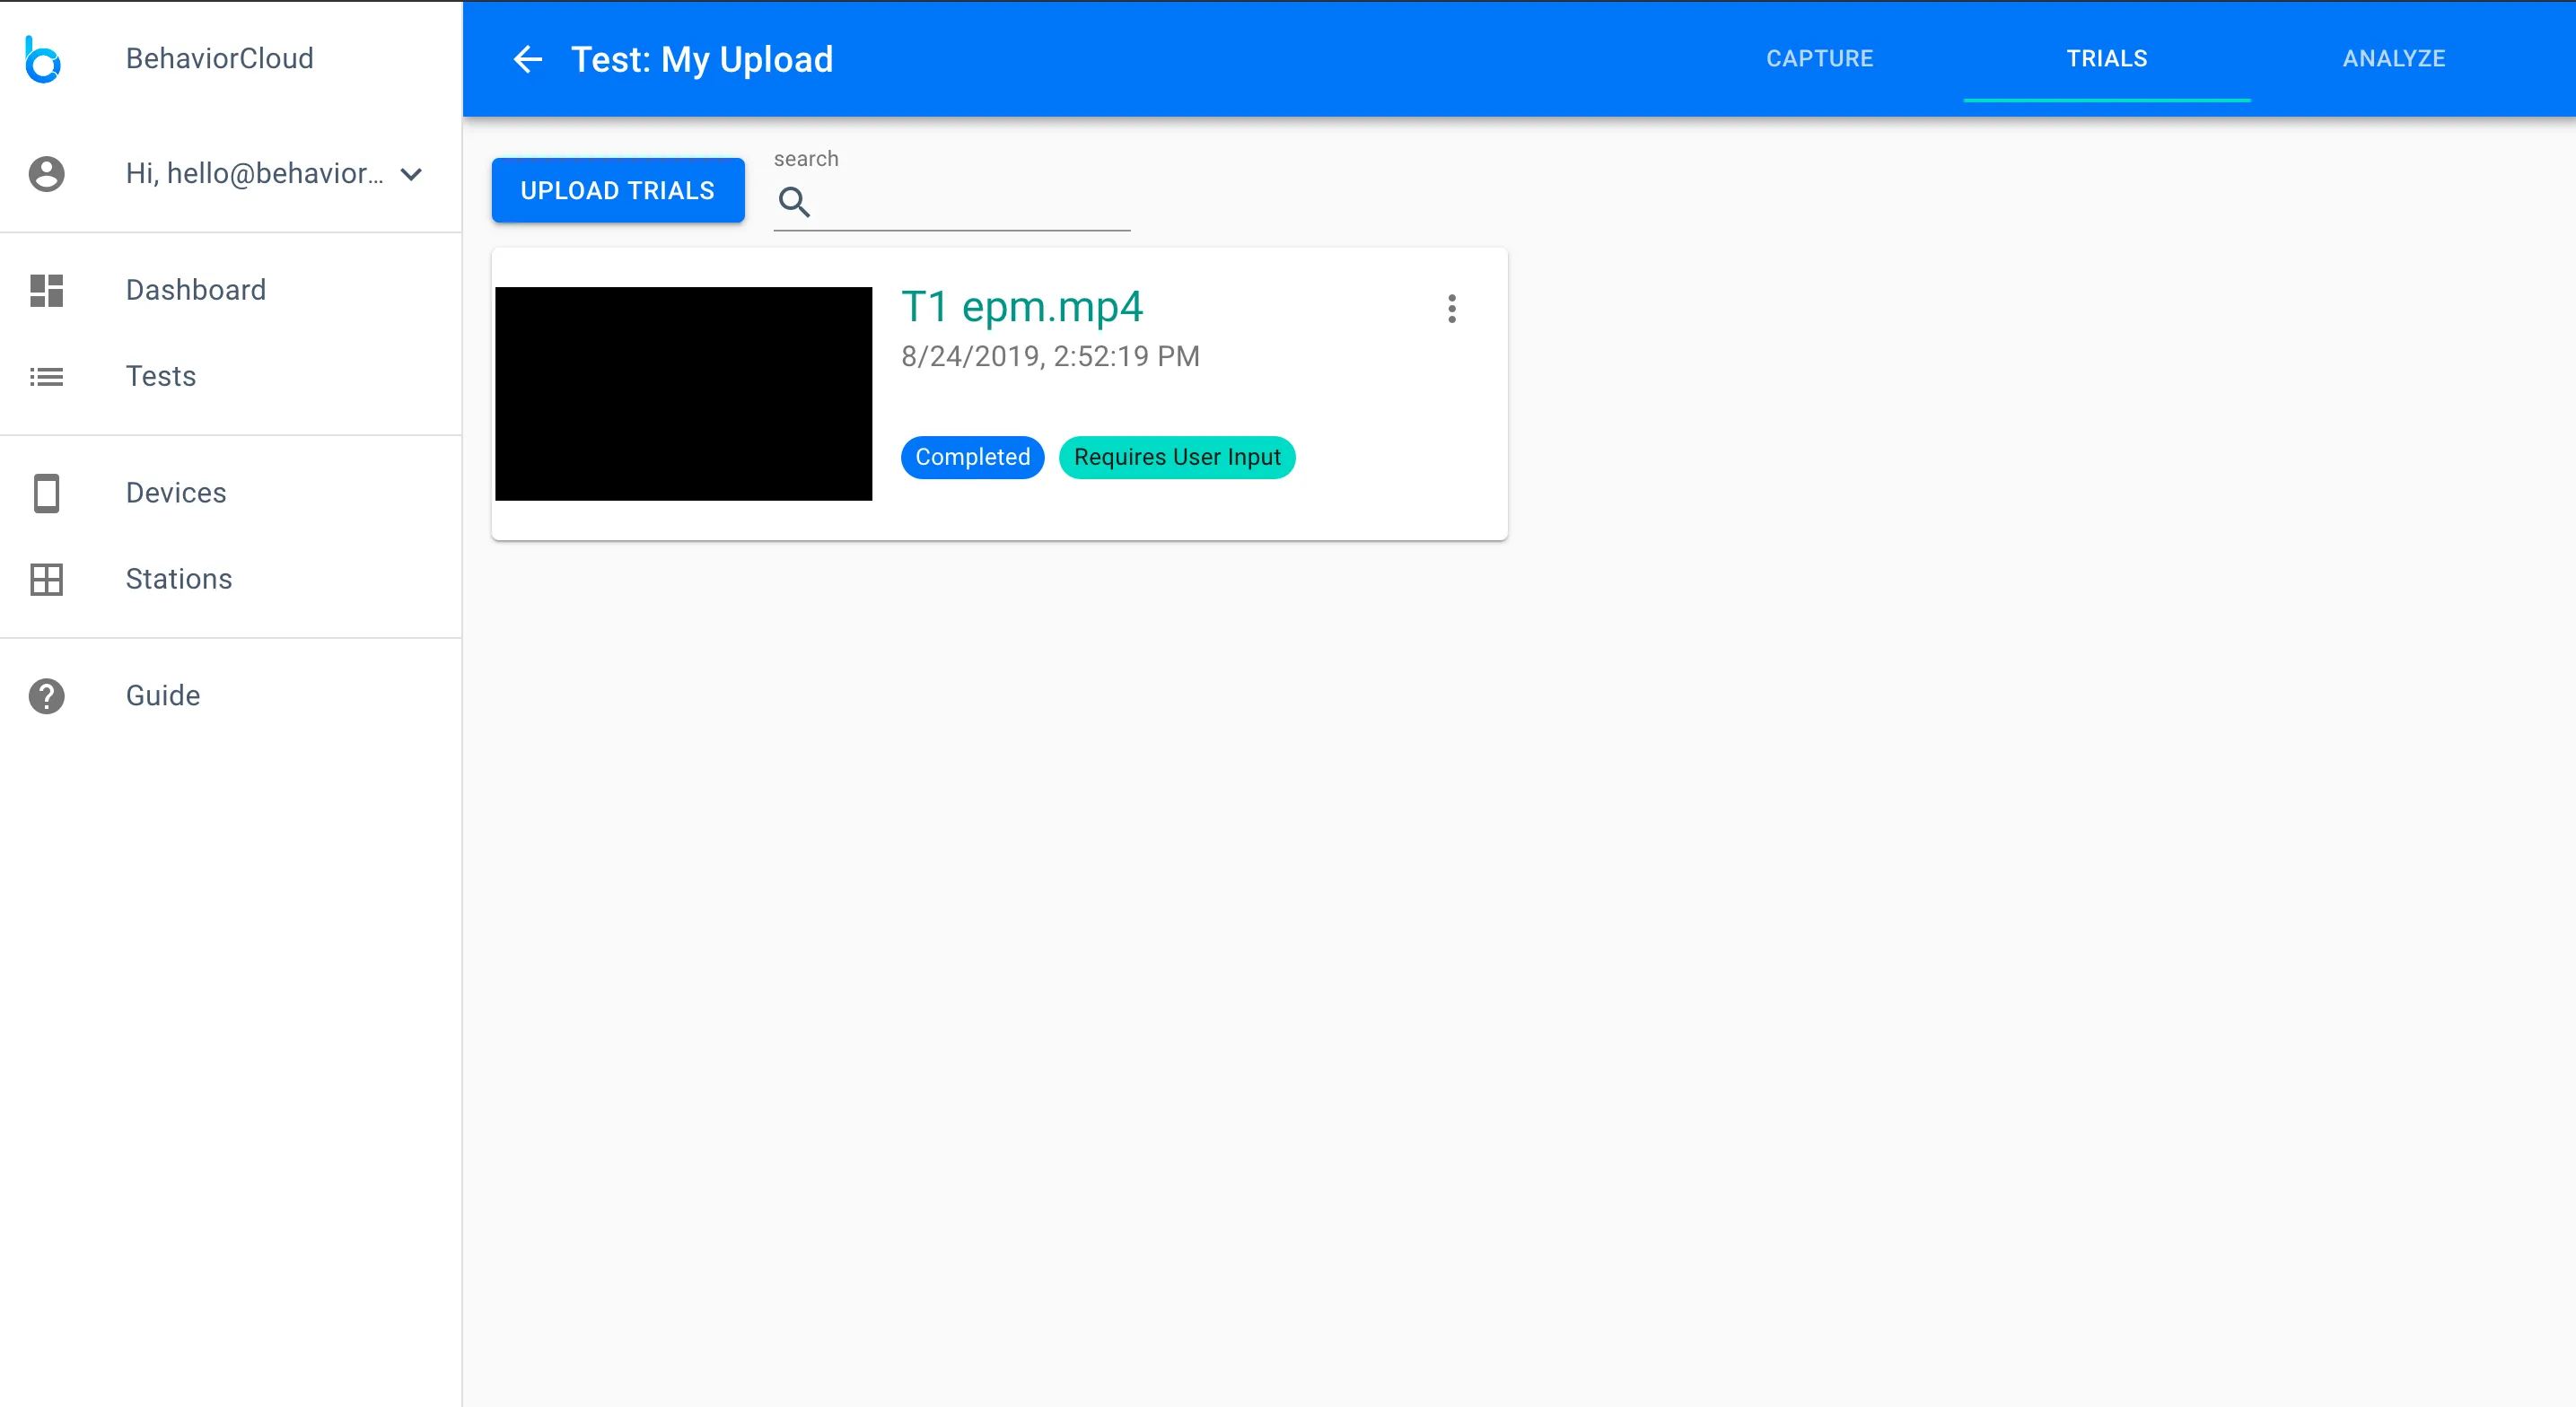
When the upload and conversion process is complete you will see a card representing your video and it will indicate that user input is required. Click into the detail view for your video. Here you will need to set three timepoints so the system knows when the video is cleared (i.e., showing a clean background image with no subjects, shadows, or other movements), when the trial starts, and when the trial ends. Clearing the arena is critical to obtain the best possible automatic video tracking, but it is not critical for manual scoring experiments. Click Save and Finalize when you are finished.
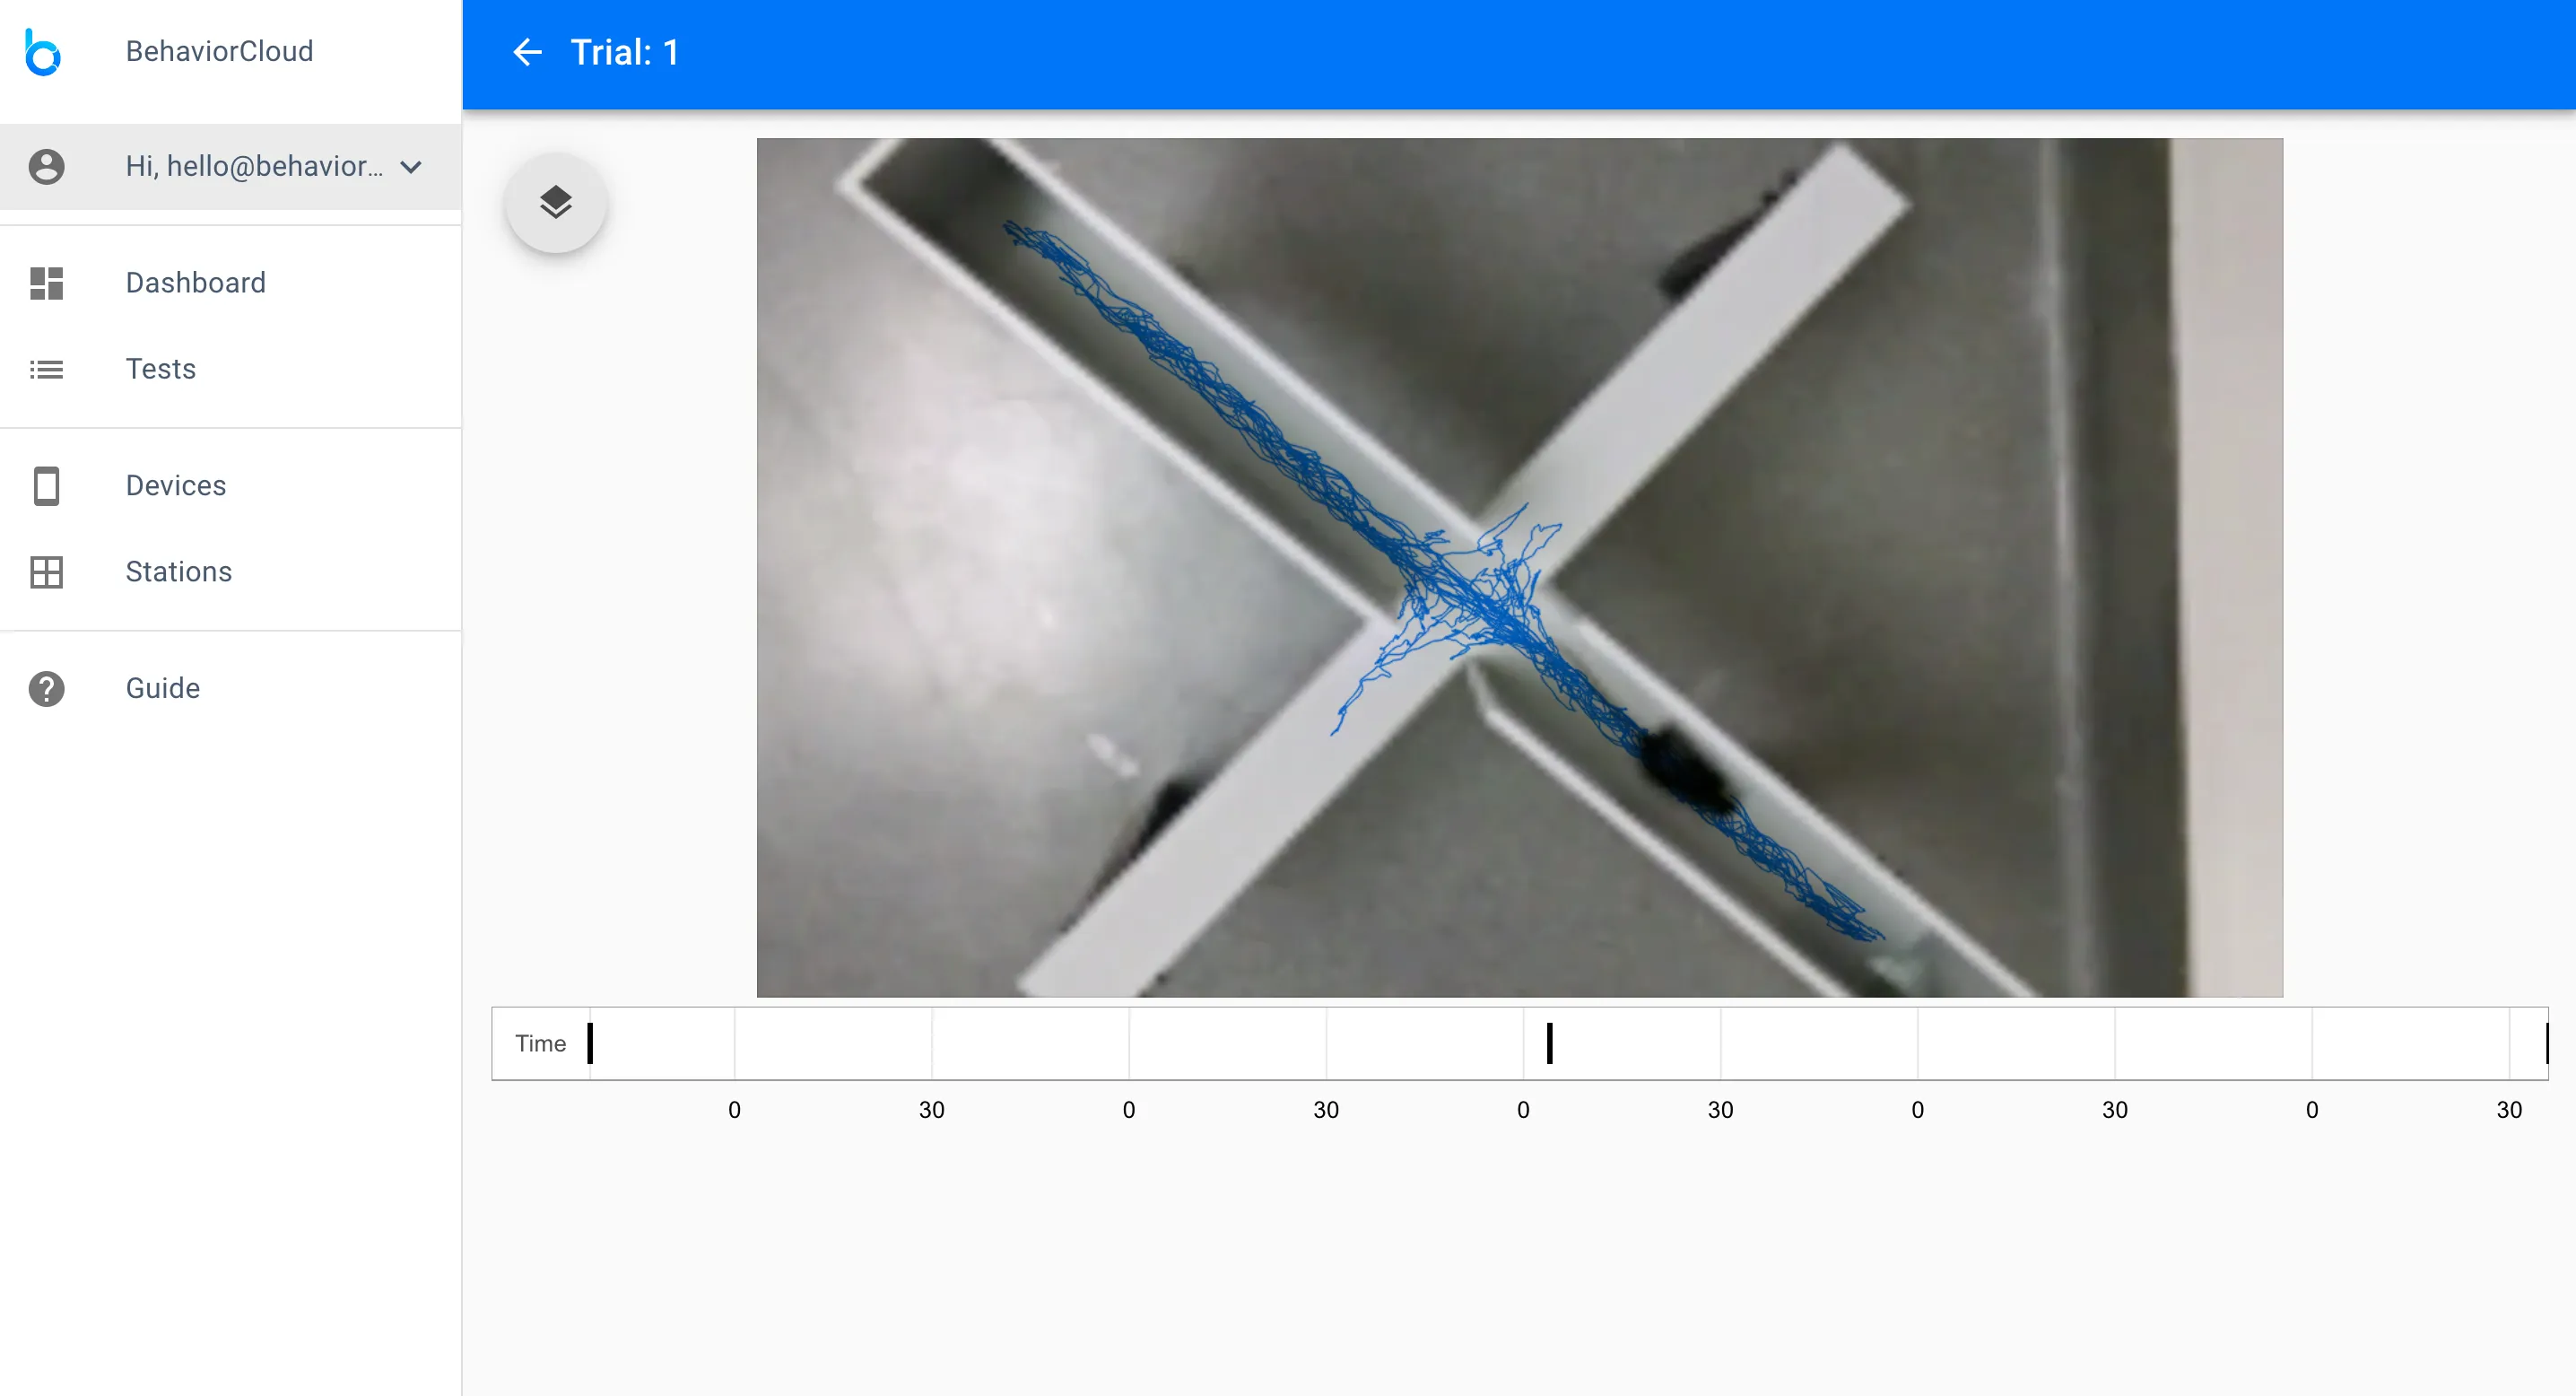
After you have captured or uploaded data, all of your trials can be viewed on the Trials tab of your Test. By clicking on one of your trials, you can access a detail view that will allow you to add additional information such as distance calibration, tracking boundary, zone map, and manual scoring data. At present this mainly applies to video data.
In the detail view for one of your trials, click the overlay icon and then click on the pencil icon next to Calibration.
Drag the line to represent a length of known distance and enter that measure in centimeters in the lefthand menu. Click Save. You will be asked if you would like to apply this calibration to any other trials. If you have run multiple trials using the same environment you can use this function to quickly select all of those trials and apply your calibration across all of them.
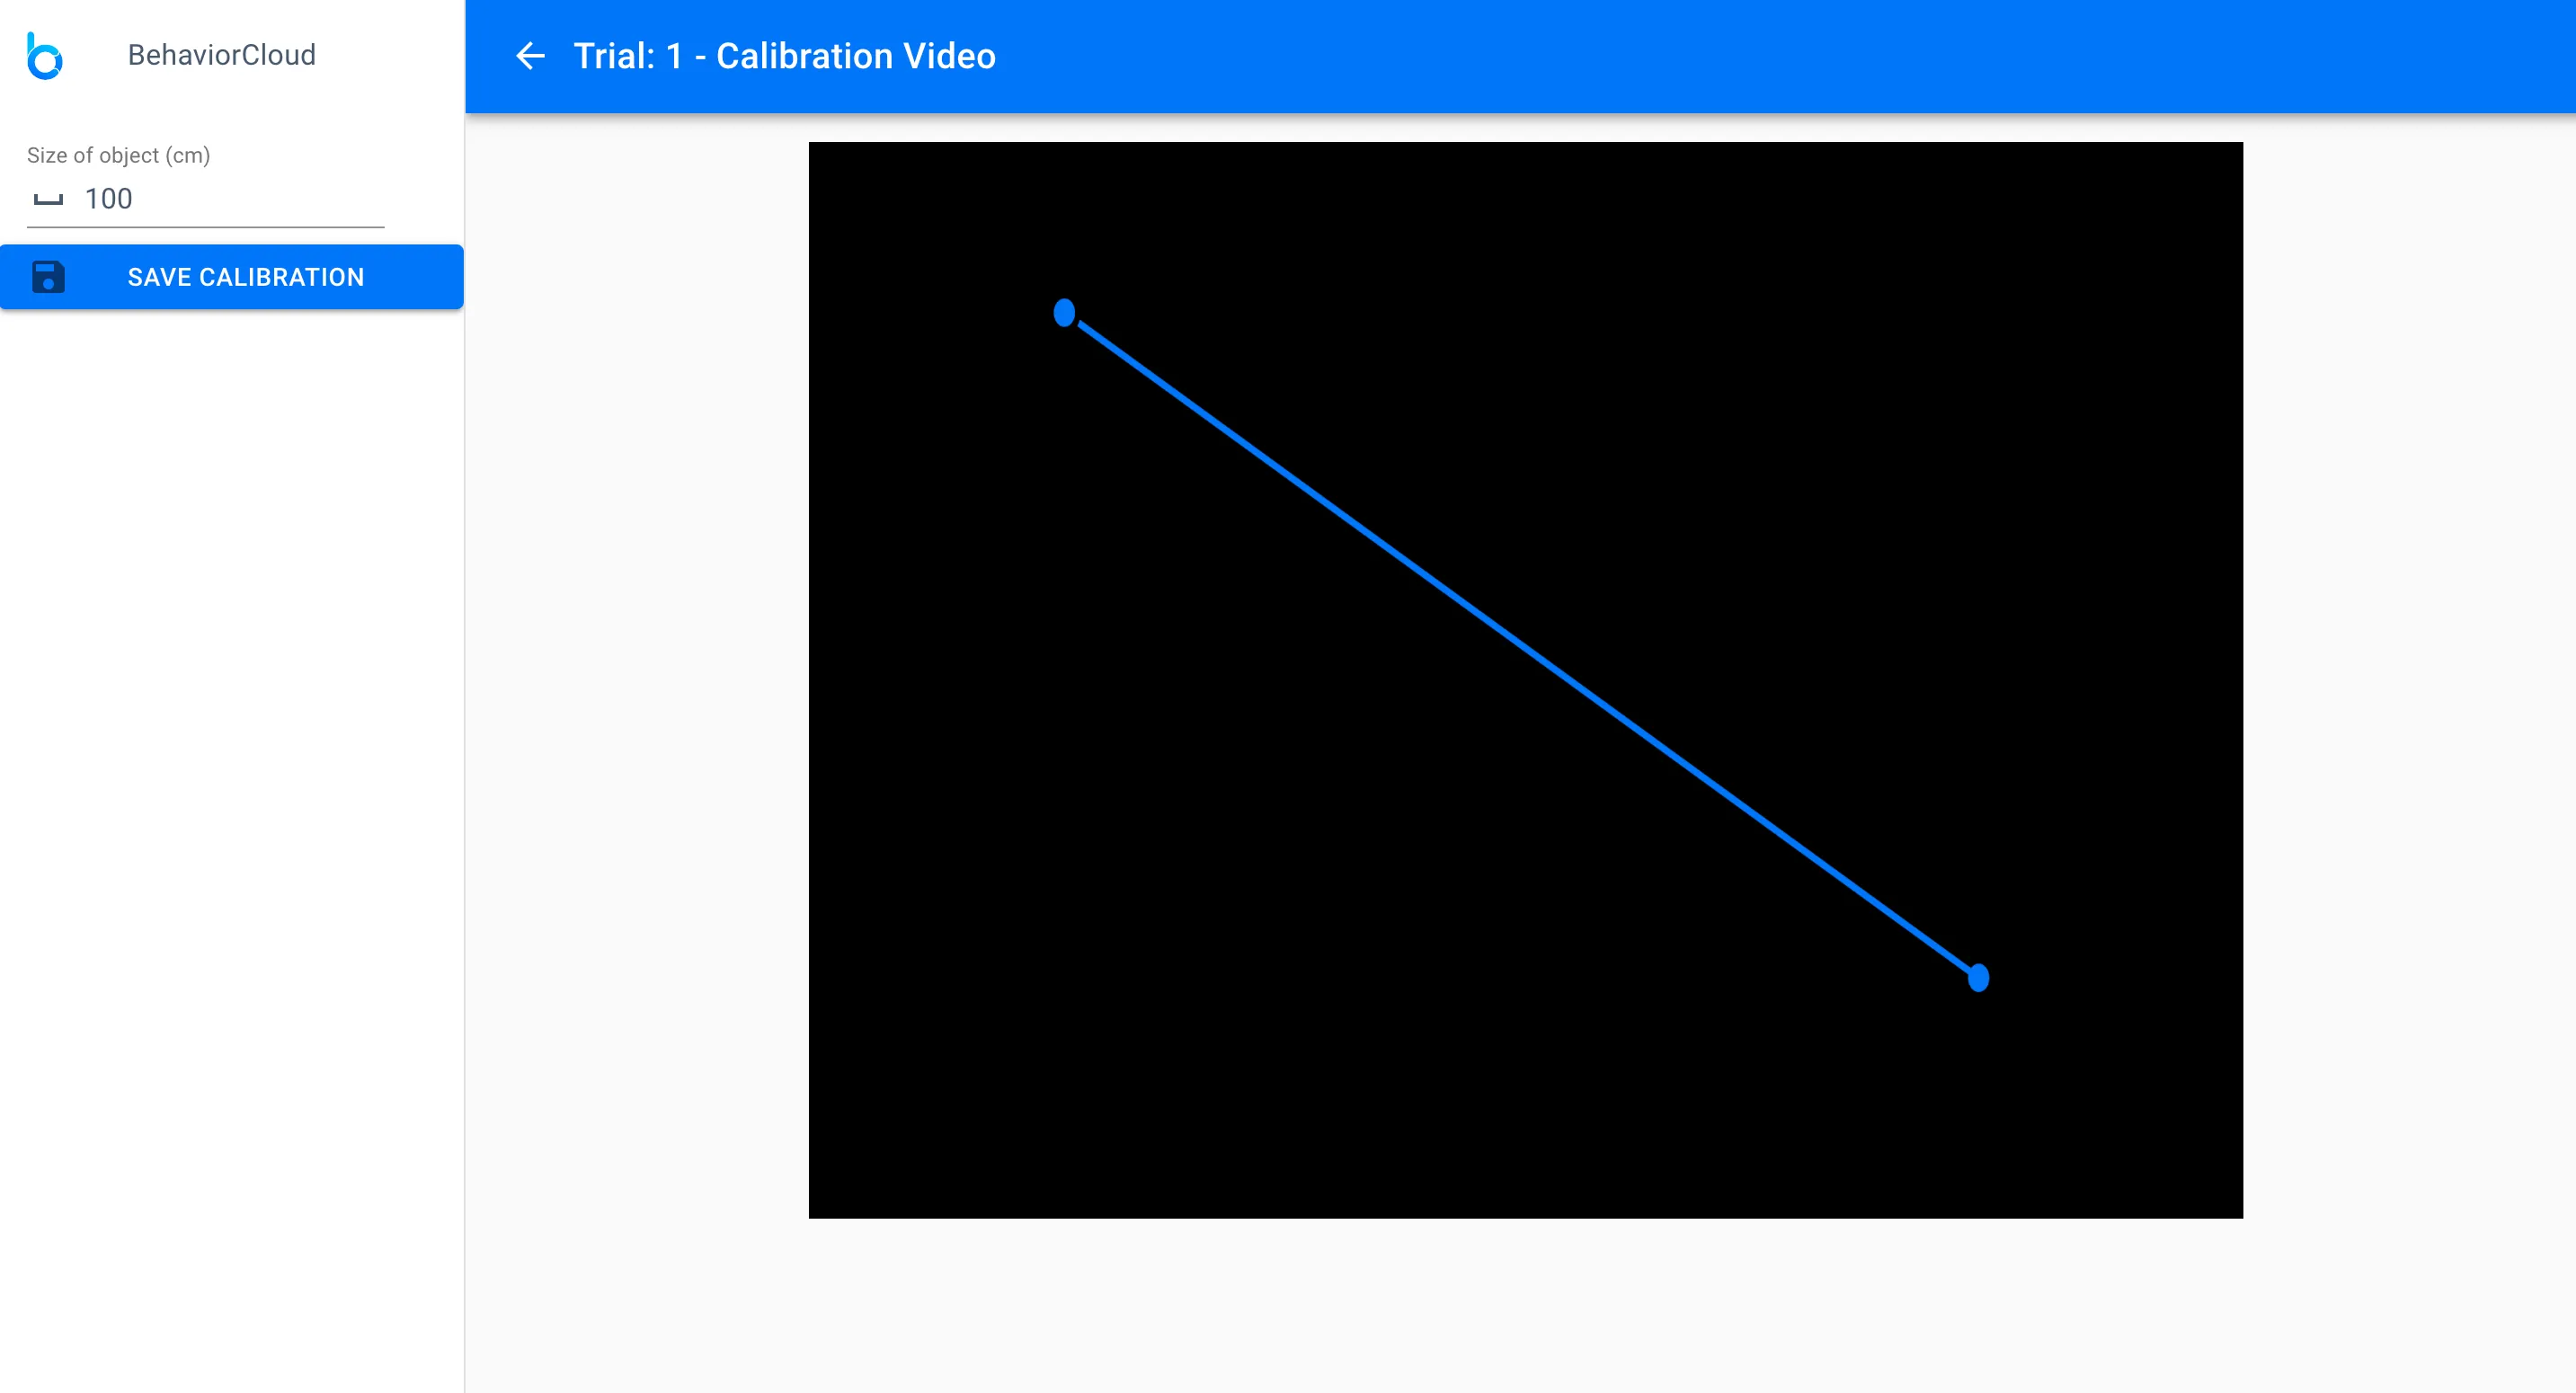
The calibration that you set will be used for downstream analysis if you intend to use BehaviorCloud to calculate distance traveled, velocity, etc. (described in more detail below).
Back on the trial detail view, click the pencil icon next to Tracking Boundary. The tracking boundary is important for automated video tracking analysis because it tells the system what areas of the video frame to use for tracking analysis vs. what areas to exclude. This is especially important if there are other subjects or people moving around in the areas adjacent to the maze/cage you are tracking.
![]()
Use the provided shape tools to cover the area you would like to track. Anything outside of this will be excluded from the automated video tracking analysis. Click save and then apply to other trials if desired.
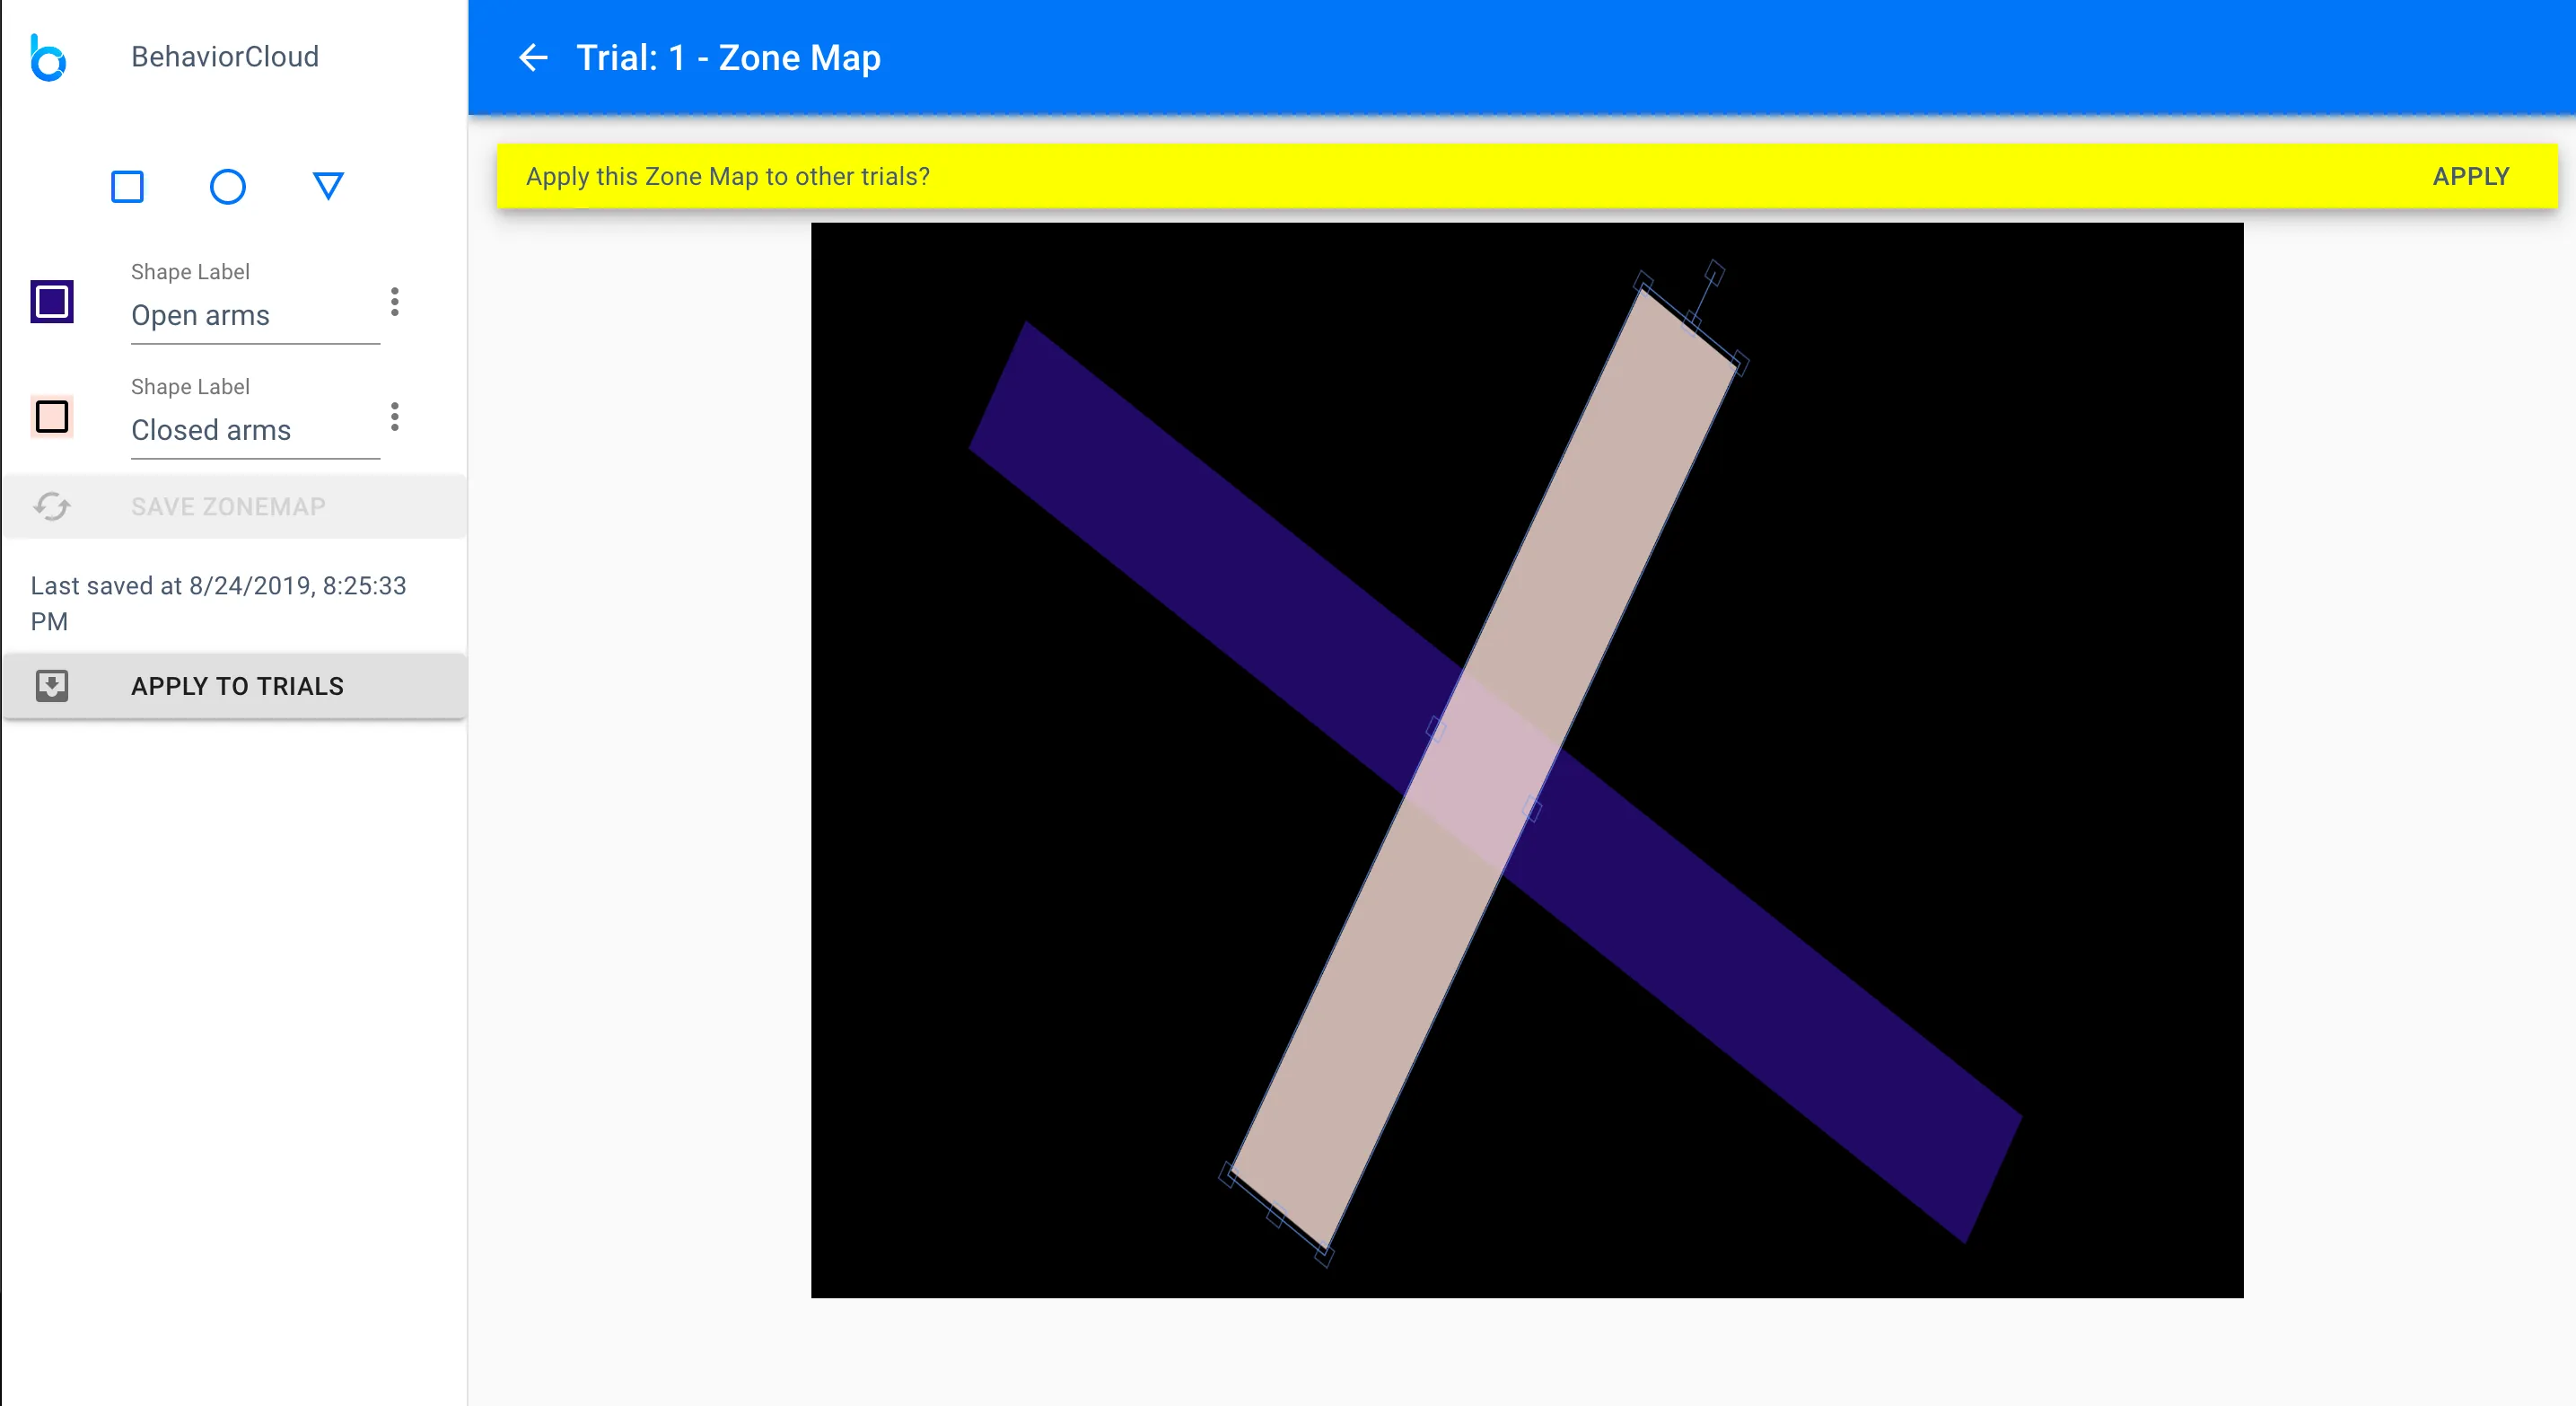
Similar to the tracking boundary, the zone map is used for automated video tracking analysis to distinguish certain areas of a maze or cage for independent analysis. In the zone map view, use the provided shape tools to cover the areas you would like to set as zones. Name your zones if desired. These names will be carried through to the analyzed results ouput by BehaviorCloud. Click save and then apply to other trials if desired.
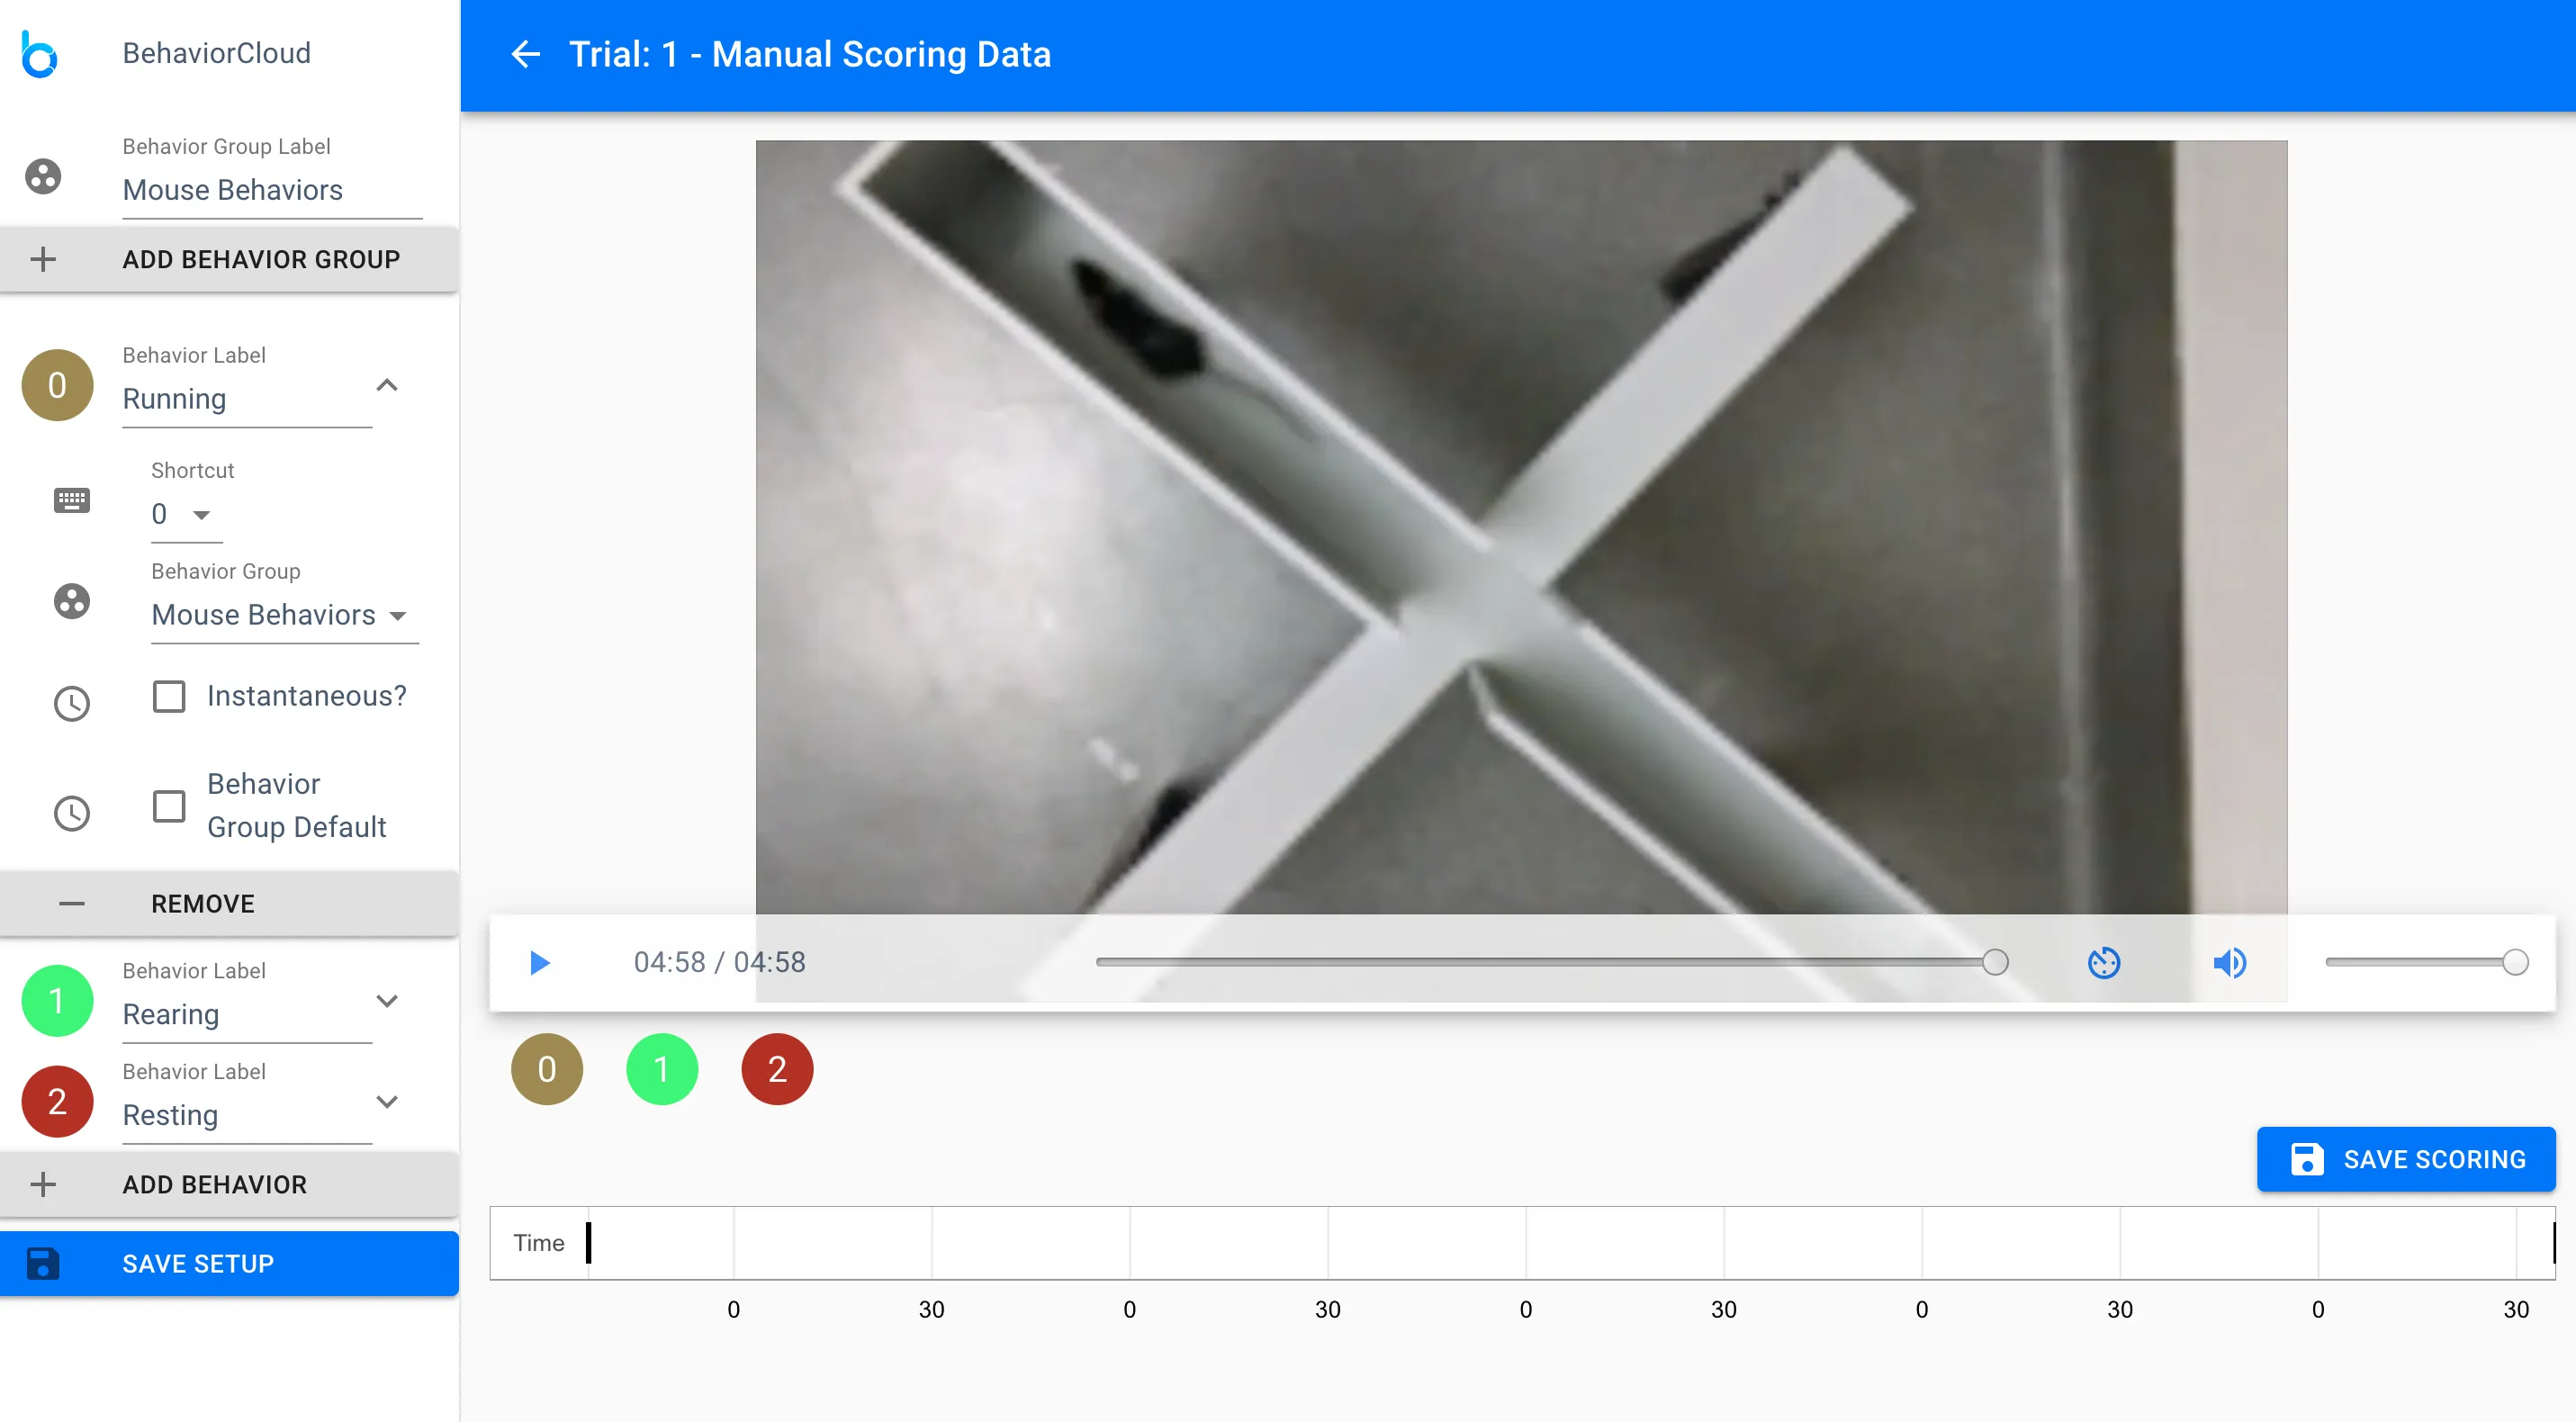
Manual scoring data can be added to any trial from the trial detail view. Click the pencil icon next to Manual Scoring from the overlay icon. In this view, you will see a playback of your video and options on the left to set up the behaviors you wish to score. Use the Add Behavior group to list each behavior you wish to score. Each behavior will get a default keyboard shortcut, which you can change as desired by opening the detail drawer for that behavior. By default, all behaviors are timed but you can select the checkbox to set any behaviors to instantaneous events as needed.
Timed behaviors have a duration, such as running or resting. Instantaneous behaviors are counted events, such as fecal boli.
You can also add individual behaviors to groups to indicate mutually exclusive behaviors. This will allow you to toggle between different behaviors while scoring and the system will automatically end one behavior when another begins. By default, each behavior will operate as an on/off switch and you will need to select a given behavior once to turn it on and a second time to turn it off while you are scoring. When you are finished setting up your manual scoring options, click Save to continue.
By default your scoring options will be made available for all trials in a test once you set them up for the first time.
Now you are ready to manually score a trial. Play the video and select behaviors by clicking the shortcut icons on the screen or by using your keyboard shortcuts. Your work will be recorded in the timeline view below the video. Click Save Scoring when finished.
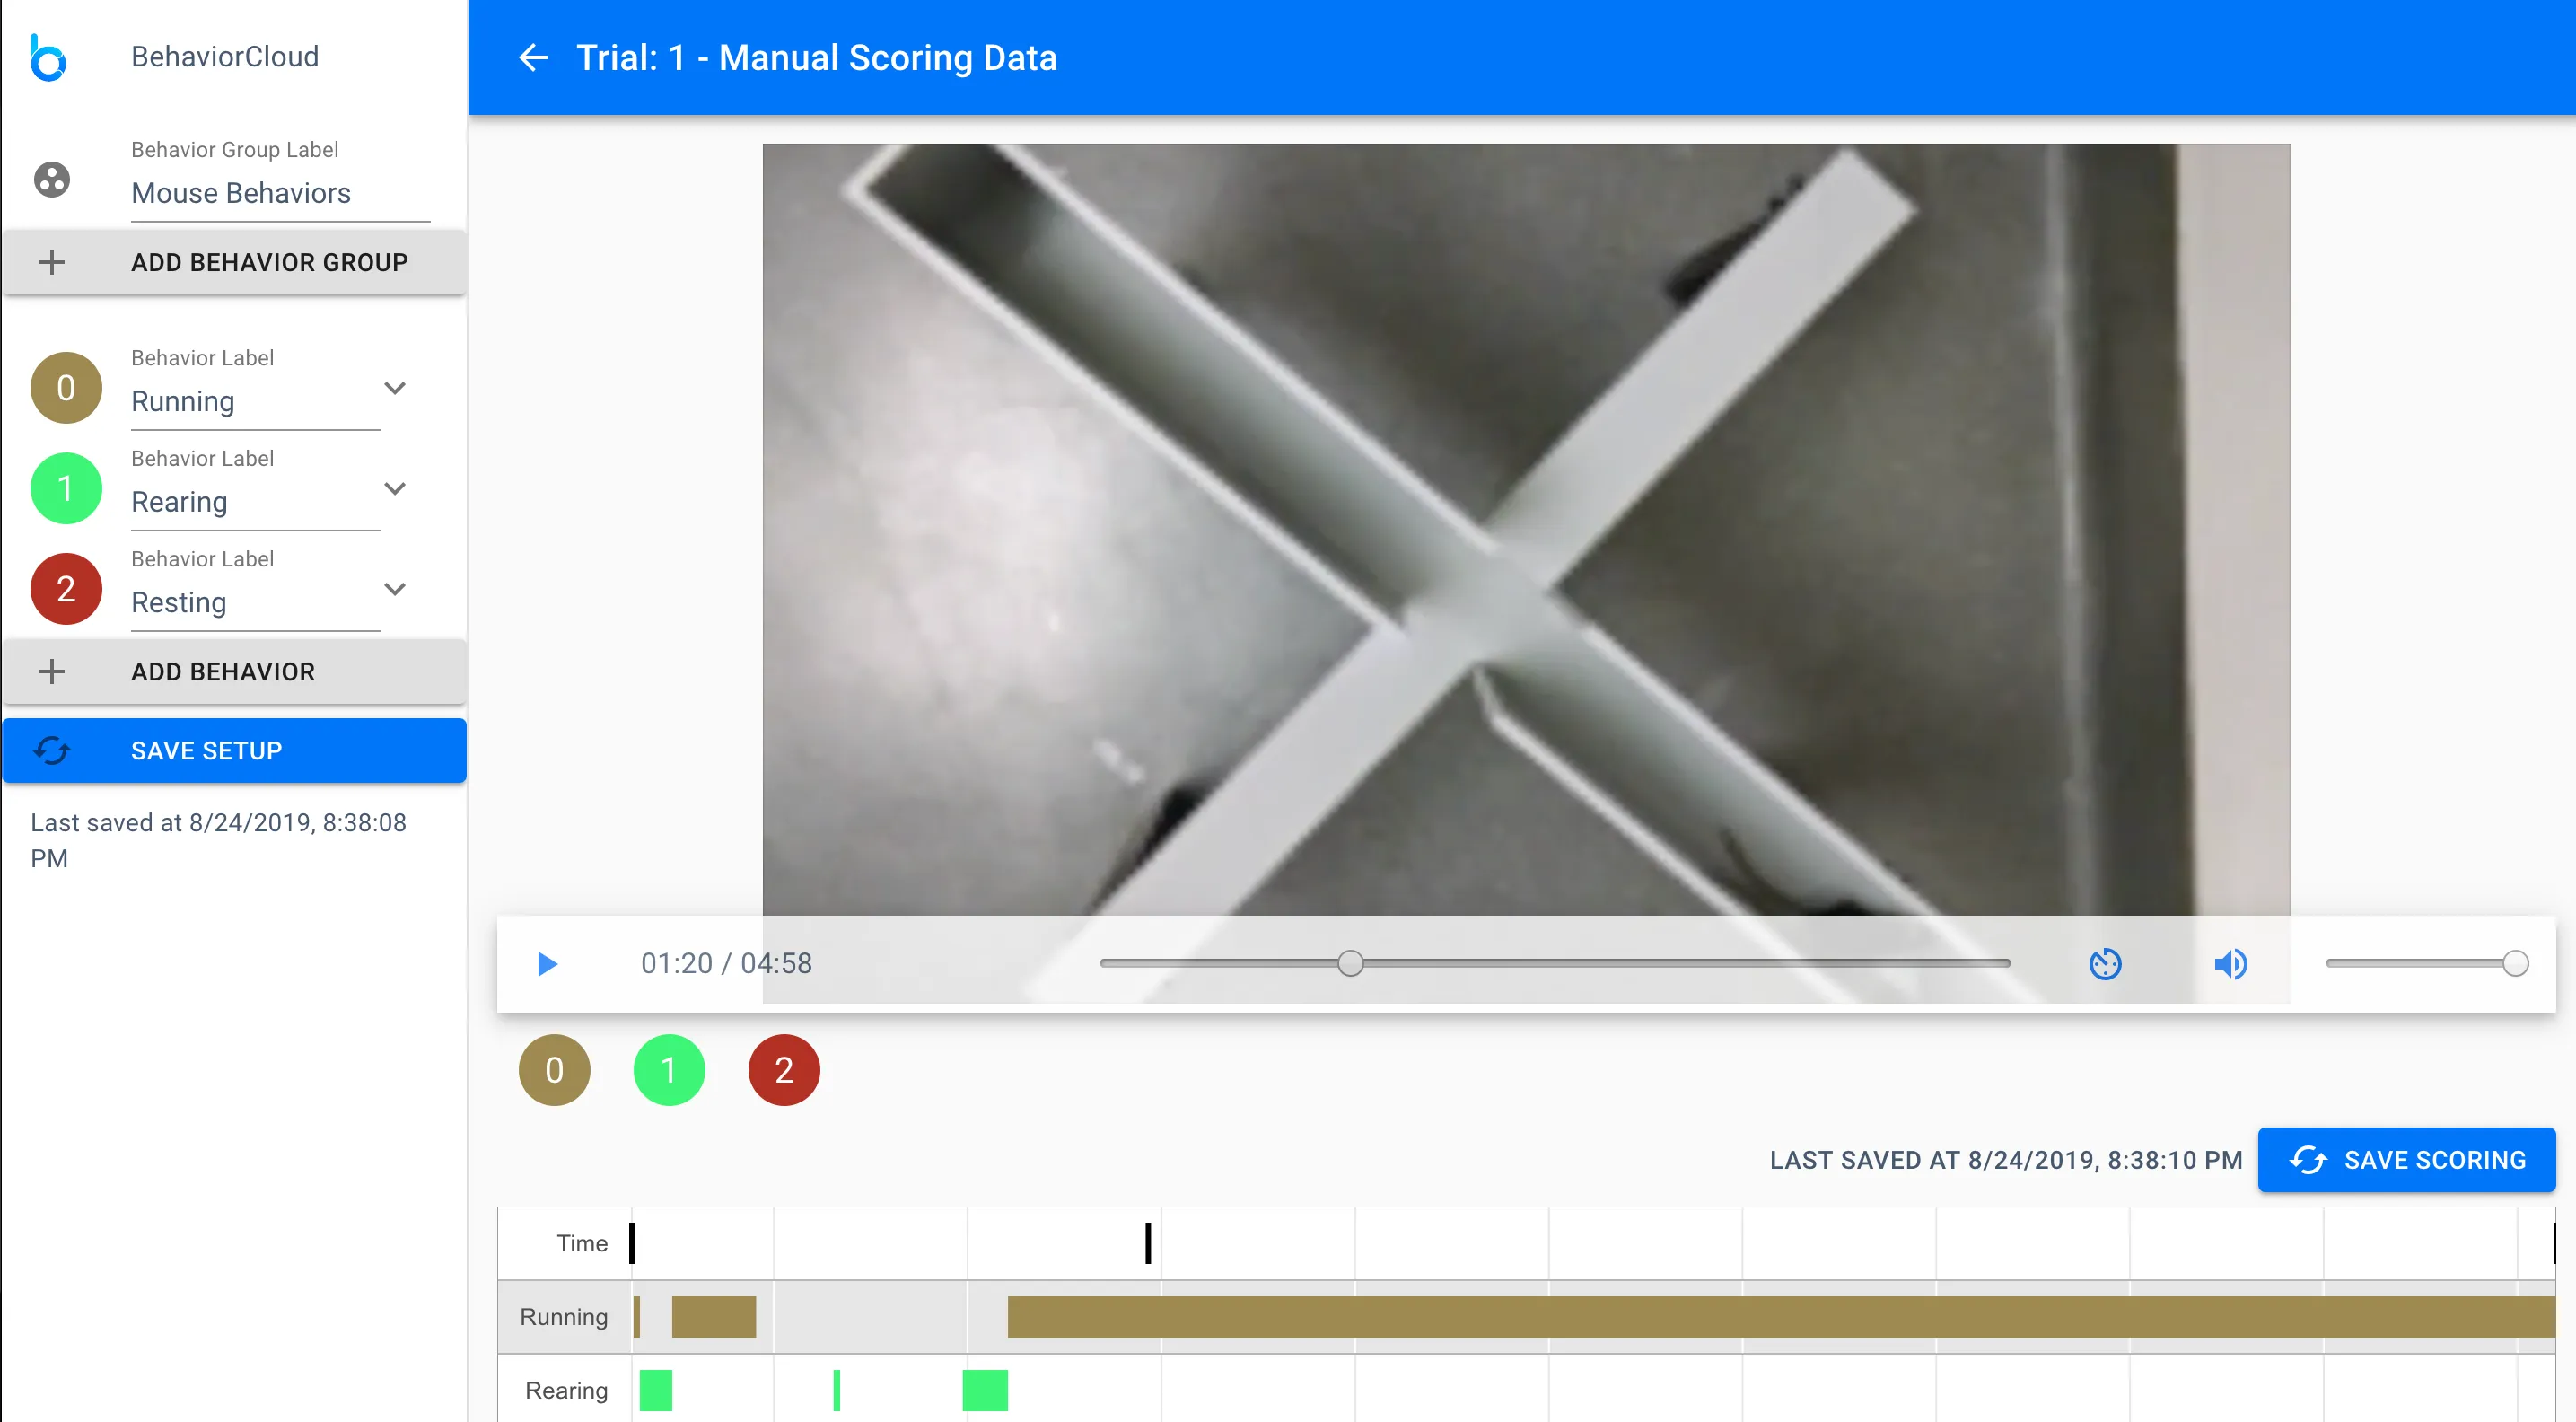
You can play back your video in real-time or speed it up or down by using the toggles on the video controls.
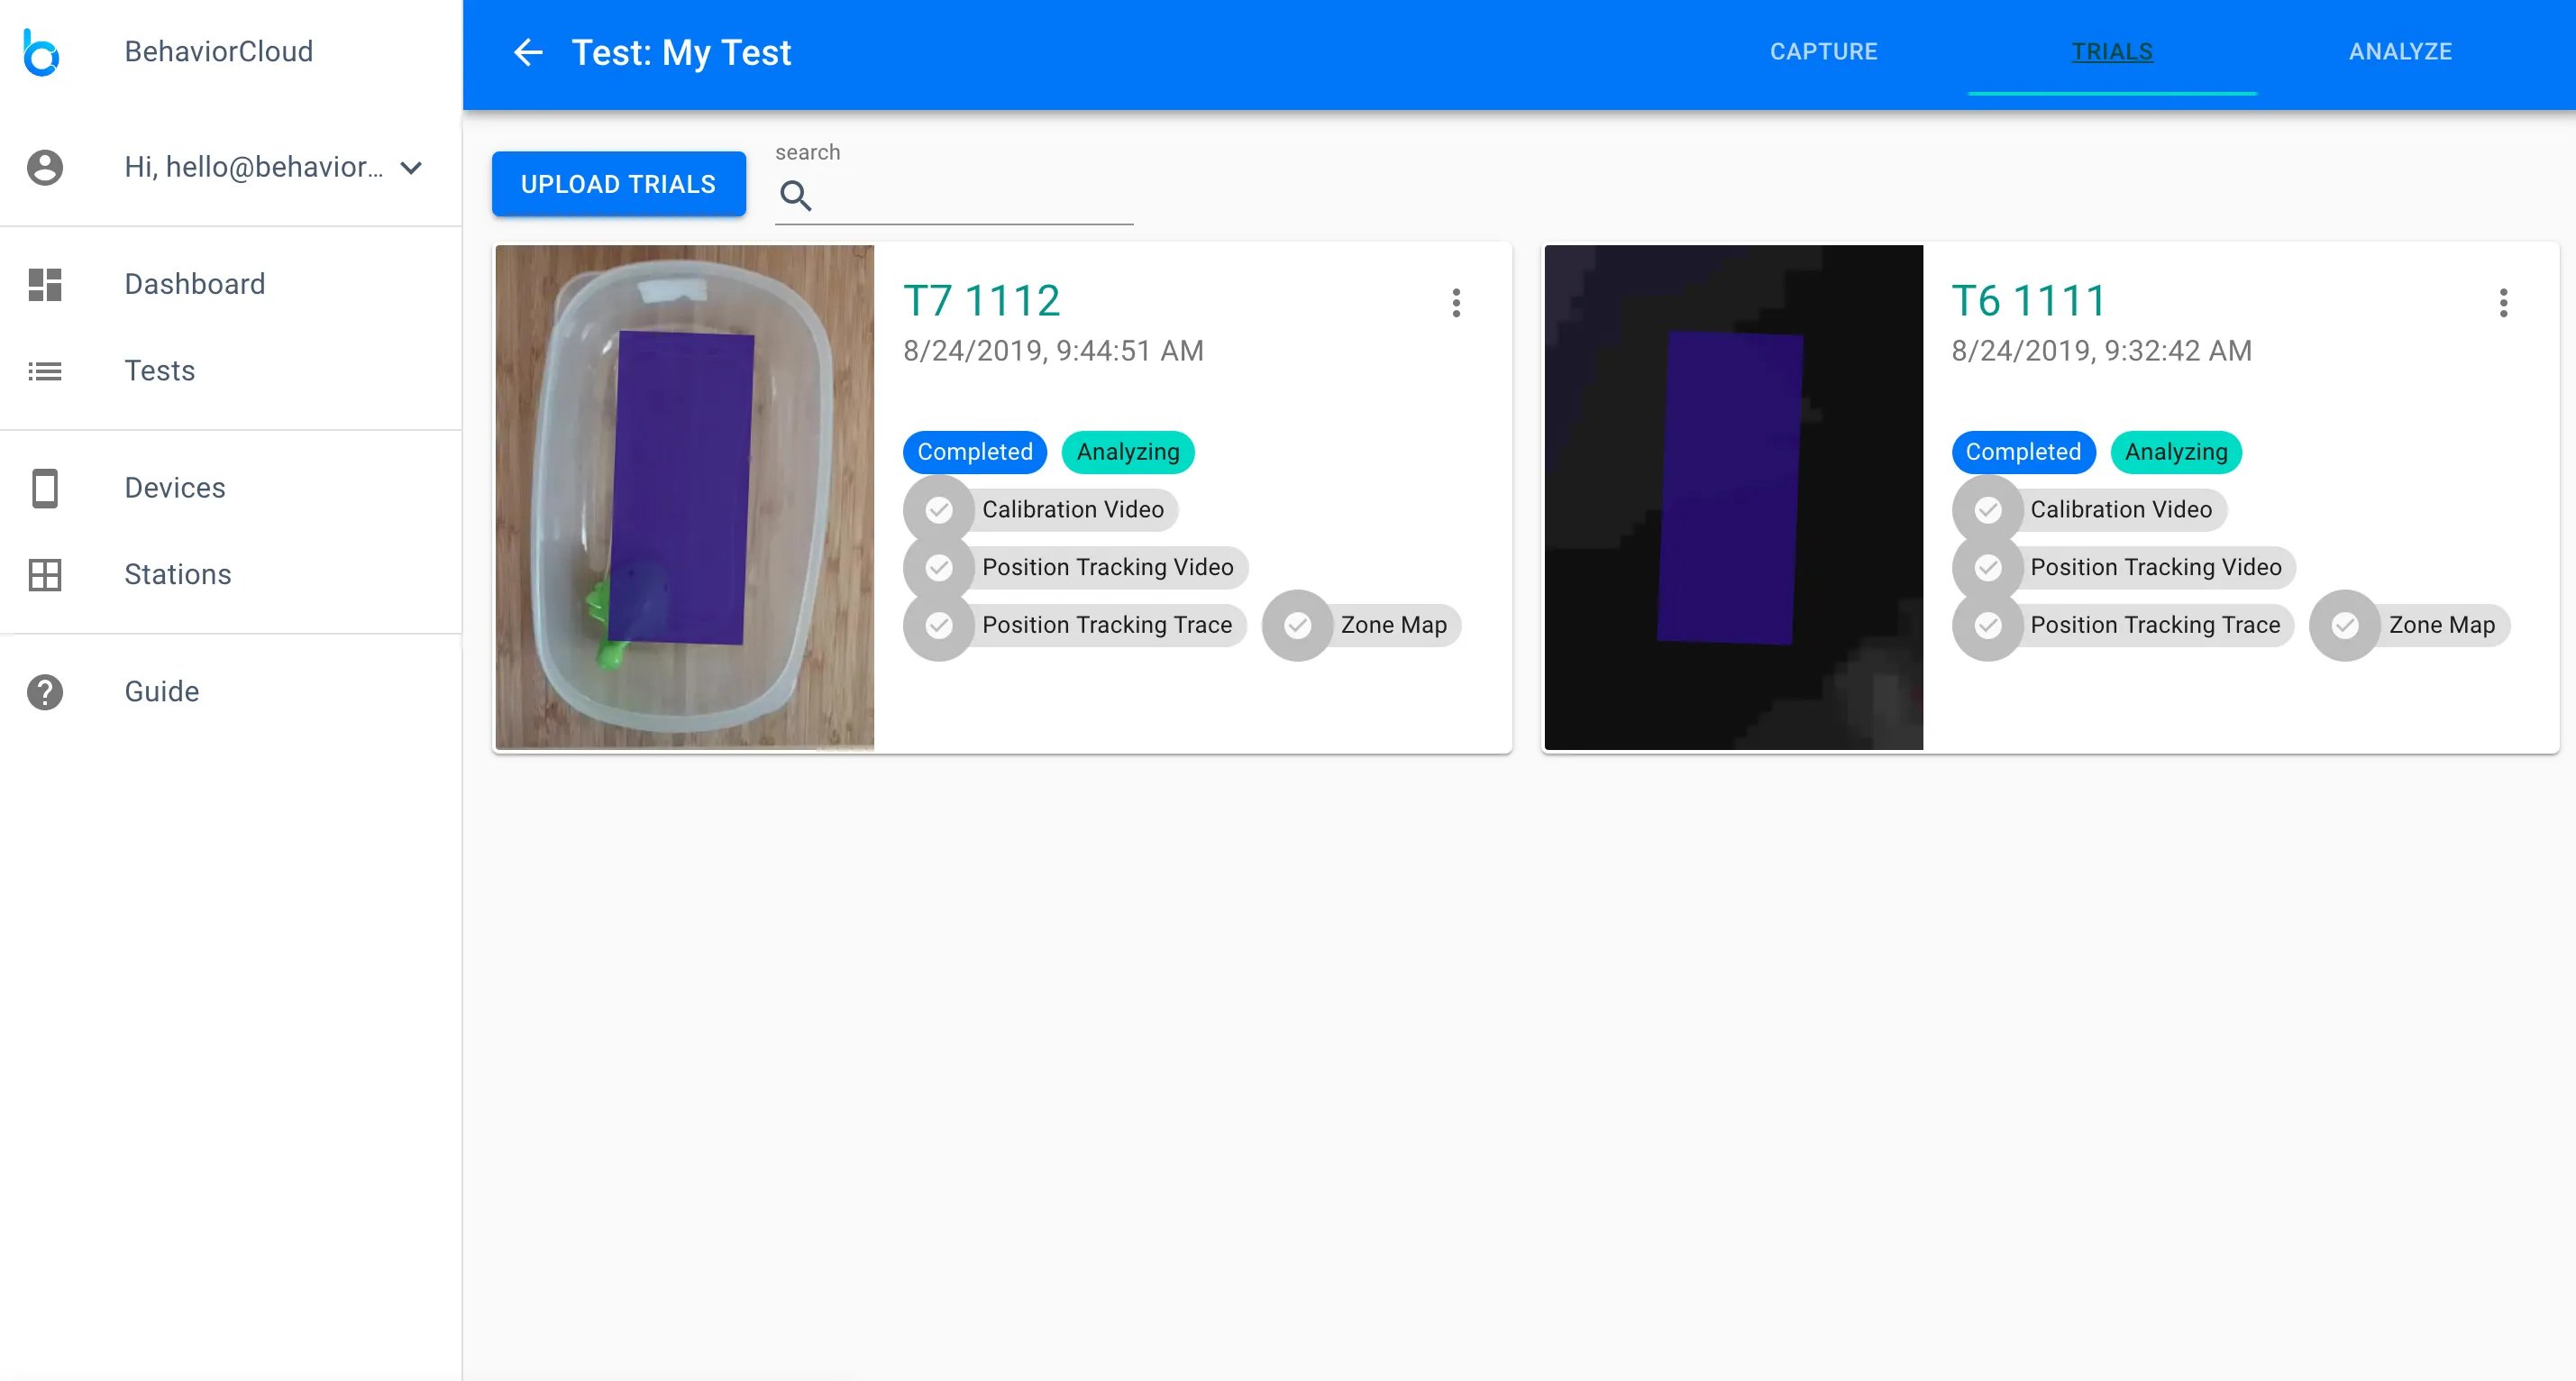
Once you have captured/uploaded all of your trials and configured them as needed, you can check that everything is complete and correct by visiting the Trials tab of your test. Each trial is shown as a separate card with a thumbnail video preview that includes any tracking boundaries and/or zone maps that you have set, and a list of all of the associated meta-data with that trial (e.g., distance calibration). You can also see if any initial analyses are already underway. BehaviorCloud begins to generate raw position data for automated video tracking experiments as soon as the calibration is set.
Navigate to the Analysis tab and you will see a space for your Analysis Plan at the top of the page. This is where you can choose the relevant analyses for your test. Use the plus icon to add an analysis. It will begin as soon as it is added. Use the trash icon to cancel or delete an analysis. The results of your analyses will appear in the drawers below your plan. You can expand those drawers to see which subjects have results, which are still being analyzed, and view or download your analyzed data.
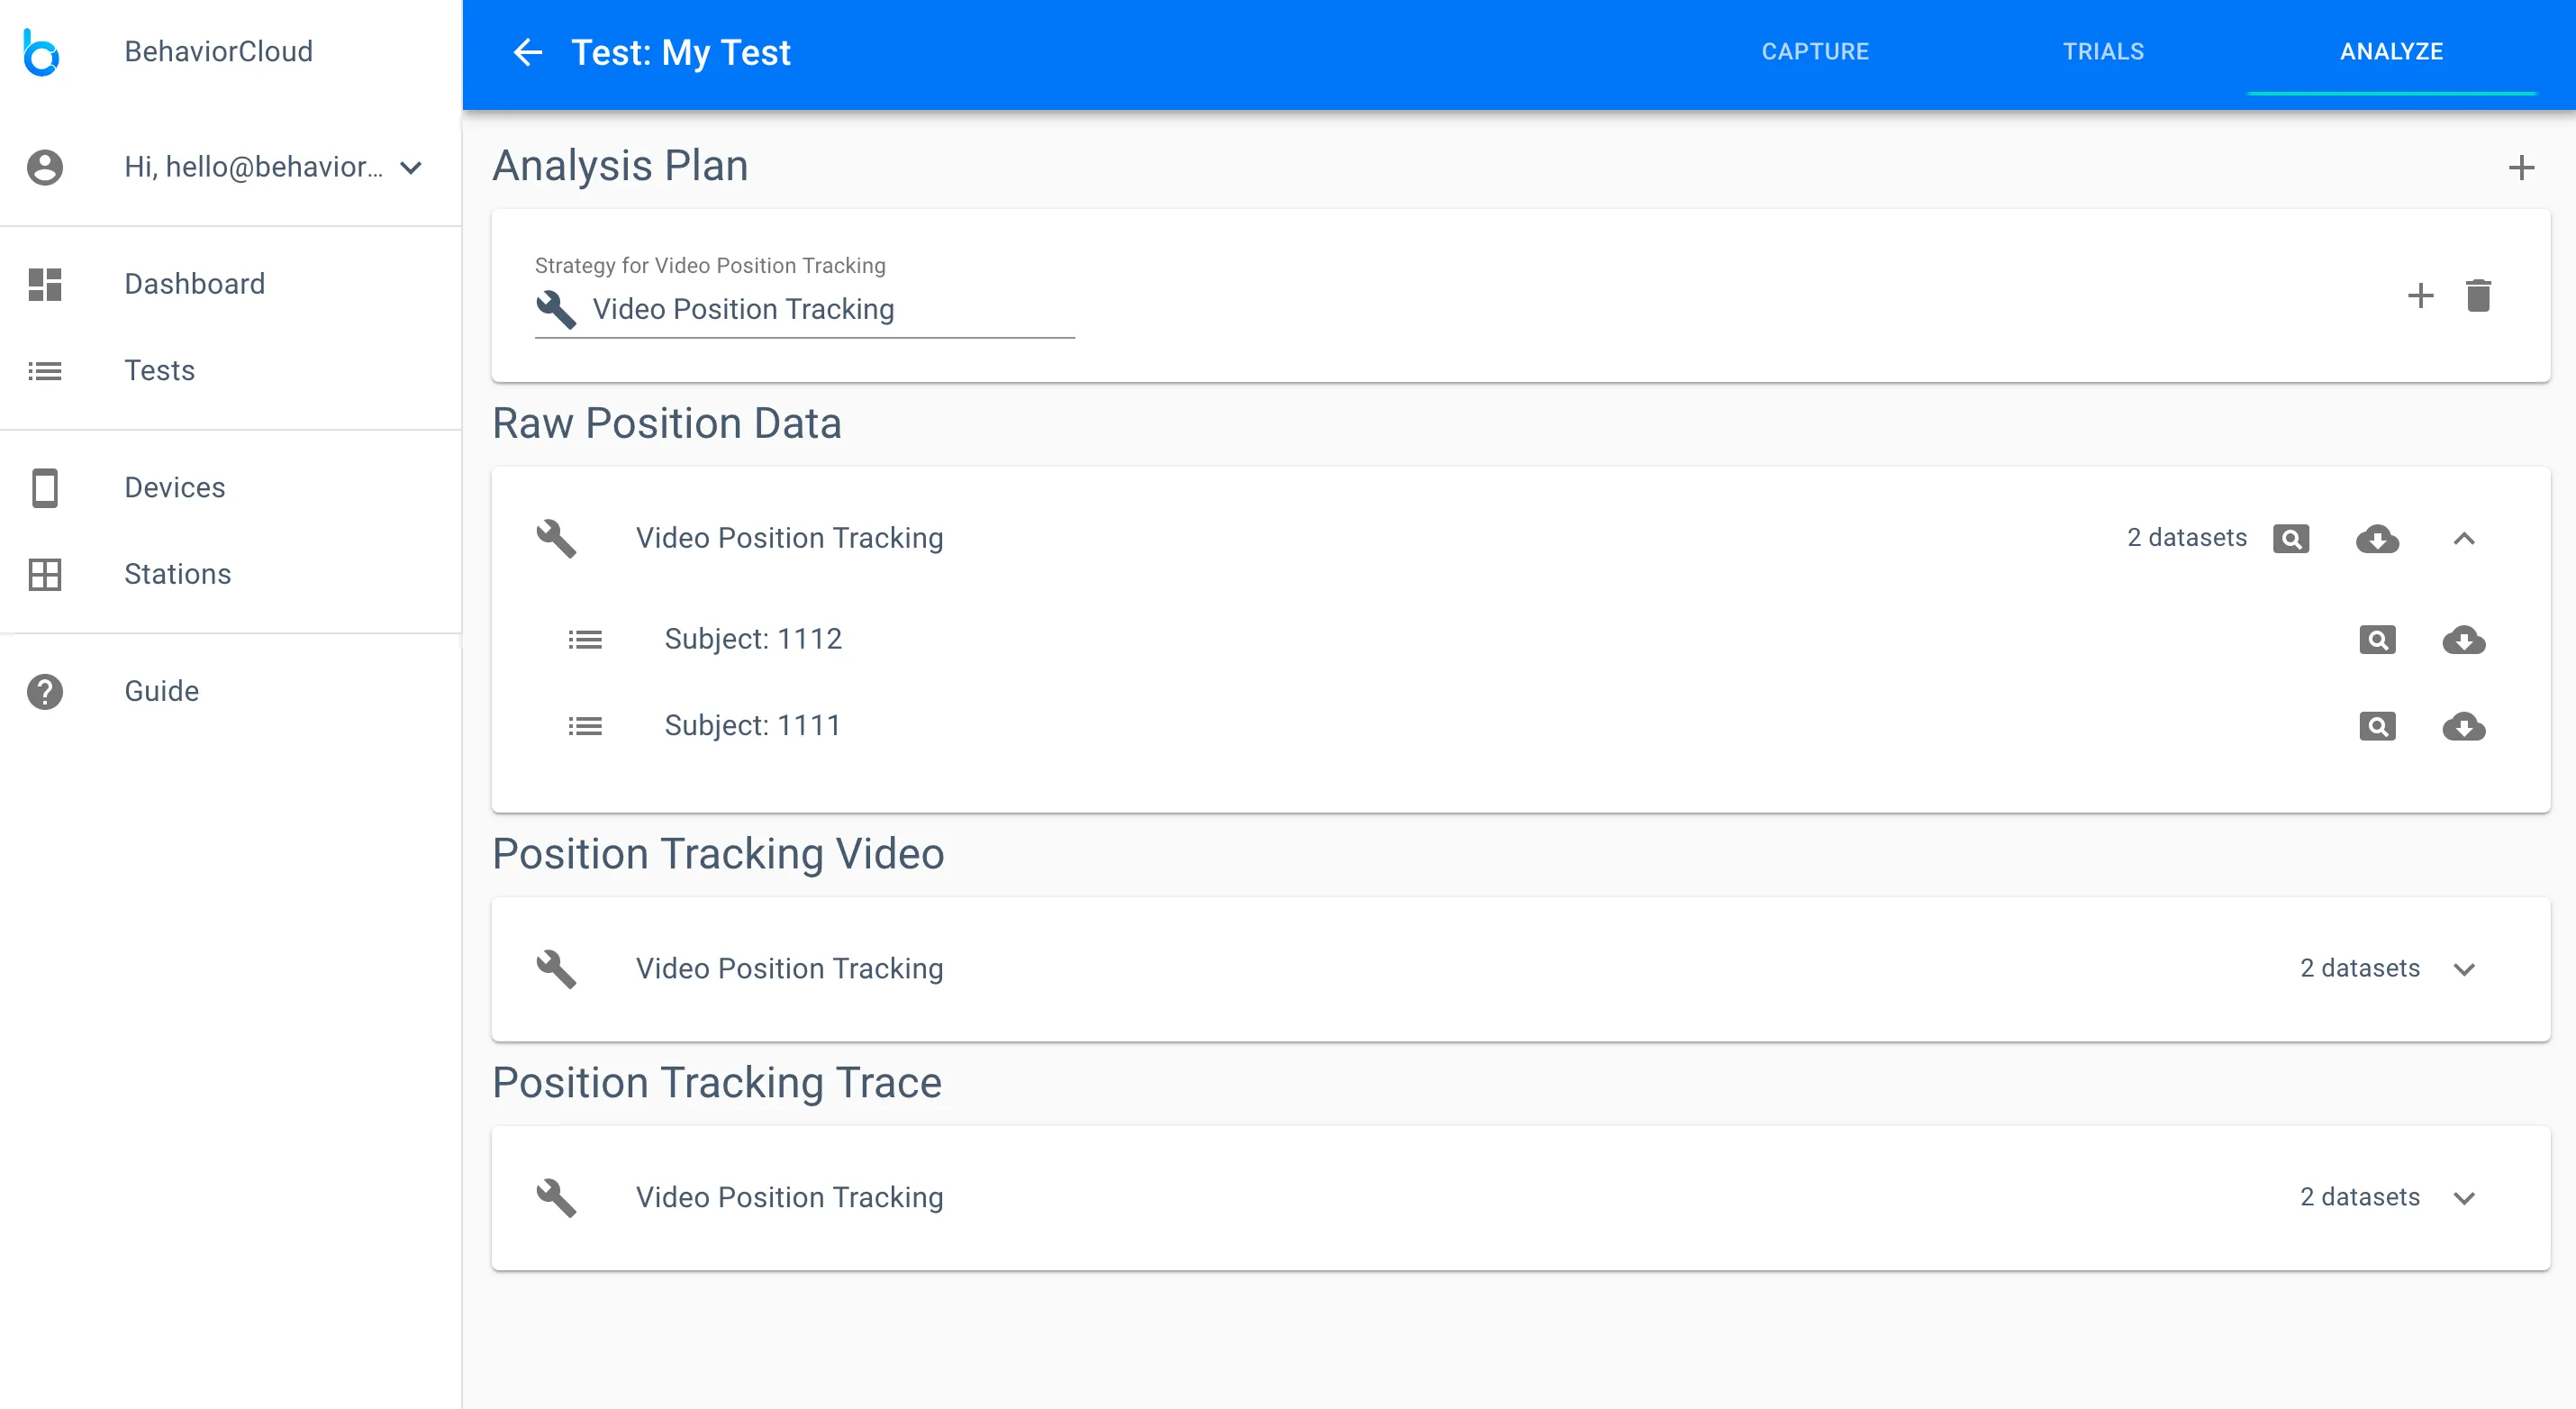
You will see different options for analyses depending on the type of test you have run. Automated video tracking experiments allow you to generate raw position data (XY coordinates), position tracking video (a video showing the tracked centroid position of the subject), position tracking trace (the traced path of the subject), activity analysis (ambulatory time, distance traveled, resting time, etc.), zone activity analysis (activity data distinguished by zone), spontaneous alternation (for y-maze), and zone sequence analysis (sequence of zone entries). Manual scoring experiments will have one analysis option that generates durations, counts, and latencies for you behavior variables. Start any of these analyses by adding them to your analysis plan.
All of your data are available for download at any time. Your data come in multiple forms depending on the analyses that were run. If you used automated video tracking analysis, the full tracked video showing centroid position and the subject outline is available from the trial detail view by clicking the overlay icon and then clicking Position Tracking Video. The path tracked during the course of the trial can also be found in the overlay icon under Position Tracking Trace. The trace can be toggled on and off in overlay mode to be shown on the video background if desired. You can also access and download these data from the analysis tab of your test. Other data generated such as durations, counts, etc. are available after running them on the Analysis tab.
You can share your data and invite collaborators to contribute to any phase of the experiment through your BehaviorCloud account. Go to Tests to view all of your experiments. Private experiments are indicated by a lock icon and shared experiments are indicated by a share icon. To add a collaborator, select the three dots menu icon to the right of a test and click Manage Sharing and Settings. You will be able to enter the email address of the person you would like to invite to your test. Your collaborator will receive an email notification prompting them to login and access the shared experiment. The default level of permission is read only. You can manage their level of permission: read only (can view data but cannot edit), read/write (can view, contribute, and edit), or admin (full permission, including to delete an experiment).

Test: A test is a group of trials where all the subjects are analyzed together in the same way. For example, a group of mice exposed to a 10-minute open field test and analyzed for central tendency.
Station: A test chamber that might have one or more data sources. For example a photobeam chamber with a video camera mounted above it would be a station with two data sources (photobeam and video). You can create any combination of stations needed for your test.
Device: A source for collecting data whether that is a video camera, photobeam activity system, etc.
1) No video preview using the Camera app
Check your WiFi connection. If WiFi signal dropped out, you may need to restart the BehaviorCloud Camera app.
3) Poor video tracking quality
BehaviorCloud is designed for robust tracking of subjects on any static background. Shadows or changes in lighting can interfere with tracking so it is recommended to follow good behavior testing practices by keeping a constant environment and not approaching the maze too closely while a trial is running. If you are testing in low light, it is advisable to do a pilot run to check tracking and adjust lighting as needed before starting your experiment. If you’ve already recorded trials that have interference, make sure you have set your tracking boundary as tight as possible to the maze so extraneous movements will be excluded.
4) Waiting for video upload
BehaviorCloud supports upload of most major file formats. If you are experiencing slow upload times of a non-standard video format, consider converting to .mp4 before upload or contact us for advice on your specific format. Very large files, including HD/4K video, are not recommended and will take longer to upload. Consider compressing your file or transcoding to lower resolution/frame rate before upload.
1) Can I run multiple subjects in parallel?
Yes, there are two methods to do this. One way is to have multiple phones running the BehaviorCloud Camera app each recording a different subject. Just add each camera as another station in your test.
2) How can I mount the camera phone?
You can purchase a video recording bundle from BehaviorCloud that includes a current generation iPod Touch and hardware for both ceiling and tripod mounting.
3) Can I record experiments in the dark?
For maze-based testing during the dark phase, dim white light or red light is sufficient for most devices to record clear video. We recommend testing your particular set-up by tracking a pilot animal before beginning real subjects. For home cage video where you may require recording in complete darkness, we recommend checking your specific device specifications and purchasing an inexpensive infrared light source. In our testing we have found that some devices record just fine under infrared light (many Android devices) but others (iPhones) do not because they have infrared light filters built into the camera lens. Contact us for specific recommendations.
4) What if I need a wide angle lens?
In some cases, such as recording home cage video or recording from a close distance, you may find that a wide angle lens is necessary to capture the desired field of view. Inexpensive clip-on wide angle lenses specifically designed for smartphones are available on Amazon. In our testing, we have found them to be sufficient even for close up video of home cage activity. Contact us for recommendations.
5) Can you explain the variables in the analysis output?
Automated video tracking, Raw Position Data:
time: An ISO8601 formatted date and time stamp
xcoordinate: X coordinate of subject relative to upper left corner of video, in microns
ycoordinate: Y coordinate of subject relative to upper left corner of video, in microns
Automated video tracking, Activity Analysis:
totaltime: Total test time in seconds
ambulatorytime: Total time the subject was moving, in seconds
distancetraveled: Total distance traveled, in cm
averagevelocity: Average velocity, in cm/s
starttime: Start time of trial as an ISO8601 formatted date and time stamp
restingtime: Total time the subject was resting, in seconds
endtime: End time of trial as an ISO8601 formatted date and time stamp
subject: Subject ID as provided by user
Automated video tracking, Zoned Activity Analysis:
totaltime: Total time spent in zone, in seconds
latency: Amount of time to first enter a zone, in seconds
ambulatorytime: Total time the subject was moving within zone, in seconds
zonename: Name of zone as provided by user
distancetraveled: Total distance traveled within zone, in cm
averagevelocity: Average velocity within zone, in cm/s
starttime: Start time of trial as an ISO8601 formatted date and time stamp
zoneentries: Number of entries into zone
restingtime: Total time the subject was resting within a zone, in seconds
endtime: End time of trial as an ISO8601 formatted date and time stamp
subject: Subject ID as provided by user
Automated video tracking, Zoned Sequence Analysis:
time: An ISO8601 formatted date and time stamp
zone: Zone name as provided by user
subject: Subject ID as provided by user
Automated video tracking, Spontaneous Alternation:
spontaneousalternation: Percent alternation (number of triads / (number of arm entries - 2)) x 100
starttime: Start time of trial as an ISO8601 formatted date and time stamp
endtime: End time of trial as an ISO8601 formatted date and time stamp
subject: Subject ID as provided by user
Manual scoring analysis
count: Number of times a behavior occurred
latency: Amount of time to first occurrence of a behavior, in seconds
last: Amount of time to last occurrence of a behavior, in seconds
verb: Behavior, as defined by user
total: Total amount of time a behavior occurred, in seconds
verbgroup: Behavior grouping, as defined by user
Please email or call (833) 788-6888 / +1 (614) 334-4888.